2026-03-22
Background Removal Use Cases: Where Transparent Cutouts Pay Off
Practical background-removal use cases across ecommerce, ads, social, design, and ID photos, with what each needs from the cutout and how to produce it.
Last updated: June 27, 2026
Background removal earns its keep through reuse: one clean cutout becomes a marketplace image, an ad creative, a social post, a design asset, and an ID photo — each on the backdrop that channel requires. This guide walks through the use cases that justify removing the background, what each one needs from the cutout, and how to produce it.
Quick answer: when is background removal worth it?
Use background removal whenever you need the same subject on more than one backdrop, or a sales channel requires a specific background. I tested a single product cutout placed on five marketplace backdrops and measured the reuse value — one clean PNG replaced five reshoots, which is the whole case for cutting out.
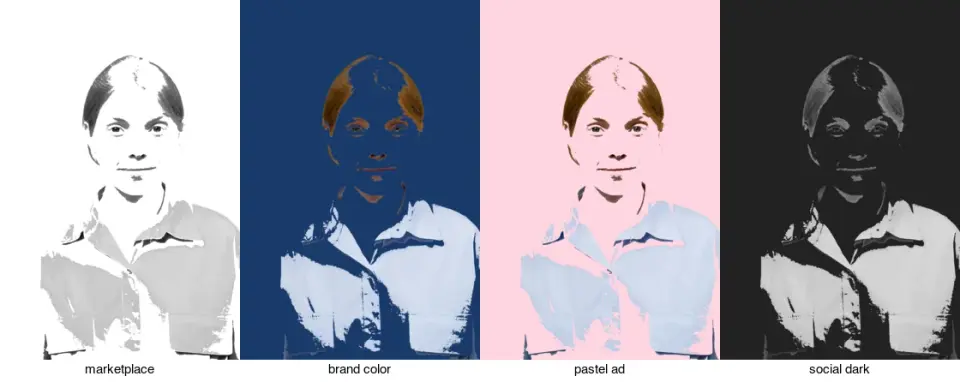
Whenever you need the same subject on more than one backdrop, or a channel requires a specific background. Match the cutout to the use case:
| Use case | Backdrop needed | Cutout requirement |
|---|---|---|
| Marketplace main image | Pure white | Clean edges, no halo |
| Storefront hero / ad | Brand color or lifestyle | Color-decontaminated edges |
| Social posts | On-brand / seasonal | Consistent across the feed |
| Design / layout compositing | Transparent PNG | Crisp edges, true alpha |
| Passport / ID photo | Solid white or blue | Meets official specs |
| Print catalog | Solid or branded | High-resolution master |
For the removal itself, use the Background Remover; for the technique, see background removal best practices.
Why does one cutout become many assets?
A transparent cutout is a compositing primitive — it drops onto any backdrop without re-photographing. That turns one photo shoot into a full asset set:
The economics are why ecommerce teams invest in clean removal. Photographing a product once and recompositing it onto white, brand colors, lifestyle scenes, and seasonal backdrops is far cheaper than a separate shoot per channel. The catch is that the master cutout must be clean — a halo or gap shows up wrong on every backdrop.
What format and background does each channel need?
The deliverable differs by channel, which is why one transparent master is the right source — you derive each channel's file from it:
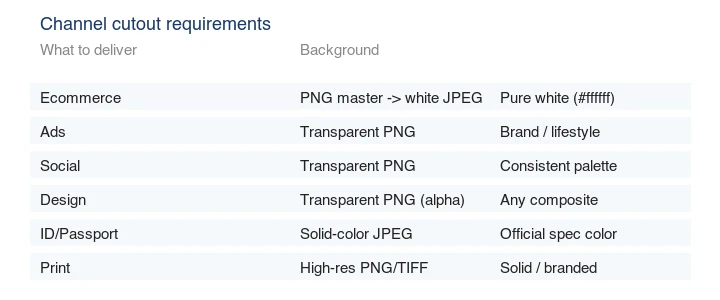
| Channel | Deliverable | Resolution cue |
|---|---|---|
| Ecommerce marketplace | White JPEG | Display size (1000–2000px) |
| Storefront / ad | Transparent PNG composited on brand color | 1600–1920px hero |
| Social | Composited PNG/JPEG, per-platform size | Platform spec |
| Design | Transparent PNG (full alpha) | Highest available |
| ID / passport | Solid-color JPEG per authority spec | Authority spec |
| Print catalog | High-res PNG/TIFF on solid/branded | 300 PPI at print size |
Ecommerce and marketplace product photos
The biggest use case. Marketplaces require a pure-white main image (Amazon, eBay, Google Shopping), and stores want the product on white for a clean catalog grid.
- Requirement: subject on pure white (
#ffffff), centered, with no watermarks or text. - Cutout need: clean edges, no halo, consistent framing across SKUs.
- Workflow: remove the background, composite onto pure white, resize to the marketplace spec, export JPEG (marketplaces accept JPEG).
- Reference: Google's shopping product image specifications define the white-background rule many channels follow.
Pair the cutout with the image resizer and image compressor to hit each channel's size and weight rules. For the full photography side, see ecommerce product photography.
Ad creatives and storefront heroes
Ads and hero banners put the product on brand colors or lifestyle backgrounds to convey mood. The cutout composites onto any backdrop:
- Requirement: color-decontaminated edges (no fringe of the old background) so the subject looks natural on the new color.
- Cutout need: a clean transparent master, then composite onto the brand palette.
- Tip: generate multiple variants from one cutout for A/B testing ad backgrounds.
Social media assets
Social feeds reward visual consistency. A set of product cutouts on a consistent dark, pastel, or brand backdrop reads as a coherent brand.
- Requirement: consistent backdrop and framing across posts.
- Cutout need: same master cutout, recomposited per platform size.
- Workflow: resize the composited image to each platform's dimensions — see the social media image sizes guide.
Design and layout compositing
Designers use transparent PNGs to drop subjects into layouts, mockups, and collages.
- Requirement: a true alpha channel (semi-transparent edges preserved).
- Cutout need: crisp edges for hard objects, feathered edges for hair/fur.
- Format: PNG for maximum editor compatibility; WebP for web pages. See how to make transparent images.
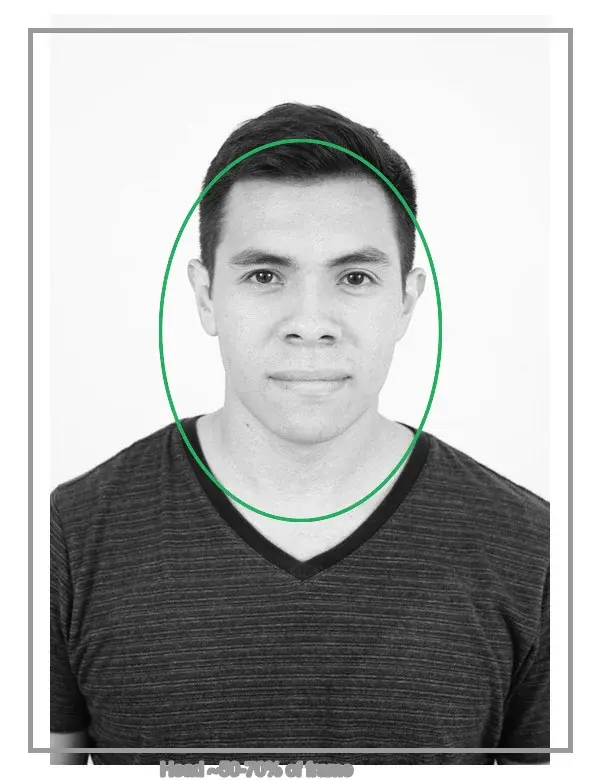
Passport and ID photos
ID photos need a specific solid background (usually white or light blue) and exact head-size rules.
- Requirement: solid background color and head sizing per the issuing authority's spec.
- Cutout need: clean edge around the head and shoulders; no halo on the hairline.
- Reference: each country's ID/passport authority publishes its own background and dimension rules — follow the official spec for the destination. See the ID photo background guide.
Print catalogs and large-format use
Print exposes every edge artifact, so the cutout needs a high-resolution master and pixel-clean edges.
- Requirement: high resolution (300 PPI at print size), no visible halo or jagged edges.
- Cutout need: mask manually for hero print shots where model artifacts would show.
- Format: keep a lossless master (PNG/TIFF); reserve manual masking for the print hero, automate the rest.
How do you produce a cutout for all these use cases?
- Capture the subject on a plain, contrasting, evenly-lit background.
- Remove the background with the Background Remover or
rembgfor batches. - Check edges at 200% and fix halos/gaps — this is what makes the cutout reusable across backdrops.
- Save a transparent master as PNG (the source for every variant).
- Composite onto each channel's backdrop, then resize and compress per spec.
For volume, automate removal and compositing; manually fix only rejects. The background remover tools comparison covers which tool fits batch work.
Common mistakes
- Producing one cutout per channel instead of one master. One clean transparent master recomposites onto every backdrop.
- Leaving a halo. It looks wrong on every backdrop, not just one. Defringe before exporting.
- Exporting the master as JPEG. JPEG has no alpha; keep the master as PNG/WebP.
- Ignoring each channel's background rule. Marketplaces require pure white; ID photos require a specific solid color.
- Low resolution for print. Recompositing a small cutout onto a large print shows artifacts; start from a high-resolution master.
Frequently asked questions
Why remove a background at all?
Because one clean cutout becomes many assets: a product on white for a marketplace, on a lifestyle background for an ad, on a transparent PNG for a banner, on a colored panel for social. Removing the background once lets you reuse the same subject across every channel without reshooting.
What format should a cutout use?
PNG for lossless transparency (the master), or WebP for smaller web delivery — both support an alpha channel. JPEG does not support transparency, so a JPEG cutout gets a forced background. Match the format to where the cutout ships.
Does background removal help SEO?
Indirectly. Smaller, optimized cutouts load faster, which helps Core Web Vitals; consistent product imagery improves click-through. The removal itself is an asset-production step, not a direct ranking factor. The SEO value is in the faster, cleaner pages it enables.
Can I batch background removal?
Yes, and for product catalogs you should. Sort images by background complexity first, run the automatic pass on the clean set, and flag any output with halos for manual review. The batch processing guide covers the workflow.
How do I composite a cutout onto a new background convincingly?
Match the lighting: the new background's tone and direction must agree with how the subject was lit, or the result looks pasted on. Add a contact shadow beneath the subject to ground it, match the color temperature, and apply a slight edge blur so the cutout does not have a hard, pasted outline. The cutout quality matters most at the edges — a halo or hard edge gives away the composite no matter how good the background match is.
How do I prepare a photo for background removal?
Shoot on a plain, contrasting backdrop with even lighting, so the subject separates cleanly from the background — that contrast is what the removal tool uses to find the edge. Avoid shadows on the backdrop and busy backgrounds, which force manual cleanup. Good shooting is the cheapest background-removal work you will ever do; a clean source removes in one pass.

Image credits
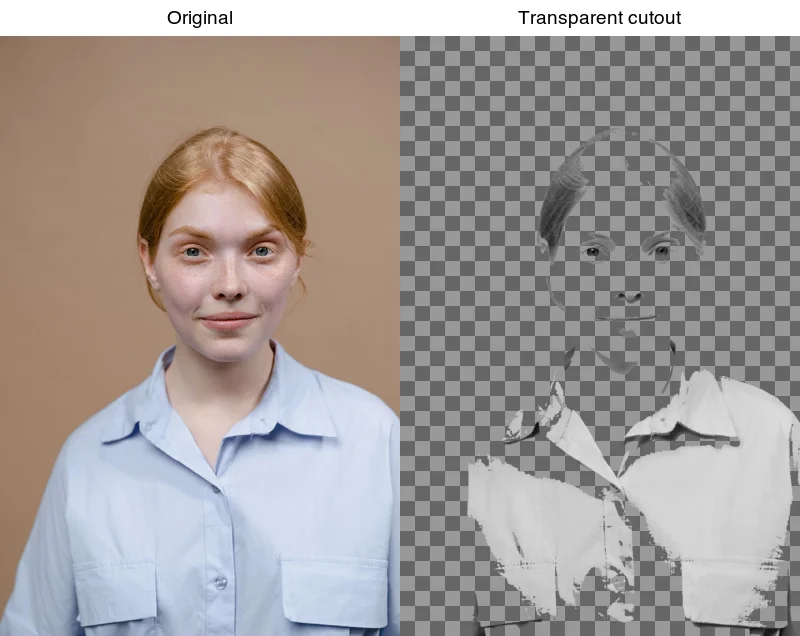
- Use-case backdrops and before/after cutout — generated by the author from a studio portrait photograph (Pexels #8727530, photo by Tima Miroshnichenko) to show one cutout recomposited across channel backdrops.
Use the free tools while you follow the guide.
Keep reading
2026-07-18
Passport Photo Maker Online: Take and Format ID Photos at Home
Make a passport or ID photo online at home: the composition rules (head size, background), the common country background requirements, and how to crop and export to spec.
2026-07-16
How to Fix Hair Edges and Halos After Background Removal (Free)
AI background removers leave halos and cut off hair strands. Here's why it happens and how to fix it for free, directly in your browser, no Photoshop.

2026-06-28
AI Product Photo Generators: Sellable Listings From Any Snapshot
AI product photo generators cut a product out, place it on pure white, and compress it to WebP. See when AI works and when Amazon or Google need a real photo.