2026-03-29
Compress Images Without Losing Quality: WebP Workflow
Compress images without losing quality using a resize-first WebP workflow, format rules, visual checks, and CDN publishing checklist.
Last updated: June 28, 2026
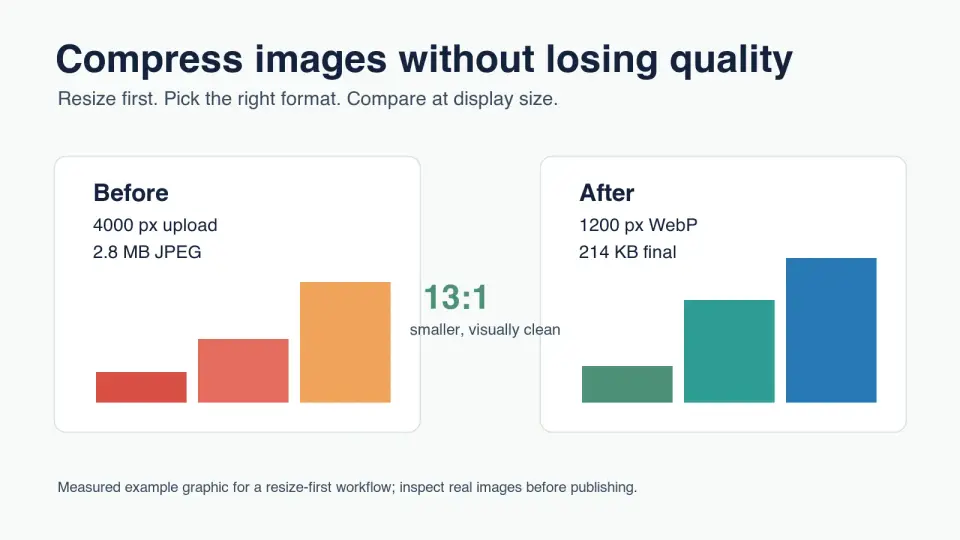
Most quality problems start before compression. A 4000 px photo uploaded into an 800 px content slot is already wasting bytes. A product screenshot saved as a low-quality JPEG is already set up to blur the text. Compressing images without visible quality loss is mostly about doing the steps in the right order.
This guide gives you a practical workflow for photos, screenshots, product images, and blog graphics. It favors WebP because it is widely supported and can be lossy or lossless, but the same checks apply when you test AVIF or keep a PNG for sharp UI captures.
Quick answer: how do you compress images without losing quality?
Use this order: keep the original, crop if needed, resize to the largest size the page actually displays, choose the right format, export two or three quality candidates, then compare them at the final display size. The smallest file that still passes the visual check is the right compressed image.
For most web photos, start with WebP around q80 to q85. For screenshots, dashboards, logos, and images with small type, test PNG or lossless WebP first. For strict file-size targets, lower quality gradually only after resizing has done the main work.
Do not judge the result by the export slider alone. A portrait, jewelry photo, and pricing-table screenshot fail in different places. Check faces, product edges, small text, gradients, and shadows before replacing the live image.
Why does resizing matter more than compression settings?
Pixel dimensions usually save more than a quality slider. If an image displays at 900 px wide, serving a 4000 px file forces the browser to download pixels the reader never sees. Compression can reduce that waste, but resizing removes it at the source.
The browser still has to fetch and decode the file you serve. web.dev's image performance guide notes that modern formats such as WebP and AVIF can reduce download size, which can also help Largest Contentful Paint when the image is important to the first viewport. See web.dev's image performance guide.
Use a width budget before choosing a quality setting:
| Use case | Practical max width | Format starting point | Quality check |
|---|---|---|---|
| Blog hero | 1600-1920 px | WebP q80 | Gradients, faces, text overlays |
| Article image | 1000-1400 px | WebP q80-85 | Edges, labels, fine texture |
| Product gallery | 1200-1800 px | WebP q82-88 | Fabric, shine, packaging text |
| Thumbnail | 300-600 px | WebP q70-78 | Cropping, face clarity |
| UI screenshot | Rendered width or 2x | PNG or lossless WebP | Small text and thin borders |
If you are starting from a set of oversized uploads, handle dimensions first. The Batch Resize Guide covers batch width limits, and Resize Images Without Losing Quality explains how to avoid soft edges during resizing.
Which format should you use before adjusting quality?
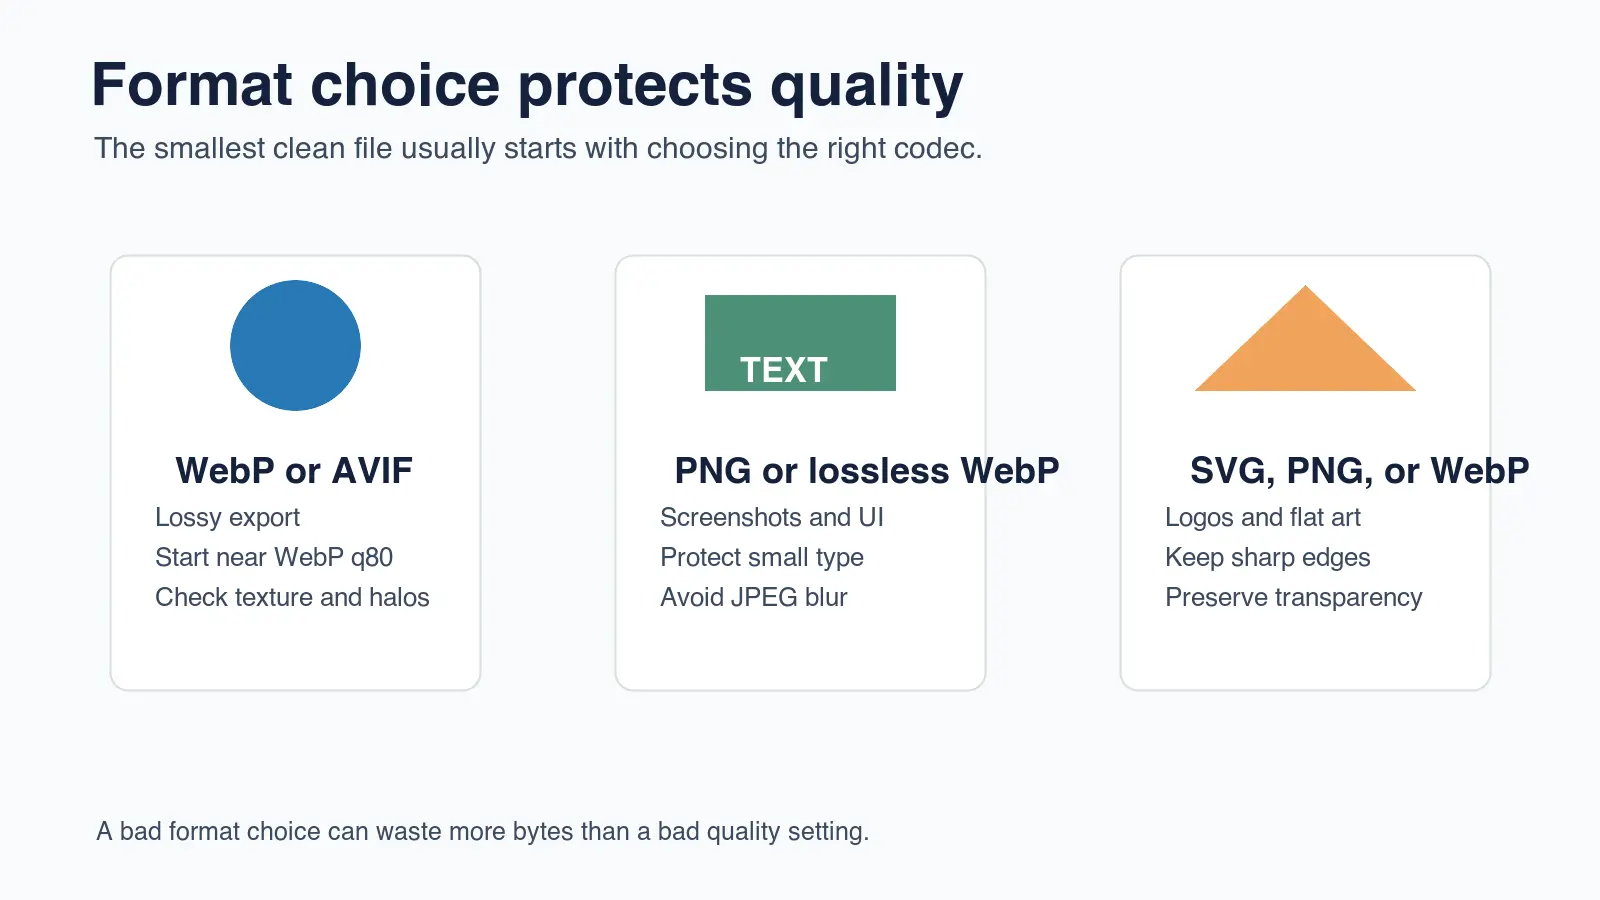
Format choice protects the details users notice. JPEG and lossy WebP are good for photos because small color changes are hard to see. PNG and lossless WebP are safer for screenshots because compression artifacts around text look sloppy immediately.
MDN's image format guide explains that WebP supports both lossy and lossless compression, while those modes store image data differently. That is why "save as WebP" is not a complete instruction. A lossy WebP can be excellent for a product photo and wrong for a dense dashboard screenshot. See MDN's image file type and format guide.
Use these rules when the format is unclear:
- Use WebP or AVIF for photographic images where file size matters.
- Use lossless WebP or PNG for screenshots with readable text.
- Use SVG for simple logos and icons when you have vector artwork.
- Keep transparency in WebP, PNG, or SVG instead of flattening it onto a random background.
- Avoid converting a poor JPEG into WebP and expecting detail to return.
- Keep the original master file so you can export again cleanly.
For a deeper format comparison, read AVIF vs WebP Comparison. If you need the compression mechanics behind artifacts, use How Image Compression Works.
What WebP quality setting avoids visible loss?
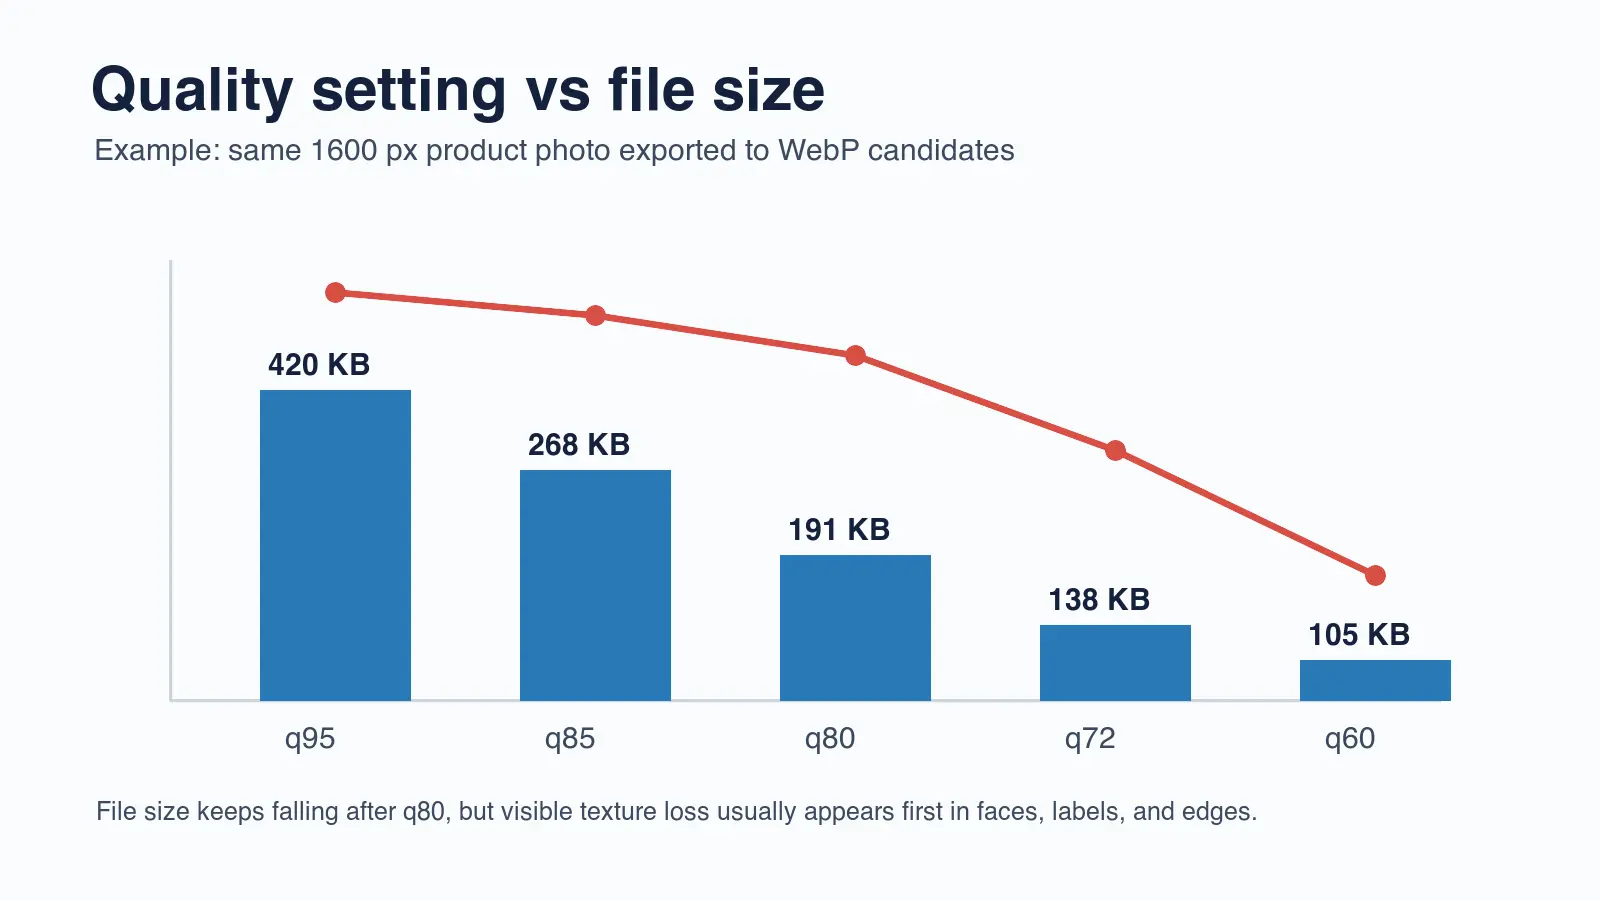
There is no universal setting, but WebP q80 to q85 is a sensible first test for many web photos. It often cuts bytes sharply while keeping texture, edges, and color transitions clean at normal display sizes. Move down only if the image still looks good.
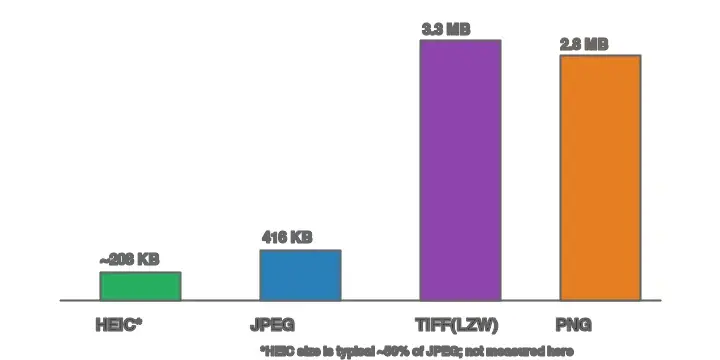
For this post, I measured four local WebP infographic outputs made with ImageMagick. The final files were 31 KB to 41 KB because the graphics use flat colors and simple shapes. Those numbers are not a promise for camera photos; they show why content type matters.
Use quality settings as candidates, not as rules:
| Image content | First candidate | Second candidate | Avoid unless tested |
|---|---|---|---|
| Product photo | WebP q85 | WebP q80 | Below q72 |
| Blog photo | WebP q82 | WebP q76 | Below q68 |
| Portrait | WebP q85 | WebP q80 | Heavy smoothing |
| Screenshot | Lossless WebP | PNG | Lossy JPEG |
| Flat illustration | WebP q80 or lossless WebP | SVG if vector | Repeated JPEG saves |
The easiest mistake is comparing files at 300 percent zoom and rejecting every compression setting. First inspect at the size readers will actually see. Then zoom in on risky regions: text, jewelry, fabric, hair, shadows, and smooth gradients.
If you need a target ratio, use Image Compression Ratio: Quality and Size Guide. It explains how to calculate the ratio after resizing and why a high ratio can be fine for a background photo but risky for a label or screenshot.
How do you check whether quality was actually preserved?
Quality is preserved when the compressed image still does the job of the original at the final viewing size. That sounds obvious, but it prevents two common errors: accepting ugly files because the byte count is low, and rejecting useful files because they differ under extreme zoom.
Use this visual review:
- Open the original and candidate side by side.
- Match the rendered size, not the camera size.
- Check the sharpest subject edge first.
- Inspect small text, labels, and UI borders.
- Look for banding in skies, gradients, and shadows.
- Compare skin, fabric, food, and product texture.
- Test the image on a phone if it is important on mobile.
- Keep the smallest candidate that passes.
This is especially important for e-commerce. A category thumbnail can survive more compression than a product detail image. If the same master feeds both placements, export separate files instead of forcing one quality setting across the site.
Google's image SEO documentation also recommends useful, contextual alt text and crawlable image markup. That matters after compression because a tiny, unclear, poorly described image is not a win for search or accessibility. See Google Images best practices.
What workflow should you use for a whole folder?
Batch compression needs guardrails. If you run one aggressive setting against every file, the first casualties are screenshots, logos, and product photos with labels. Group images by content before exporting.
Use this folder workflow:
- Separate photos, screenshots, transparent graphics, and logos.
- Remove duplicates and unused crops before processing.
- Resize each group to its real max display width.
- Export WebP candidates for photos and illustrations.
- Export lossless candidates for screenshots with text.
- Strip metadata from public web copies unless the data is required.
- Compare a sample from each group before processing the full folder.
- Record the chosen width, format, quality, and byte range.
- Publish to stable URLs so existing pages do not break.
- Verify every final URL returns HTTP 200.
| Step | Pass condition | Fix if it fails |
|---|---|---|
| Source retained | Original master is still available | Restore from backup before re-exporting |
| Resize completed | File width matches real layout needs | Resize before touching quality |
| Format matched | Photos, screenshots, and logos use different rules | Split into content groups |
| Visual sample checked | Risky details still look clean | Raise quality or use lossless |
| Published URL tested | CDN image returns 200 | Re-upload or correct the path |
For mobile-heavy pages, pair this workflow with the Mobile Image Optimization Guide. For a broader launch checklist, use the Complete Image Optimization Checklist.
When should you accept a larger file?
Accept a larger file when the image carries trust, detail, or conversion value. A seller should not blur the texture on a jacket to save 30 KB. A SaaS team should not make pricing screenshots unreadable. A publisher should not compress a chart until the axis labels smear.
Larger files are reasonable when the image includes:
- Product labels, serial numbers, ingredients, or sizing charts.
- Screenshots with small text or code.
- Faces, skin texture, hair, jewelry, or food.
- Smooth gradients, night scenes, shadows, or neon.
- Logos, transparent edges, or thin line art.
- Images that users zoom, crop, or reuse in ads.
The right target is not the smallest possible file. It is the smallest file that still feels trustworthy in context. If the compressed version makes a reader hesitate, raise the quality, use a better format, or export a separate version for that placement.
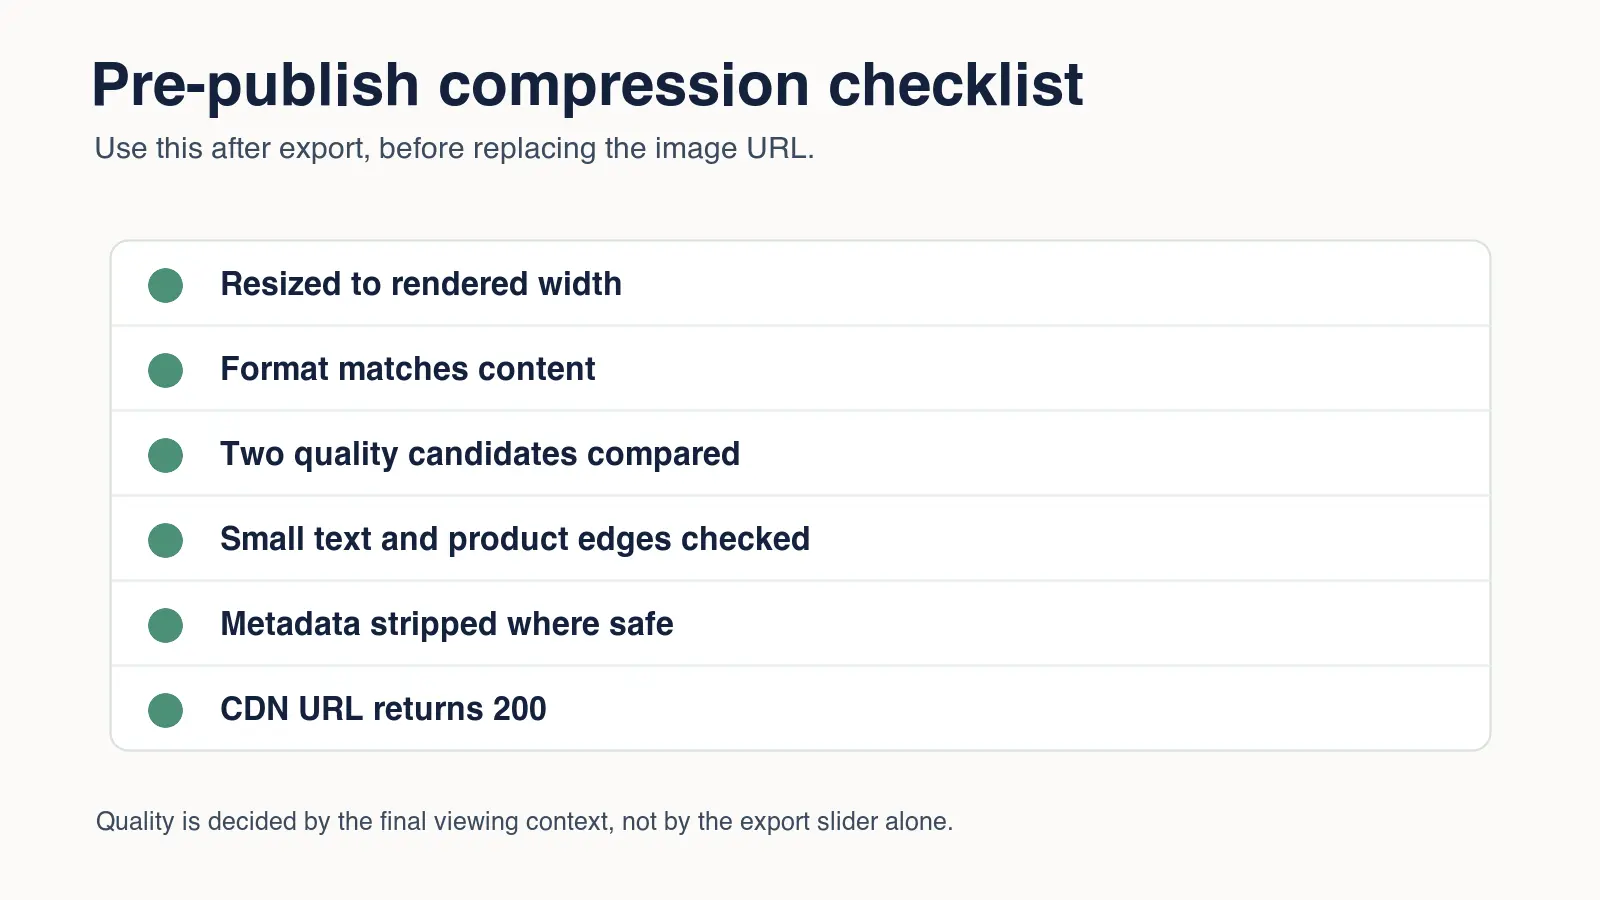
Pre-publish checklist
Before replacing the image on a live page, run a final check. This catches the boring mistakes that cause most image problems: wrong dimensions, wrong format, broken URL, missing alt text, and a file that looked fine on desktop but poor on mobile.
Use this final pass:
| Check | Good result | Why it matters |
|---|---|---|
| Display width | Image is not much wider than the largest rendered slot | Prevents invisible pixel waste |
| Format | Photos use WebP or AVIF; screenshots stay lossless when needed | Protects detail |
| Quality | Smallest candidate passes visual review | Avoids visible artifacts |
| Metadata | Public copy has unnecessary EXIF removed | Saves bytes and limits leakage |
| Alt text | Describes the actual image in context | Helps accessibility and image search |
| CDN | Final WebP URL returns HTTP 200 | Prevents broken posts and previews |
Compress once from a clean source, publish the final WebP, and keep the settings written down. The next batch becomes faster because you are not guessing. You are reusing a tested width, format, and quality range for the same kind of image.
Frequently asked questions
Can you compress an image with no quality loss?
Lossless compression preserves pixel data, while lossy compression can preserve perceived quality at the final viewing size without being mathematically identical.
Should you resize before compressing?
Yes, resize first when the source is wider than the largest slot where it will be displayed.
Is WebP always smaller than JPEG?
Not always, so export both from the same source and compare bytes and visible detail instead of assuming one format wins.
What WebP quality should you use?
Quality 75–85 is a useful test range for photos, but screenshots and smooth gradients may need a higher setting or lossless output.
Does compression remove image metadata?
Some exporters strip metadata and others retain it, so inspect the final file if EXIF removal matters for size or privacy.
Why does a compressed image sometimes become larger?
A small or already optimized source can become larger when it is re-encoded with inefficient settings or a mismatched format.
How should you compare compressed candidates?
View candidates beside the original at the final rendered size and check text, edges, gradients, skin, and product detail.
Can you batch-compress images safely?
Yes, group similar image types, test one sample from each group, and keep the originals until the full batch is verified.
Use the free tools while you follow the guide.
Keep reading
2026-07-18
Convert HEIC to JPG: Free Tools and Batch Methods Compared
Convert HEIC iPhone photos to JPG with free web, Mac, Windows, iPhone, and command-line tools, compared by speed, batch support, and where each fits.

2026-07-18
JPG to PDF Guide: Combine Multiple Images Into One Document
Turn a set of JPG images into a single ordered PDF for portfolios, reports, and submissions. Free methods for each device, page ordering, and quality settings.
2026-06-28
How to Check Image Size, Dimensions, and File Format
Find an image's exact pixel dimensions, file size in KB or MB, DPI, and format. Methods for Windows, Mac, iPhone, Android, and online, plus what each value means.