2026-02-24 · Updated 2026-07-26
How to Resize an Image Without Losing Quality
Resize an image without losing quality: keep the aspect ratio, only resize down, pick the right resampling filter, and resize before compressing, with real sizes.
Last updated: July 26, 2026
Resizing an image without losing quality comes down to three rules: only resize down (never up unless you must), keep the aspect ratio, and use a good resampling filter. Done right, a large photo shrinks to web size with no visible quality loss — and a far smaller file. This guide covers the rules, the filters, and the real byte savings, with the workflow that preserves quality.
Quick answer: how do you resize without losing quality?
| Rule | Why |
|---|---|
| Only resize down | Downscaling discards extra pixels cleanly; upscaling adds none |
| Keep aspect ratio | Forcing exact dimensions distorts the image |
| Use Lanczos for downscale | Best quality-to-speed for photos |
| Resize before compressing | Removes pixels you don't display, the biggest byte saving |
For one image, use the Image Resizer; for batches, ImageMagick. For the broader workflow, see how to batch resize.
What does "without losing quality" actually mean?
Resizing down does not lose quality in the way people fear. When you shrink a 4000px photo to 800px, you discard 15× the pixels — but you only discard pixels you were not going to display, so at 800px the result looks as sharp as the original did at 800px. The information loss is invisible because the display cannot show the discarded detail anyway.
The cases where resizing does lose visible quality are specific:
- Upscaling (making an image larger) cannot add real detail — see how to upscale images.
- Forcing exact dimensions distorts the image by stretching it.
- Using a poor filter (nearest-neighbor) makes downscaling look jagged.
Get those three right and a downscale is effectively lossless at the target size.
Why keep the aspect ratio?
The aspect ratio is width-to-height. If you resize without preserving it — forcing a 3:2 photo into a 16:9 box — the image stretches and looks distorted. Always resize by specifying one dimension (e.g. width 1920) and let the height follow automatically.
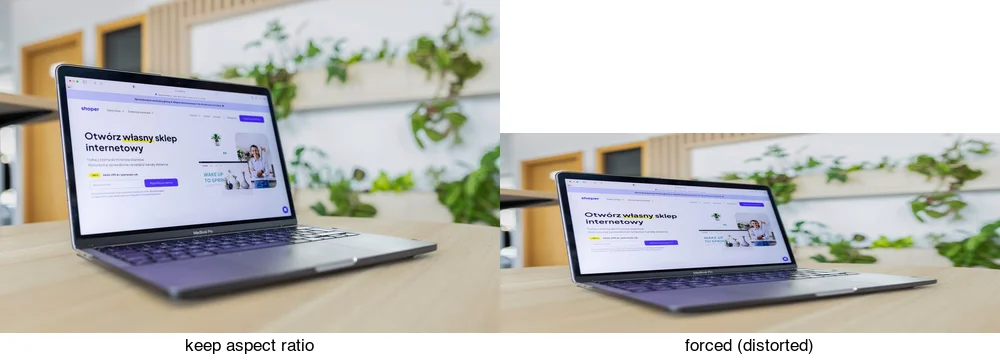
The one exception is when you need a fixed box (a square thumbnail): then crop to the ratio first, then resize, so you remove pixels rather than stretch them. See crop image to circle for shape crops.
Which resampling filter should you use?
Resampling filters decide how the new pixels are computed from the old. For downscaling photos, Lanczos is the best general choice — sharp without ringing. Bicubic is a close second; bilinear is faster but softer; nearest-neighbor is only for pixel art.
| Filter | Best for | Speed |
|---|---|---|
| Lanczos | Photos (downscale) | Medium |
| Bicubic | Photos (close to Lanczos) | Medium |
| Bilinear | Fast, softer | Fast |
| Nearest-neighbor | Pixel art only | Fastest |
In ImageMagick, -filter Lanczos selects it. Most editors default to a good filter for downscaling, so you rarely need to change it. The ImageMagick resize documentation and the Wikipedia article on Lanczos resampling cover the filters and their trade-offs in depth.
Why resize before compressing?
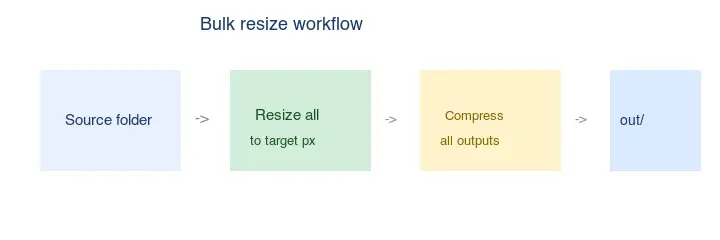
Resizing removes pixels you do not display; compression removes detail within the pixels you keep. Resizing is the bigger lever — a 4000px photo compressed well is still a 4000px download. Resize first, then compress:
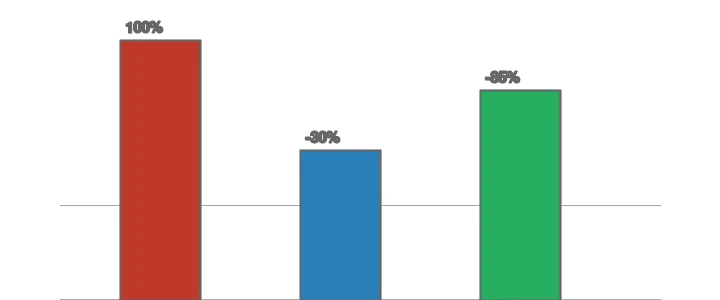
Measured on one photo, resize + compress cut bytes ~85%, versus ~30% for compress alone. See how to compress JPEG.
How do you pick the target size?
The right target is the display size, not "as large as possible." Match the longest edge to where the image is shown, with a small buffer for high-DPI screens. A content image in an 800px-wide article column needs roughly 1200–1600px (1.5–2× for retina); a hero banner across a 1920px screen needs 1920–2560px; a thumbnail shown at 200px needs only 300–400px. Going larger than the display wastes bytes on pixels the screen cannot show; going smaller makes the image look soft when the browser scales it up. The social media image sizes guide has the per-platform dimensions for social targets. When in doubt, resize to about 1.5× the display width — that covers most high-DPI screens without bloating the file.
How do you resize keeping quality?
## Resize to 1920px wide, aspect ratio kept, Lanczos filter
magick input.jpg -filter Lanczos -resize 1920x output.jpg

## To a specific height instead
magick input.jpg -filter Lanczos -resize x1080 output.jpg
For one image, the Image Resizer handles it visually. Always write to an output folder so the original stays safe — see how to batch resize.
When is upscaling unavoidable — and what then?
Sometimes you must enlarge (an old photo, a downloaded image). Upscaling cannot add real detail, but a good upscaler (Real-ESRGAN) predicts plausible detail and looks better than a raw resize. Accept that the result is softer than a native high-res capture. See how to upscale images.
The key distinction is between downscaling, which is effectively free of quality loss at the target size, and upscaling, which is fundamentally limited. When someone asks how to "resize without losing quality," they usually mean downscale a large source to web size — and for that, the rules above (keep ratio, use Lanczos, resize before compress) give a result indistinguishable from the original at the new size. Upscaling is a different problem with a different answer, and conflating the two is what leads to disappointment when a small image is enlarged and looks soft. If you are enlarging, read the upscaling guide first and set your expectations accordingly.
Common mistakes
- Upscaling and expecting detail. It cannot be added; re-capture if possible.
- Forcing exact dimensions. Distorts the image; keep the aspect ratio.
- Compressing before resizing. Wastes effort; resize first.
- Using nearest-neighbor on photos. Jagged output; use Lanczos/bicubic.
- Overwriting the original. Always write to an output folder.
Final resize checklist
- Lock the aspect ratio before changing width or height.
- Use Lanczos or a high-quality bicubic filter.
- Resize from the original, not from an already-compressed copy.
- Export once after resizing to avoid generation loss.
- Check sharp edges and text at the final display size.
Frequently asked questions
Does resizing reduce quality?
Downscaling does not reduce visible quality at the target size — it only discards pixels you weren't displaying. Upscaling cannot add detail, so it looks soft.
How do I resize without distorting?
Keep the aspect ratio: specify one dimension and let the other follow. Never force both.
What is the best resize filter?
Lanczos for photos (sharp, minimal artifacts). Bicubic is a close alternative.
Should I resize or compress first?
Resize first. Resizing removes pixels you don't display — the bigger byte saving — then compress what remains.
How do you resize without losing quality?
Use a good resampling filter (Lanczos for downscaling, bicubic for mild changes) and keep the aspect ratio. Resizing changes pixel count, not quality per pixel — quality loss comes from upscaling beyond the source or re-compressing. Resize from a high-quality master; do not resize and re-save an already-compressed JPEG.
Why keep the aspect ratio?
To avoid stretching. Resizing width and height independently distorts the image — circles become ovals, faces look wrong. Lock the aspect ratio so the image scales uniformly. Most tools lock it by default; unlocking it is how you accidentally stretch a photo.
Why resize before compressing?
Because reducing pixels is the biggest byte saving. Compressing a full-resolution image wastes effort on pixels nobody will see. Resize first, then compress — the order is the single biggest determinant of file size. See the web speed guide.
What is the best resampling filter?
Lanczos for downscaling (sharpest, preserves detail), bicubic for general use, nearest-neighbor only for pixel art. The filter decides how new pixels are calculated from the old ones. For photographs, Lanczos is the default; test by content for graphics.
Does resizing change the file size?
Yes — downscaling reduces pixels, which reduces file size (fewer pixels to encode). That is why resizing before compressing is the biggest byte saving. Upscaling increases file size without adding real detail. Always resize toward the display dimensions, not away from them.
Can I resize an image without an app?
Yes — a browser tool like our Image Resizer resizes with no install, and the OS built-in tools (Preview on Mac, Photos on Windows) resize too. For batches or automation, the command line (ImageMagick, sips) handles folders. Pick by the job: one image in a browser, a batch on the command line.
Can I resize an image larger without losing quality?
Not really. Upscaling invents pixels — interpolation softens, AI invents texture — so the result is never as sharp as a native high-resolution capture. Resize down from a high-quality master; if you need a larger image, reshoot or scan at higher resolution rather than upscaling.
Image credits
- Resize-size comparison, aspect-ratio preserve-vs-distort, and resize-vs-compress diagrams — generated by the author from an ecommerce-style photograph (Pexels #16675632, photo by Mikael Blomkvist) to show real resize results and byte savings.
Use the free tools while you follow the guide.
Keep reading
2026-07-26
How to Batch Resize Images: Free Tools and Scripts Compared
Resize hundreds of images at once with free online tools, ImageMagick, XnConvert, and Python scripts. Copy-paste commands, preset sizes, and a practical workflow.
2026-07-26
Bulk Image Resizer: Resize Hundreds of Images at Once (Free)
Resize hundreds of images in bulk for free with a browser tool, ImageMagick, XnConvert, or a Python script, with real byte savings and the safe batch workflow.
2026-07-26
How to Crop an Image to a Circle (Profile Photos and Avatars)
Crop an image to a circle for avatars and profile photos: the square-first rule, making a transparent circle PNG or a circle on a background, and where circles are used.