2026-02-25 · Updated 2026-07-26
Image Quality Enhancement: Fix Blur, Noise, and Resolution
Image quality enhancement explained: the defects you can fix (blur, noise, low resolution, exposure), the honest limits, and the workflow order that decides the result.
Last updated: July 26, 2026
Image quality enhancement fixes the common defects that make an image look bad — blur, noise, low resolution, poor exposure — so it reads as sharp and clean. It is genuinely useful, with a clear boundary: it can improve a photo that captured enough detail, but it cannot recover detail that was never captured. This guide covers what enhancement fixes, the limits, the tools, and the workflow order that decides the result.
Quick answer: how do you enhance image quality?
Match the fix to the defect:
| Defect | Fix | Tool |
|---|---|---|
| Soft / slightly blurry | Sharpening or AI sharpener | Editor / AI |
| Noisy / grainy | Denoising | AI denoiser |
| Low resolution | Upscaling | AI upscaler |
| Dark / low contrast | Brightness, contrast, levels | Editor |
| Color cast | White balance | Editor |
For one image, use the AI Photo Enhancer. For the full how-to, see how to enhance photo quality.
What can enhancement fix — and what can it not?
The limits are the single most important thing to understand:
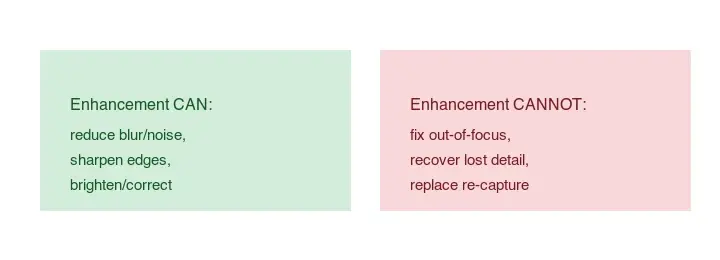
- Can: reduce softness and noise, sharpen edges, brighten, correct color, upscale moderately.
- Cannot: fix a genuinely out-of-focus image, recover detail that was never captured, or replace re-capturing the photo.
A slightly soft or noisy image improves a lot. An image where the camera missed focus entirely does not — enhancement gives a bigger, sharper-looking blur, not a focused image.
The honest test is to ask whether the information you want is somewhere in the original, just obscured. If it is — a face blurred by motion, texture hidden by noise — enhancement can bring it forward. If the information was never captured — an eyelash in a 50px face, a texture in an out-of-focus region — no enhancement creates it; the model can only guess plausibly, which is fine for display but not for accuracy. Always start from the best capture available; see how to upscale images for the resolution side.
When should you re-capture instead?
When you control the capture, re-shooting almost always beats enhancing. The defects enhancement cannot fix — true out-of-focus blur, severe underexposure, blown highlights — are decided at the moment of capture, and no post-processing recovers data the sensor never recorded. If you find yourself enhancing every photo from a shoot, the problem is usually the shoot (lighting, focus, ISO), not the enhancement tool. Fixing the capture saves hours and produces better results.
How do you sharpen a blurry image?
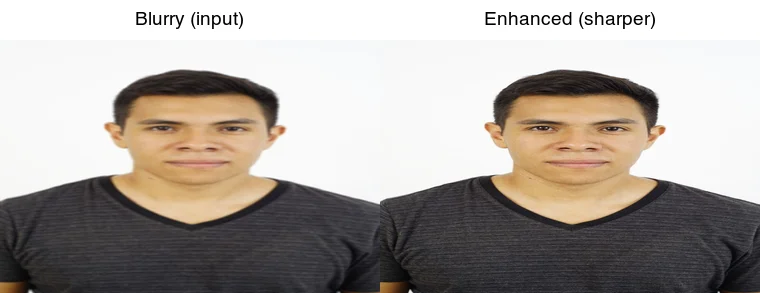
Slight blur responds to sharpening (Unsharp Mask) or AI sharpeners. Classic sharpening increases edge contrast; AI sharpeners predict sharp detail from soft input and do better on compression softness and mild motion blur. Do not over-sharpen — too much creates halos around edges and a crunchy look. Apply sharpening last, after denoising and exposure, on the final-size copy.
How do you denoise an image?
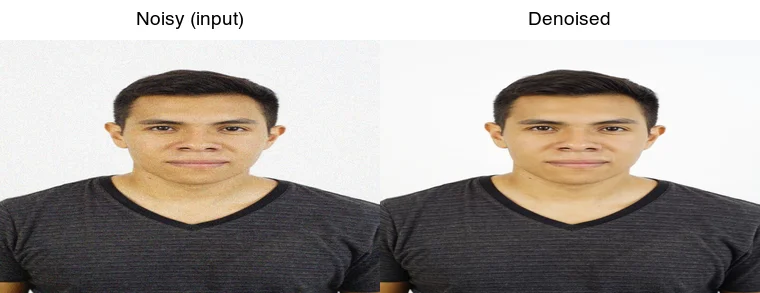
Noise (grain from low light or high ISO) is best removed by AI denoisers, which distinguish real detail from random noise far better than old blur-based filters. The trade-off is over-smoothing — push too hard and skin and fabric go "plastic." Denoise first, before sharpening, so you do not sharpen the noise. The deep-learning denoising literature documents how these models compare to classic filters.
How do you fix exposure and contrast?
Underexposed or low-contrast images respond to basic tone adjustment — brightness/exposure to lift the level, contrast or levels to set black/white points, and white balance to remove a color cast. These are the highest-return fixes and need no AI; any editor handles them, including free ones like GIMP or Photopea. Get tone right before sharpening or denoising.
How do you upscale a low-resolution image?
Upscaling enlarges an image without obvious blocking. AI upscalers (Real-ESRGAN) predict plausible detail and do better than classic resize for 2–4x enlargement, but they cannot invent real detail that the sensor never captured. For web, resize to the display size first; for the limits, see how to upscale images and image resolution and DPI.
What is the correct enhancement workflow?
The order matters more than the specific tool you choose:
- Denoise first (so you don't sharpen noise).
- Fix exposure and white balance (tone before detail).
- Sharpen last, on the final-size copy.
- Upscale if needed.
- Export at the right size and format.
Skipping the order — sharpening a noisy image — is the most common reason an enhanced image looks worse than the original.
What tools enhance image quality?
| Tool | Type | Best for |
|---|---|---|
| AI Photo Enhancer | Browser | One-off all-in-one |
| Lightroom / Camera Raw | Pro editor | Full control |
| Topaz Photo AI | Paid | Best denoise/sharpen |
| Real-ESRGAN | Open source | Upscaling |
The browser all-in-one tools are fastest for a single image — they denoise, sharpen, and correct in one pass. Pro editors like Lightroom give per-slider control, which matters for a specific defect or a batch with consistent problems. Topaz Photo AI leads on the hardest noise and blur, and Real-ESRGAN is the free upscaling option — the Upscayl, Topaz, and Magnific comparison covers which of the three suits enlargement specifically. For the full tools comparison, see AI photo enhancement tools. As with most image tooling, the workflow order (denoise, then tone, then sharpen) matters more than which brand you pick, so get the order right before evaluating paid upgrades.
Common mistakes
- Sharpening before denoising. Amplifies noise. Denoise first.
- Over-sharpening / over-denoising. Halos or plastic skin. Less is more.
- Trusting enhancement to fix bad focus. It cannot; re-capture if possible.
- Re-enhancing an enhanced file. Compounds artifacts; work from the original.
- Enhancing instead of re-capturing. When you control the shoot, a clean original beats any enhancement.
Frequently asked questions
What can image quality enhancement fix?
Noise, mild blur, low resolution, and poor exposure — within limits. It cannot recover an image that is severely out of focus, badly underexposed, or too low-resolution to start from. Enhancement sharpens and cleans what is there; it does not create missing detail.
How do you sharpen a blurry image?
Apply an unsharp mask or AI sharpening, which detects edges and increases their contrast. Mild blur responds well; heavy blur does not, because there is no real edge to recover. Over-sharpening creates halos, so apply gently and check at 100 percent.
When should you re-capture instead?
When the image is too far gone — severely out of focus, badly underexposed, or tiny in resolution. Enhancement has hard limits, and an hour of editing a lost image often produces a worse result than a quick reshoot. Re-shoot when the source lacks the information to recover.
What is the correct enhancement order?
Denoise first (remove false edges), then upscale (add resolution), then sharpen (on the clean, full-size image), then export. Sharpening before denoise amplifies grain; upscaling before denoise wastes effort. Order matters as much as the tools.
Does enhancement work on old scans?
Yes, and it is a common use case — denoise, upscale, and scratch repair on scanned photos. The limits are the scan quality: a low-DPI scan caps the result. Scan at 600 DPI+ as TIFF before enhancing. See the restoration guide.
What is the limit of image enhancement?
Enhancement cannot recover information that was never captured. A photo that is severely out of focus, badly underexposed, or tiny in resolution cannot be fixed — enhancement sharpens and cleans what is there, it does not create missing detail. Know when to re-capture instead: an hour on a lost photo often produces a worse result than a two-minute reshoot.
Can enhancement fix a blurry photo?
Mildly. AI sharpening recovers apparent edge detail that classic sharpening misses, so a slightly soft photo improves. But a photo that is fundamentally out of focus cannot be fixed — there is no real edge to recover, and the model invents generic texture instead. Enhancement sharpens what is there; it does not refocus a missed shot. Know the limit before you spend time on a lost photo.
What is the difference between sharpness and clarity?
Sharpness increases edge contrast at small scales (fine detail); clarity increases mid-tone contrast, which affects larger structures and adds punch and texture. Cranking either creates artifacts — halos from sharpness, an over-processed look from clarity. Use both gently: sharpen to recover fine detail, clarify to add local contrast where the image reads flat.
Image credits
- Enhancement-limits, blurry-to-sharp, and noisy-to-denoised diagrams — generated by the author from a portrait photograph (Pexels #5931195, photo by August de Richelieu) by applying blur and noise to demonstrate enhancement before/after.
Use the free tools while you follow the guide.
Keep reading
2026-07-28
How to Enhance Photo Quality: Sharpen, Denoise, and Brighten
Enhance photo quality by sharpening, denoising, and brightening, with what enhancement can and cannot fix, the tools, and a real before/after.

2026-07-26
AI Face Enhancer: Natural Portrait Retouching Guide
Use an AI face enhancer without plastic skin: choose the right portrait, protect identity, check artifacts, and export sharp web-ready headshots.
2026-07-26
AI Face Restoration: GFPGAN vs CodeFormer Compared
GFPGAN and CodeFormer both repair damaged faces but trade accuracy for polish differently. Which to use, how they work, and where both invent detail.