2026-03-29
How to Make Transparent Background Images (PNG, WebP, Formats)
Make image backgrounds transparent: which formats support alpha, how to remove a background, and when transparency helps versus when it hurts, with real format examples.
Last updated: June 27, 2026
A transparent background lets one cutout sit on any backdrop — white for a marketplace, a brand color for an ad, a photo for a layout. But transparency is a format feature, not a given: JPEG cannot do it at all, while PNG and WebP can. This guide covers which formats support transparency, how to create a transparent image, and when transparency is worth the extra steps.
Quick answer: how do you make an image transparent?
Remove the background to an alpha channel and save in a format that supports it. The practical rule:
| Goal | Use | Why |
|---|---|---|
| Transparent web image, small | WebP (alpha) | Smaller than PNG, supported by all modern browsers |
| Transparent image, max compatibility | PNG (alpha) | Universal support, lossless |
| Photo with no transparency | JPEG | Smallest for photos, but no alpha channel |
| Vector/logo with transparency | SVG | Scales, tiny, transparency built-in |
Use the Background Remover to get the cutout, then export PNG or WebP. For how the removal works, see the AI background removal guide.
Which image formats support transparency?
Transparency comes from an alpha channel — a per-pixel opacity value alongside the RGB color. Not every format has one:
| Format | Alpha (transparency) | Use for |
|---|---|---|
| PNG | Yes (8-bit) | Universal transparent images, logos, UI |
| WebP | Yes (lossy and lossless) | Smaller transparent images for the web |
| AVIF | Yes | Smallest transparent images, modern browsers |
| GIF | Yes (1-bit, on/off) | Hard edges only; no semi-transparency |
| SVG | Yes (vector) | Logos, icons, illustrations |
| JPEG | No | Photos only; flattens to a solid background |
| BMP | No | Rare on the web |
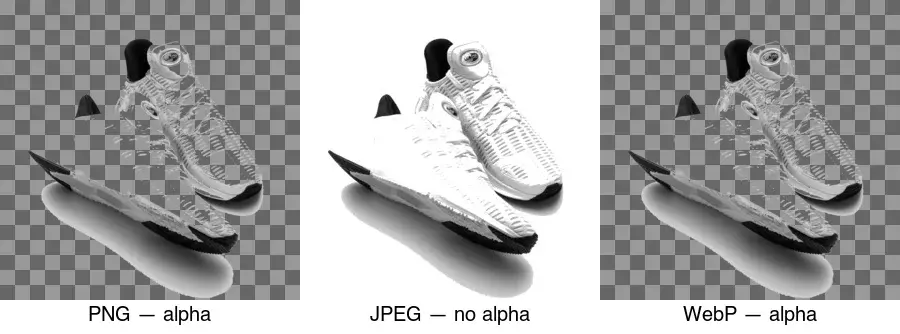
The diagram above shows the difference: PNG and WebP keep the checkerboard (transparent); JPEG fills the area with white because it has no alpha channel. This is why exporting a removed background as JPEG destroys the transparency — the single most common mistake.
How does the alpha channel work?
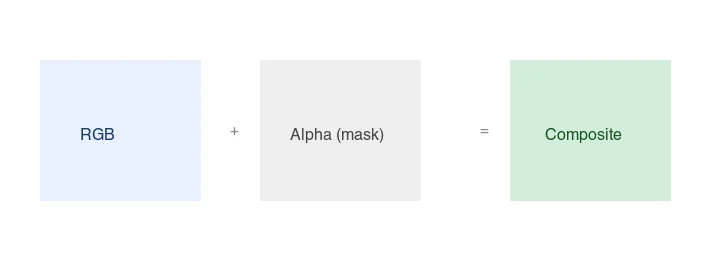
Each pixel in a PNG/WebP with alpha has four values: red, green, blue, and alpha (RGBA). Alpha is the opacity — 0 means fully transparent, 255 means fully opaque, and values in between are semi-transparent. The composite you see is the cutout blended over whatever is behind it.
Semi-transparent pixels matter for soft edges — hair, fur, shadows, anti-aliased text. A format with only 1-bit transparency (GIF) makes those edges jagged or haloed; PNG and WebP alpha keep them soft. The MDN alpha channel reference explains how alpha compositing works in browsers.
How do you create a transparent image?
- Start with the subject on as plain a background as possible. A solid white or green background is far easier to remove cleanly than a busy scene.
- Remove the background. Use the Background Remover for automatic removal, or a CLI tool like
rembgfor batches. - Export as PNG or WebP, never JPEG. Confirm the exporter preserves the alpha channel.
- Check the edges at 200% — look for halos (leftover background fringe) and gaps (missing subject).
- Test on a contrasting backdrop to confirm the transparency is real, not just white-on-white.
For a clean product cutout, the result drops onto any backdrop:
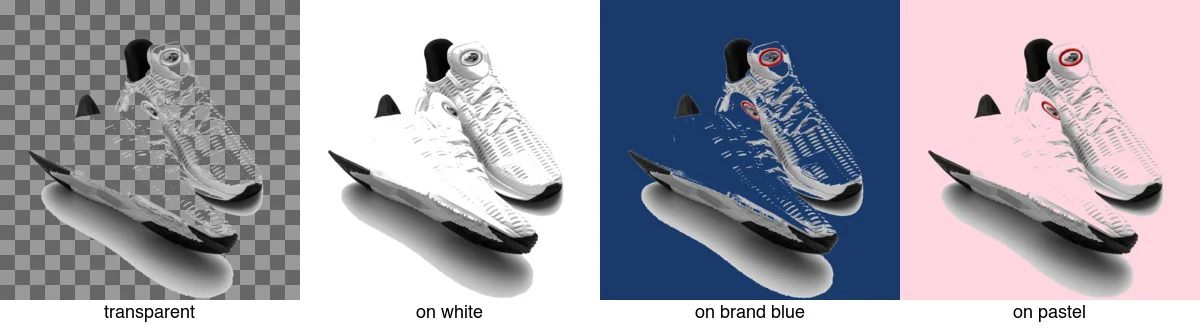
This reuse is the whole point: one cutout becomes a marketplace image, an ad creative, and a social post without re-photographing. See the background removal use cases guide for the full set.
How do you remove a background programmatically?
For a batch, rembg (a CLI wrapper around U2-Net) outputs transparent PNGs:
pip install rembg
## One image
remgb i input.jpg output.png
## A whole folder
rembg p input_dir/ output_dir/
With ImageMagick and a plain background, a fuzz-threshold removal works for simple cases:
## Remove near-white pixels to transparent (good for product shots on white)
magick input.jpg -fuzz 15% -transparent white output.png
The fuzz approach fails on busy backgrounds or hair — use a model-based remover (rembg) for those. See the background remover tools comparison for which tool fits which job.
PNG or WebP for transparent images?
Both support full alpha, so the choice is size and compatibility:
| Format | Transparent file (typical) | Browser support | When to pick |
|---|---|---|---|
| PNG | Larger | 100% | Maximum compatibility, email, archives |
| WebP | ~20–40% smaller | ~98% | Web pages where bytes matter |
For a web page, serve WebP with a PNG fallback in a <picture> element. For email, PNG — many email clients still do not render WebP. The image format guide covers the full trade-off.
When should you avoid transparency?
Transparency is not always the right choice. Skip it when:
- The image is a photograph shown at full size. Photos do not need alpha; JPEG is smaller and correct.
- The background is part of the image. A lifestyle scene or a textured backdrop should stay.
- You are exporting for a system that does not support alpha. Some print pipelines and old editors flatten or mangle transparency.
- File size is critical and the subject has hard edges. A flattened JPEG with a matched background can be smaller than a transparent PNG.
Common mistakes
- Exporting as JPEG. JPEG has no alpha; your transparent area becomes white. Use PNG or WebP.
- Leaving a halo. A faint background fringe shows up on a new backdrop. Shrink/defringe the mask by 1–2px.
- Using GIF for soft edges. GIF is 1-bit transparency; hair and shadows get jagged. Use PNG/WebP.
- Over-compressing the alpha. Some aggressive optimizers degrade the alpha channel; verify edges after optimizing.
- Not testing on a contrasting background. White-on-white hides a failed removal. Always preview on a dark or colored backdrop.
Frequently asked questions
Which image formats support transparency?
PNG (lossless, universal), WebP (lossy or lossless, smaller), and SVG (vector). JPEG does not support transparency — a JPEG cutout gets a forced background. Use PNG for masters, WebP for web delivery.
How do I make an image transparent?
Remove the background to create an alpha channel, then export as PNG or WebP. The removal can be automatic (AI) or manual (mask). See the background removal guide.
PNG or WebP for transparent images?
WebP for web delivery (smaller, supports alpha); PNG for masters and maximum compatibility. Serve WebP with a PNG fallback through a <picture> element so older browsers still get the transparency.
How does the alpha channel work?
Each pixel has a transparency value (alpha) in addition to its color, so parts of the image can be fully transparent, fully opaque, or anywhere between. The alpha channel is what lets a cutout sit over any background. PNG and WebP store it; JPEG does not.
What is matte fringe and how do I remove it?
Matte fringe is a colored halo around a cutout, left over from the original background's color bleeding into the subject's edge pixels. Remove it with a defringe or decontaminate tool, or by erasing the outermost edge pixels at low opacity. The fringe shows up when you place the cutout on a contrasting background — check it there before shipping.
What is the alpha channel?
A fourth channel (alongside red, green, blue) that stores each pixel's transparency, from fully opaque to fully transparent and anywhere between. It is what lets a cutout sit over any background with soft edges. PNG and WebP store an alpha channel; JPEG does not, which is why JPEG cannot do transparency. Without alpha, a cutout gets a forced solid background.
How do I add transparency to a JPEG?
You cannot — JPEG has no alpha channel, so a JPEG cannot store transparency. To get a transparent image, remove the background and export as PNG or WebP, both of which support an alpha channel. Converting a JPEG to PNG does not add transparency; you must remove the background first, then export to a format that can hold it.
Can I make a JPEG transparent?
No — JPEG has no alpha channel and cannot store transparency. A JPEG always has a solid background. To get transparency, remove the background and export as PNG or WebP, which support an alpha channel. Converting a JPEG to PNG does not magically add transparency; the background must be removed first.

Image credits
- Format transparency comparison, cutout-on-backdrops, and alpha-channel concept — generated by the author from a sneaker product photograph (Pexels #1461048, photo by Ray Piedra) to show real transparency across formats and backdrops.
Use the free tools while you follow the guide.
Keep reading
2026-07-18
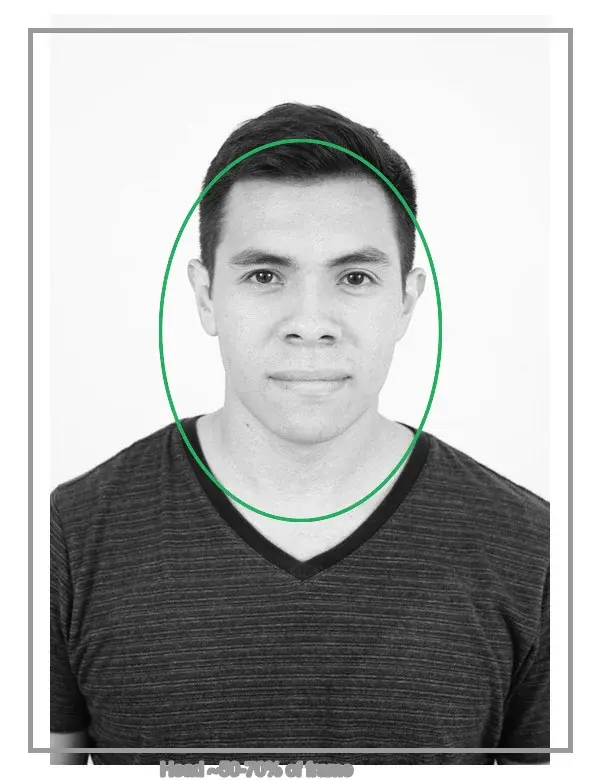
Passport Photo Maker Online: Take and Format ID Photos at Home
Make a passport or ID photo online at home: the composition rules (head size, background), the common country background requirements, and how to crop and export to spec.
2026-07-16
How to Fix Hair Edges and Halos After Background Removal (Free)
AI background removers leave halos and cut off hair strands. Here's why it happens and how to fix it for free, directly in your browser, no Photoshop.

2026-06-28
AI Product Photo Generators: Sellable Listings From Any Snapshot
AI product photo generators cut a product out, place it on pure white, and compress it to WebP. See when AI works and when Amazon or Google need a real photo.