2026-03-14
AI Image Upscaler Guide: Enlarge Photos Without Losing Quality
How AI image upscalers work, which tool to use (Real-ESRGAN, Topaz, Lanczos), what upscaling can and cannot recover, and the right target resolution for each use case.
Last updated: June 27, 2026
An AI image upscaler enlarges a photo while predicting the detail a simple resize would leave blocky. Used right, it rescues low-resolution images you cannot re-capture; used wrong, it produces soft or "plastic" output you mistake for quality. This guide covers how the tools work, which to pick, and the honest limits every upscaler shares.
Quick answer: which upscaler should you use?
Match the tool to the content and how much you need to enlarge:
| Goal | Tool | Why |
|---|---|---|
| One image, no install | Image Upscaler | Browser-based, no setup |
| Photos, 2–4x, free | Real-ESRGAN | Open source, strong results |
| Anime / digital art | waifu2x or anime model | Tuned for clean lines |
| Maximum polish, paid | Topaz Gigapixel | Best commercial quality, up to 6x |
| Modest 2x, fast | Lanczos (ImageMagick) | Free, no AI needed |
For the underlying mechanics, see how to upscale images; for the leading open model, the Real-ESRGAN guide.
How do the upscalers compare?
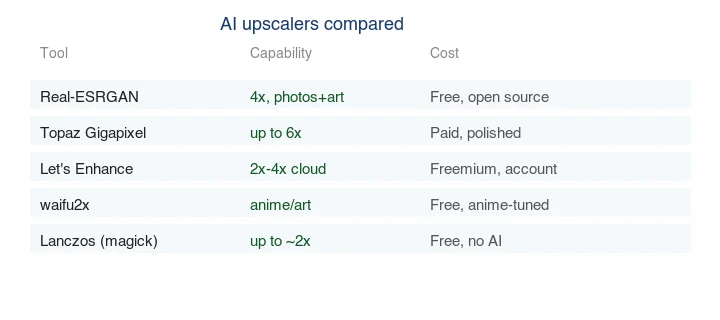
The tools differ less in raw capability than in tuning, cost, and convenience:
| Tool | Capability | Cost | Best for |
|---|---|---|---|
| Real-ESRGAN | 4x, photos + art | Free, open source | Most cases |
| Topaz Gigapixel | up to 6x | Paid | Polished commercial work |
| Let's Enhance | 2–4x cloud | Freemium | Occasional, no install |
| waifu2x | anime/art | Free | Illustration, anime |
| Lanczos (magick) | up to ~2x | Free | Simple enlargement, no AI |
Confirm current pricing on each tool's site before committing. The pattern: free open-source tools (Real-ESRGAN, waifu2x) cover most needs; paid tools add polish and scale for professional workflows.
What can upscaling actually recover?
Set the expectation honestly. Every upscaler — AI or not — has the same hard limits:
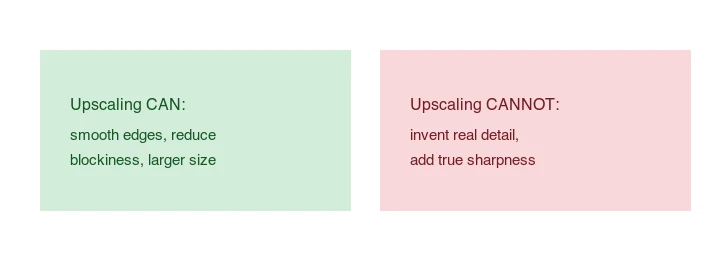
- It can: smooth edges, reduce pixelation, produce a larger image without obvious blocking.
- It cannot: invent detail that was never captured (eyelashes from a 50px face), add true sharpness to a blurry source, or replace a low-res capture with a high-res one.
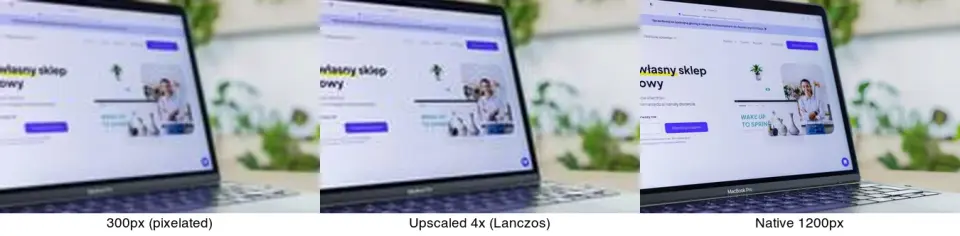
A 300px photo upscaled to 1200px looks better than the 300px original stretched to 1200px, but it does not match a photo captured at 1200px. The comparison above shows exactly that gap. Start from the highest-resolution source available.
What resolution do you actually need?
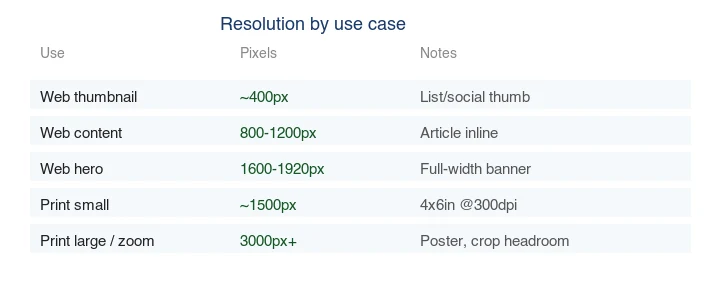
Upscaling to "as large as possible" wastes bytes. Match the resolution to the use case:
| Use case | Target pixels |
|---|---|
| Web thumbnail | ~400px |
| Web content image | 800–1200px |
| Web hero | 1600–1920px |
| Small print (4×6") | ~1800×1200 @ 300 PPI |
| Large print | 3000px+ |
For web, 1600–1920px is almost always enough; upscaling beyond that just bloats the file. For print, calculate from physical size at 300 PPI — see image resolution and DPI.
How does AI upscaling actually work?
Most AI upscalers are super-resolution neural networks trained on pairs of low- and high-resolution images. The model learns to map a small, blocky input to a sharp larger output by recognizing patterns — edges, textures, common shapes — rather than by interpolating pixels. Two families dominate: GAN-based models (like Real-ESRGAN), where a generator produces the image and a discriminator judges it, and diffusion-based models, which refine the image over several passes. Both synthesize plausible detail; neither recovers true captured detail.
The reason this beats classic resizing is that interpolation (Lanczos, bicubic) can only smooth between existing pixels, while a trained model can "guess" what the missing high-frequency texture should look like based on what it has seen before. The trade-off is that the guess is sometimes wrong — a texture that looks plausible but is not what the original scene contained. The Google AI blog post on super-resolution and the Real-ESRGAN paper explain the approach in depth. This is also why upscalers should never be used where pixel accuracy matters — see how to upscale images for the limits.
How do you run an AI upscaler?
For one image, use the Image Upscaler. For batches or scripts, Real-ESRGAN's CLI is the standard free option:
## 4x upscale a photo
realesrgan-ncnn-vulkan -i input.jpg -o output.jpg -n realesrgan-x4plus

## A folder
realesrgan-ncnn-vulkan -i input_dir -o output_dir -n realesrgan-x4plus
For a simple 2x enlargement without AI, Lanczos is fast and free. It cannot invent detail, but for a decent source that just needs to be a bit bigger it produces a clean, artifact-free result in milliseconds, which is why it is still the right choice for moderate upscaling where the source already has good detail.
magick input.jpg -filter Lanczos -resize 200% output.jpg
When is upscaling the wrong answer?
Upscaling is a rescue, not a substitute for resolution. Avoid it when:
- You can re-capture. A photo shot at the resolution you need always beats an upscaled one.
- The source is blurry. Upscaling a blurry image gives a bigger blurry image.
- The use is evidence-sensitive. AI upscalers invent detail; do not use them for medical, forensic, or archival work where accuracy matters.
- You only need it for web. A 1920px web image does not need upscaling; resize and compress instead. See how to compress JPEG.
Common mistakes
- Trusting upscaled detail as real. It is synthesized, not measured.
- Upscaling beyond 4x. Diminishing returns; the result looks soft.
- Using a general model on faces. Produces plastic skin; use a face-specific model.
- Upscaling for web past 1920px. Bloats the file with no screen benefit.
- Skipping the 100% check. AI output hides artifacts that look fine zoomed out.
Frequently asked questions
How does AI upscaling actually work?
A model trained on pairs of low- and high-resolution images learns to synthesize plausible detail when enlarging. Unlike bicubic resize (which just interpolates between existing pixels), an AI upscaler invents texture — skin pores, fabric weave, foliage — that looks real but was not in the source. This is why it can sharpen a photo but also why it can produce plastic-looking skin.
What resolution do I actually need?
Usually 2x is enough for web and screen; higher ratios invent more detail and risk artifacts. Match the upscale factor to the display size — there is no point upscaling to 8K for a photo shown at 1080p. See the upscaling guide for the limits.
Why do upscaled faces look plastic?
Because the model invents skin texture from training, and on faces it often over-smooths and then adds generic pores, producing a waxy look. Use a face-specific model or lower the strength on faces, and check the result at 100 percent. Faces are where upscaling artifacts are most visible.
Is AI upscaling better than traditional resizing?
For photographs at 2x and above, yes — it recovers apparent detail that bicubic cannot. For graphics, text, and line art, traditional (Lanczos) resizing is more accurate, because AI synthesis distorts sharp edges. Pick by content type.
How long does AI upscaling take?
A few seconds per image for a 2x upscale on a typical machine or hosted service; longer for 4x or very large files. It is not real-time for batches. Budget the time, or use a hosted service that handles the compute queue.
What upscale ratio should I use?
2x for most web and screen work — it doubles resolution with manageable artifact risk. 4x invents much more detail and is only safe on illustrations or when you will scrutinize and clean the result. Beyond 4x, the invented detail dominates and the result drifts from the source. Match the ratio to the display need: there is no point upscaling to 8K for an image shown at 1080p. Start at 2x, check the result at 100 percent, and only go higher if the display genuinely requires it.
Can I upscale a compressed JPEG?
Yes, but the compression artifacts (blocking, banding) get upscaled along with the real detail, so the result shows the JPEG damage at a larger size. AI upscalers trained on clean images can sometimes smooth these, but the honest answer is that a heavily compressed source upscales to a larger, equally damaged image. Start from the highest-quality source you have; upscaling cannot undo prior compression.
Image credits
- Upscale before/after, upscaler-tools comparison, upscaling-limits, and resolution-by-use-case diagrams — generated by the author from an ecommerce-style photograph (Pexels #16675632, photo by Mikael Blomkvist) to show real upscaling results and tool trade-offs.
Use the free tools while you follow the guide.
Keep reading
2026-07-18
AI Face Restoration: GFPGAN vs CodeFormer Compared
GFPGAN and CodeFormer both repair damaged faces, but they trade accuracy for polish differently. Which one to use, how they actually work, and where both can quietly invent a face that isn't the real person.
2026-06-28
AI Face Enhancer: Natural Portrait Retouching Guide
Use an AI face enhancer without plastic skin: choose the right portrait, protect identity, check artifacts, and export sharp web-ready headshots.
2026-06-28
How to Enhance Photos With AI in 2026: Real Results
I enhanced 60 photos with AI to fix noise, blur, and low resolution. Here is the 2026 workflow, the tools that actually worked, and where AI falls short.