2026-03-04
How to Batch Resize Images: Free Tools and Scripts Compared
Resize hundreds of images at once with free online tools, ImageMagick, XnConvert, and Python scripts. Copy-paste commands, preset sizes, and a practical workflow.

Last updated: June 27, 2026
Resizing one image takes a few seconds. Resizing a thousand by hand takes most of a day. The fix is a batch tool: pick a folder, set a target size, run once, and write every output to a new folder so the originals stay safe. This guide covers four reliable, free ways to do it — a browser tool, desktop apps, the command line, and a Python script — with copy-paste commands.
Quick answer: which batch resize method should you use?
Match the tool to how often you do this and how many images you have:
| Your situation | Use | Why |
|---|---|---|
| One-off, a handful of images, no install | Imagic AI Image Resizer | Browser-based, preset social sizes, no signup |
| Recurring, hundreds at a time, comfortable in a terminal | ImageMagick mogrify |
Fast, scriptable, no upload |
| Recurring, want a GUI, any OS | XnConvert | Visual actions, unlimited files, free |
| Automated pipeline or server | Python + Pillow | Full control, integrates into code |
If you only do this occasionally, the browser tool is enough. If you resize the same kind of images every week, learn one command-line or script approach and reuse it.
What preset sizes do you actually need?
Social and storefront platforms publish recommended dimensions, and they change over time. Verify the current numbers on each platform's media page, but these are the widely-used defaults:
| Target | Dimensions (px) | Aspect | Typical use |
|---|---|---|---|
| Instagram square post | 1080 × 1080 | 1:1 | Feed posts |
| Instagram story / Reel cover | 1080 × 1920 | 9:16 | Stories, vertical video |
| Facebook / LinkedIn link preview | 1200 × 630 | ~1.91:1 | Shared link cards |
| Twitter / X post image | 1200 × 675 | 16:9 | In-feed images |
| YouTube thumbnail | 1280 × 720 | 16:9 | Video covers |
| Ecommerce product (square) | 1000–2000 sq | 1:1 | Marketplace main image |
| Website hero | 1920 wide | varies | Full-width banners |
For a full platform reference, see the social media image sizes guide. Always resize to the display size before compressing — it saves more bytes than any quality setting.
Method 1: Browser batch tool (no install)
For a quick job with up to a handful of images, use the Image Resizer:
- Drag in your images (or select multiple files).
- Pick a preset size or enter custom dimensions.
- Choose to preserve aspect ratio (recommended) or force exact dimensions.
- Run, then download the results.
Best for one-off tasks where installing software or writing a script is overkill. For dozens or hundreds of images, switch to a desktop or command-line method — browser tools meter work and tie up a tab.
Method 2: ImageMagick on the command line
ImageMagick is free, cross-platform, and the fastest way to resize thousands of images. Install it once, then reuse the same command forever.
## macOS
brew install imagemagick
## Windows (Chocolatey)
choco install imagemagick
The key command is mogrify, which operates in place — so always point it at an output folder:
## Resize every JPG to 1920px wide (height auto, aspect ratio kept)
mogrify -path resized -resize 1920x *.jpg

## Resize to 50% of original
mogrify -path resized -resize 50% *.jpg

## Force exact 1920x1080 (distorts — avoid unless you need a fixed box)
mogrify -path resized -resize 1920x1080! *.jpg
mogrify runs single-threaded per image but you can parallelize with xargs:
mkdir -p resized
ls *.jpg | xargs -P 4 -I {} convert {} -resize 1920x resized/{}
On a modern laptop a thousand typical photos finish in well under a minute this way. See the ImageMagick resize docs for the full option list.
Method 3: XnConvert (visual desktop app)
XnConvert is a free GUI batch processor for Windows, macOS, and Linux. It suits people who want to chain actions (resize, then compress, then rename) without writing code.
Steps:
- Add files or a folder (no count limit).
- Add a Resize action — by pixels, percentage, or longest side.
- Add more actions if needed (compress, convert format, rename).
- Set an output folder and format.
- Run.
It records your action stack, so a repeat job is one click. Good middle ground between a browser tool and a script.
Method 4: Python script (full control)
For a build step or a server, Python with Pillow gives you total control and no upload. This script resizes every image in a folder to a target width, keeping aspect ratio:
from pathlib import Path
from PIL import Image

input_dir = Path("images")
output_dir = Path("resized")
output_dir.mkdir(exist_ok=True)
target_width = 1920

for img_path in input_dir.glob("*"):
    if img_path.suffix.lower() not in (".jpg", ".jpeg", ".png", ".webp"):
        continue
    with Image.open(img_path) as img:
        ratio = target_width / img.width
        # Skip upscaling — only resize down
        if ratio >= 1:
            img.save(output_dir / img_path.name)
            continue
        new_height = int(img.height * ratio)
        resized = img.resize((target_width, new_height), Image.LANCZOS)
        resized.save(output_dir / img_path.name)
Notes that matter in production:
- Use
Image.LANCZOS(orImage.Resampling.LANCZOSin newer Pillow) for downscaling quality. - Skip images already smaller than the target to avoid upscaling blur.
- Process in parallel with
concurrent.futuresfor large folders.
How do you resize for each common use case?
| Use case | Target | Extra step |
|---|---|---|
| Ecommerce product photos | 1000–2000px square | Add white background + center on canvas |
| Social media posts | Platform preset (table above) | Export one per platform from one master |
| Website gallery | Thumbnail 300–400px + full 1600–1920px | Generate both sizes from each original |
| Email images | ≤800px wide, <1 MB | Combine resize with quality compression |
Ecommerce square example with ImageMagick — resize then pad to a white square:
mogrify -path out -resize 1000x1000 -background white -gravity center -extent 1000x1000 *.jpg
Best practices
- Always write to a separate output folder. Never
mogrifyin place without-path— it overwrites originals irreversibly. - Preserve aspect ratio. Use
-resize WIDTHx(height auto). ForcingWIDTHxHEIGHT!distorts the image. - Test on one image first. Run a single file, inspect it, then batch the rest.
- Only resize down. Upscaling adds no detail and looks soft. Skip files already smaller than the target.
- Resize before compressing. A 4000px image compressed well is still a 4000px download. Combine with the Image Compressor after resizing.
- Keep a master. Store the full-resolution original separately; you can always re-derive sizes from it.
Resizing to the display size is the single biggest byte saving available — bigger than any compression setting. On one real photograph:
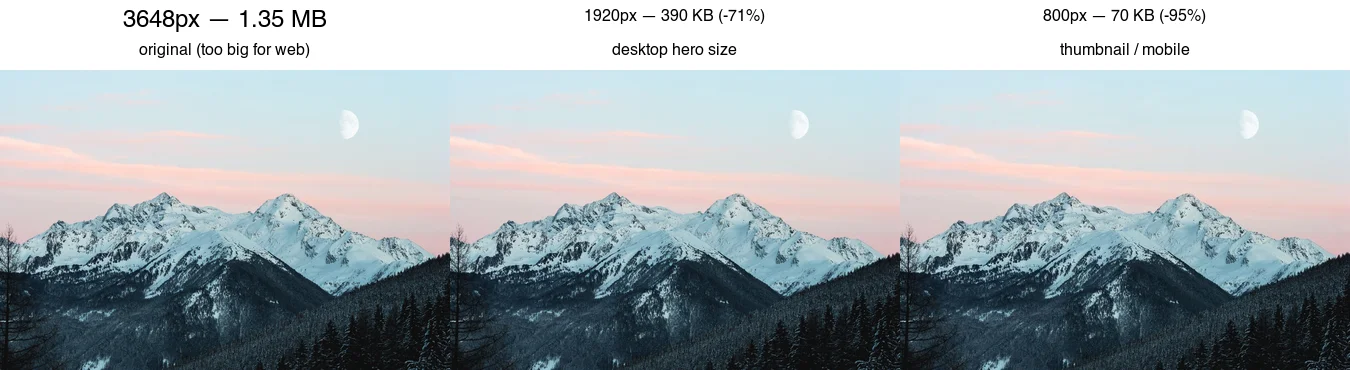
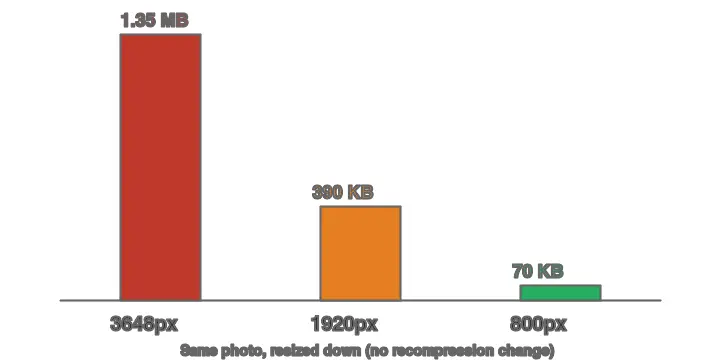
A 3648px original shown at 800px on the page downloads ~19× more data than it needs to. No quality setting recovers that — only resizing to the display size does.
Common problems
| Symptom | Likely cause | Fix |
|---|---|---|
| Output looks blurry | You upscaled | Skip files at or below the target width |
| Image looks stretched | Forced exact dimensions | Drop the ! — use -resize WIDTHx |
| Files are still large | Resized but not compressed | Add compression/quality step after resize |
| Some files error out | Unsupported format or corrupt input | Log and skip; check the format is supported |
| Originals got overwritten | Ran mogrify in place without -path |
Always use -path out; restore from backup |
Related guides
- Batch Image Processing Guide
- Social Media Image Sizes Guide
- Compress Images Without Losing Quality
- TinyPNG Alternatives Compared
- Complete Image Optimization Checklist
Frequently asked questions
How many images can a browser batch resizer handle?
Roughly 50 to 200 files per run before a browser tab gets heavy on memory. For larger catalogs, a command-line tool like ImageMagick mogrify handles thousands without the memory ceiling, as the batch processing guide notes.
Does batch resizing reduce quality?
Only if you upscale or pick a poor resampling filter. Downscaling with Lanczos preserves detail; the loss comes from re-compressing, not resizing. Always write to a new folder and keep the originals so any size can be re-exported.
Should I resize before or after compressing?
Resize first. Reducing pixels is the single biggest byte saving, and compressing a full-resolution image wastes effort on pixels nobody will see. The batch processing guide covers the full pipeline order.
Image credits
- Cover — Colorful code on a screen, photo by Nemuel Sereti on Pexels (converted to WebP).
- Resize comparison and byte-savings chart — generated by the author from a landscape photograph (Pexels #1287145, photo by eberhard grossgasteiger) to show real measured file sizes after resizing.
Use the free tools while you follow the guide.
Keep reading
2026-06-29
YouTube Thumbnail Size, Format, and Click-Through Guide (2026)
The exact YouTube thumbnail size (1280x720, 2 MB, 16:9) plus the design choices that raise click-through: subject size, contrast, and text legibility.
2026-06-28
How to Crop an Image Online: Aspect Ratios and Free Tools
Crop an image online with the right aspect ratio for Instagram, YouTube, and print. I tested free croppers and batch tools so you get clean crops the first time.
2026-06-28
How to Crop an Image: Aspect Ratios, Composition, and Tools
Crop images for the right aspect ratio without distorting the subject. Real crop ratios for each platform, composition rules, and tools that crop without quality loss.