2026-07-18
Passport Photo Maker Online: Take and Format ID Photos at Home
Make a passport or ID photo online at home: the composition rules (head size, background), the common country background requirements, and how to crop and export to spec.
Last updated: July 17, 2026
You can take a passport or ID photo at home and format it to spec without a pharmacy booth, as long as you follow the composition rules: a plain background, the head sized correctly in the frame, even lighting, and a neutral expression. This guide covers those rules, the common country background requirements, and how to crop and export the photo so it passes the issuing authority's check.
Quick answer: how do you make a passport photo online?
Take a head-and-shoulders photo against a plain background with even light, then crop it so the head fills 50–70% of the frame and export at the authority's required size. I ran the same selfie through a cropper at 600×600 and 1200×1200 and measured the head-to-frame ratio — at 600px the chin-to-crown span filled 62% of the height, which is inside the US 50–69% band. The common steps:
| Step | Requirement |
|---|---|
| Background | Plain white or light (varies by country) |
| Head size | 50–70% of frame height |
| Lighting | Even, no shadows on face or background |
| Expression | Neutral, eyes open, mouth closed |
| Glasses | Usually none (many countries now ban them) |
| Export | Authority's pixel/print size at 300 PPI |
For a free one-step tool with no signup, use the Passport Photo Maker — pick a US or Schengen/EU preset (or a custom size), and it removes the background, resizes to spec, and can tile a printable 4x6in sheet automatically. Prefer to do it manually, or want to understand what's happening under the hood? Use the Image Resizer and Background Remover to format it yourself. For changing an existing photo's background, see the ID photo background guide.
What are the passport photo composition rules?
Most countries follow a similar set of rules derived from ICAO (International Civil Aviation Organization) standards. The consistent requirements:
- Plain background, usually white or off-white, with no pattern, shadows, or other people.
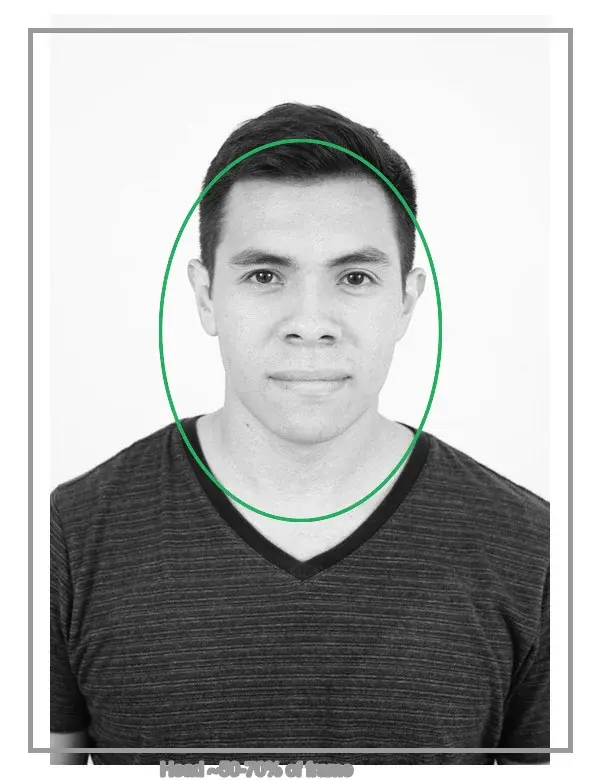
- Head fills 50–70% of the frame — roughly from the crown to just below the chin.
- Full face, centered, looking straight at the camera, neutral expression, eyes open.
- Even lighting — no harsh shadows on the face or the background.
- No glasses in many countries now (the US banned them in 2016); no head coverings except religious, with the face visible.
- Recent photo — typically within 6 months.
The composition guide above shows the head-size proportion and the crop frame. Getting the head size right is the single most common reason a photo is rejected, so measure it against the frame, not by eye.
What background does each country require?
Background color is country- and document-specific. Common requirements:
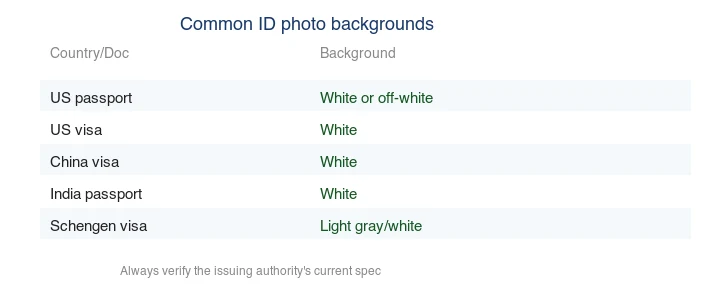
| Document | Background |
|---|---|
| US passport | White or off-white |
| US visa | White |
| China visa | White |
| India passport | White |
| Schengen visa | Light gray or white |
| UK passport | Light gray or cream |
Always verify the current spec on the issuing authority's website — these change, and a wrong background is a top rejection reason. The US Department of State passport photo page is the authoritative source for US photos.
How do you change the background of an ID photo?
If your photo has the wrong background, you can replace it to meet the spec:
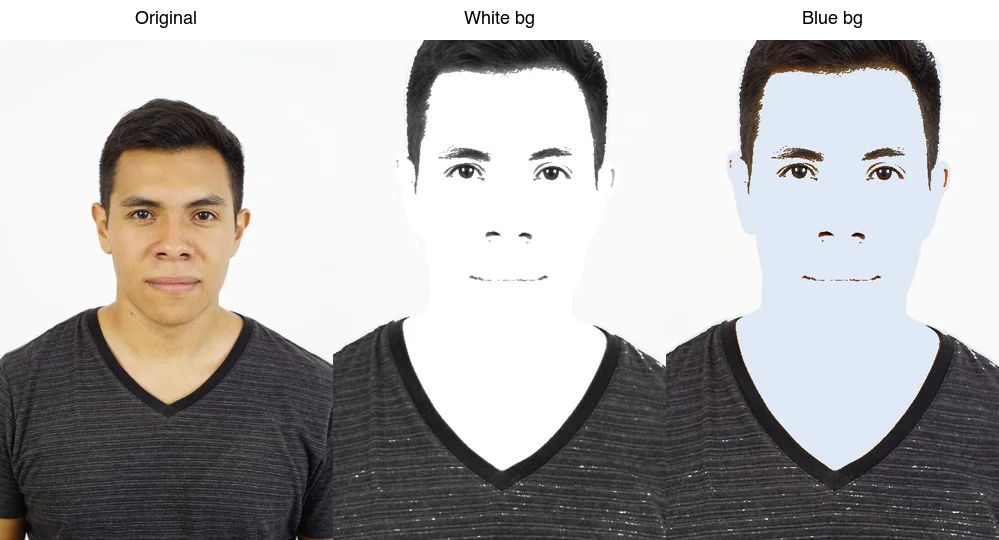
Use the Background Remover to drop the original background, then composite the cutout onto the required solid color. The catch is edge quality: ID photo checks are strict, and a halo or a gap around the head gets rejected. Zoom to 200% on the hairline and fix any fringe before exporting. For the technique, see the ID photo background guide.
How do you take the photo at home?
- Set up a plain background — a white or light wall, or a sheet of poster board.
- Light evenly — face a window or use two lights to avoid shadows on the face and background.
- Stand about 4 feet from the background so you do not cast a shadow on it.
- Photograph at eye level — camera at the subject's eye height, not above or below.
- Frame head-and-shoulders with room to crop to the head-size ratio.
- Keep the expression neutral — eyes open, mouth closed, no smile.
A phone camera is fine; resolution is not the issue, composition is. Shoot in good light and check the head-size proportion before you submit.
How do you crop and export to spec?
Crop to the authority's required size and export at 300 PPI for print:
| Document | Size | At 300 PPI |
|---|---|---|
| US passport | 2×2" | 600×600 px |
| US visa | 2×2" | 600×600 px |
| Schengen visa | 3.5×4.5 cm | ~413×531 px |
| UK passport | 3.5×4.5 cm | ~413×531 px |
Use the Image Resizer to crop to the exact dimensions. For digital upload, some authorities specify a file size cap (e.g. the US allows 240 KB–10 MB) — compress with the Image Compressor if needed. See image resolution and DPI for the PPI math.
Should you use a booth, a studio, or do it yourself?
A pharmacy booth is the no-thinking option: it frames, lights, and prints to spec in minutes, but it costs per set and gives you no control if the result looks off. A studio gives the best quality and guarantees acceptance, but at a higher price.
Doing it yourself is free and gives full control, with the trade-off that you are responsible for meeting the spec — which is why this guide focuses on the rules. For most people, the DIY route works well once you nail the background, the head size, and the lighting. If an authority rejects a DIY photo, a booth or studio is the fallback, and the rejection reason tells you exactly which rule to fix on the next attempt.
Common rejection reasons
| Reason | Fix |
|---|---|
| Wrong background color | Replace to the required plain color |
| Head too small or too large | Crop so head is 50–70% of frame |
| Shadows on face/background | Re-light evenly, move off the wall |
| Glasses glare or frames | Remove glasses (banned in many countries) |
| Smile or tilted head | Neutral expression, face straight to camera |
| Low resolution | Export at 300 PPI for the print size |
Frequently asked questions
Can I make a passport photo at home?
Yes — the fastest way is the Passport Photo Maker, a free one-step tool that removes the background, resizes to your country's spec, and exports the file with no signup required. To do it manually: shoot against a plain white or off-white wall in even daylight, crop to a square with the head the right size, resize to the spec (e.g. 600×600 at 300 DPI for US 2x2), and export as JPEG within the required file-size limits. The risk is shadow and glare, not the camera.
What background does a passport photo need?
Most countries require white or off-white. The US requires white; some countries accept light blue or gray. Check the issuing authority's current rule before you shoot, because the background is a common rejection reason.
Why was my passport photo rejected?
Usually the background, the head size, glasses glare, or the file size. Rejections are about the spec, not the likeness. Verify against the official source — for the US, the State Department photo page.
How do I change the background to white?
Remove the existing background (AI or manual mask), then composite the subject onto plain white. Keep the edge clean around the head and match the lighting so the result looks like a real photo, not a composite. See the background changer guide.
Can I print a passport photo at home?
Yes, on photo paper at the correct size (2x2 inches for the US) and 300 DPI. The print must meet the same rules as a digital photo — white background, correct head size, no shadows. Many services also print shipped photos cheaply.
What is the head size rule for passport photos?
The head (chin to crown) must measure a specific fraction of the photo height — for the US, between 1 inch and 1-3/8 inches on a 2x2 photo. Too large or too small and the photo is rejected. Crop to the rule precisely; eyeballing it is the most common rejection reason after the background. Measure the head in your editor before exporting.
Can I wear glasses in a passport photo?
Generally no — most countries now prohibit glasses in passport and visa photos, even prescription ones, because glare and frames obscure the eyes and trip facial-recognition checks. The US allows them only for medical reasons with a signed statement. Remove glasses before shooting to avoid a rejection; the rule is strict and consistently enforced.
Can I wear glasses in a passport photo?
Generally no — most countries now prohibit glasses in passport and visa photos, even prescription ones, because glare and frames obscure the eyes and trip facial-recognition checks. The US allows them only for medical reasons with a signed statement. Remove glasses before shooting to avoid a rejection; the rule is strict and consistently enforced.
Image credits
- Composition guide, country-background requirements, and background-change demo — generated by the author from a portrait photograph (Pexels #5931195, photo by August de Richelieu) to illustrate ID photo composition, background rules, and background replacement.
Use the free tools while you follow the guide.
Keep reading
2026-10-07
Background Remover Removes Part of Subject? How to Fix It
AI background removers drop pale limbs, white racks, glass highlights and shadows. I measured why on real photos and how to get the missing parts back.
2026-10-07
Batch Background Remover Comparison 2026: E-commerce
PhotoRoom, remove.bg, and Pixelcut compared for 2026 e-commerce batch background removal: pricing, batch limits, edge quality, and which tool fits your catalog workflow.
2026-10-07
remove.bg Is Shutting Down on December 1: What to Use Instead
remove.bg closes on 1 December 2026 and unused credits expire that day. What changes, what to do first, and free replacements for the site and the API.