2026-10-07
Background Remover Removes Part of Subject? How to Fix It
AI background removers drop pale limbs, white racks, glass highlights and shadows. I measured why on real photos and how to get the missing parts back.
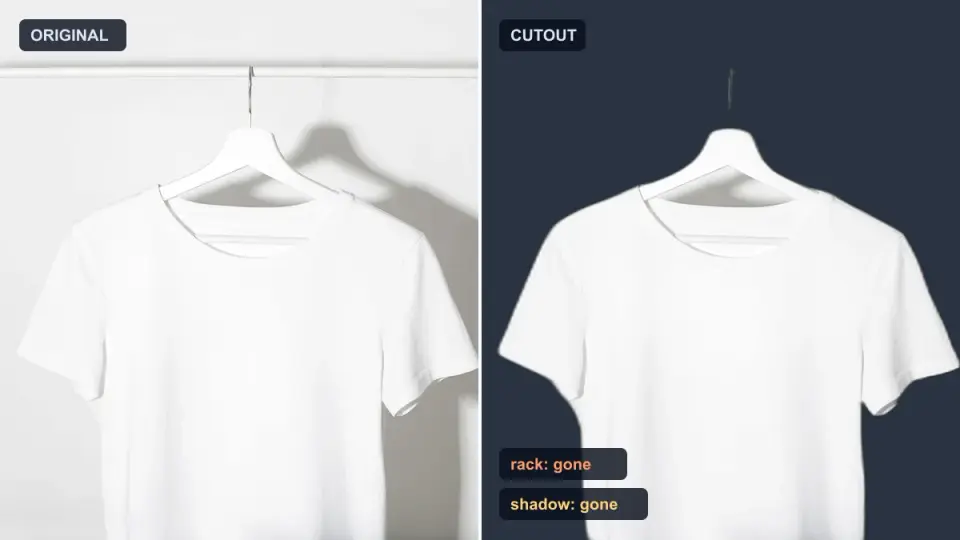
Last updated: October 7, 2026. Measurements use two models from the open-source rembg 2.0.76 on four photos: u2net, the classic default, and isnet-general-use, the model Imagic AI's Background Remover runs. They show a mechanism, not a benchmark.
You ran a photo through a background remover. The background is gone, but so is the model's forearm, a pair of beige trousers, the white clothing rack, the glass bottle's highlight, or the product's shadow. The tool didn't just cut the background. It deleted pieces of the subject itself, and now the cutout has holes or missing parts.
There are three repairs, from fastest to most thorough: a one-click light-background retry for pale parts, a restore brush that paints the original pixels back, and a reshoot so it stops happening. You don't need to reshoot to fix most of these. This article covers both, with measurements from the same U²-Net model that Imagic AI's remover runs.
Quick answer: why is my background remover deleting parts of my subject?
The model predicts, for every pixel, how much of it belongs to the subject. When part of the subject looks like the background, that prediction flips. Beige trousers against a white wall, a white rack on a white wall and a bright reflection on glass next to a white table are all exported as transparent. Shadows are a separate case: salient-object models are built to cut out the object, so they drop its cast shadow even when the shadow is clearly darker than the backdrop.
I measured both effects on four real photos:
-
Pale clothing and limbs: with u2net, only 45% of a pair of beige trousers on a white wall survived the cutout (isnet-general-use kept them whole). A pale forearm entering from the frame edge survived at 0% on both models.
-
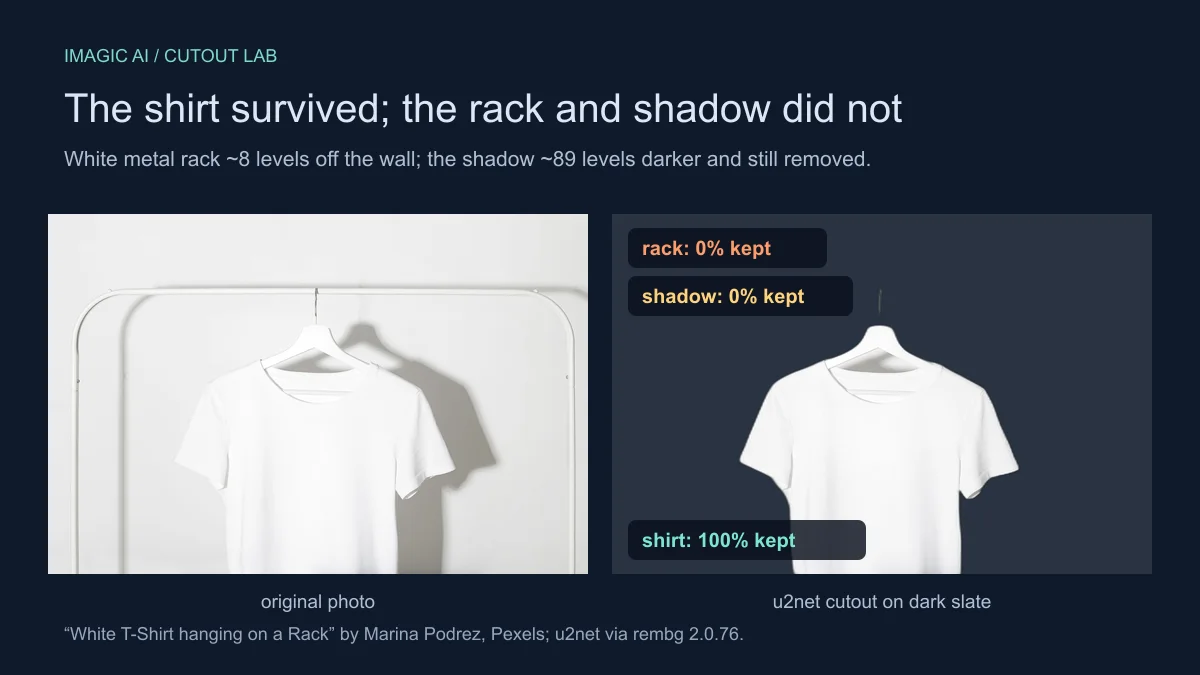
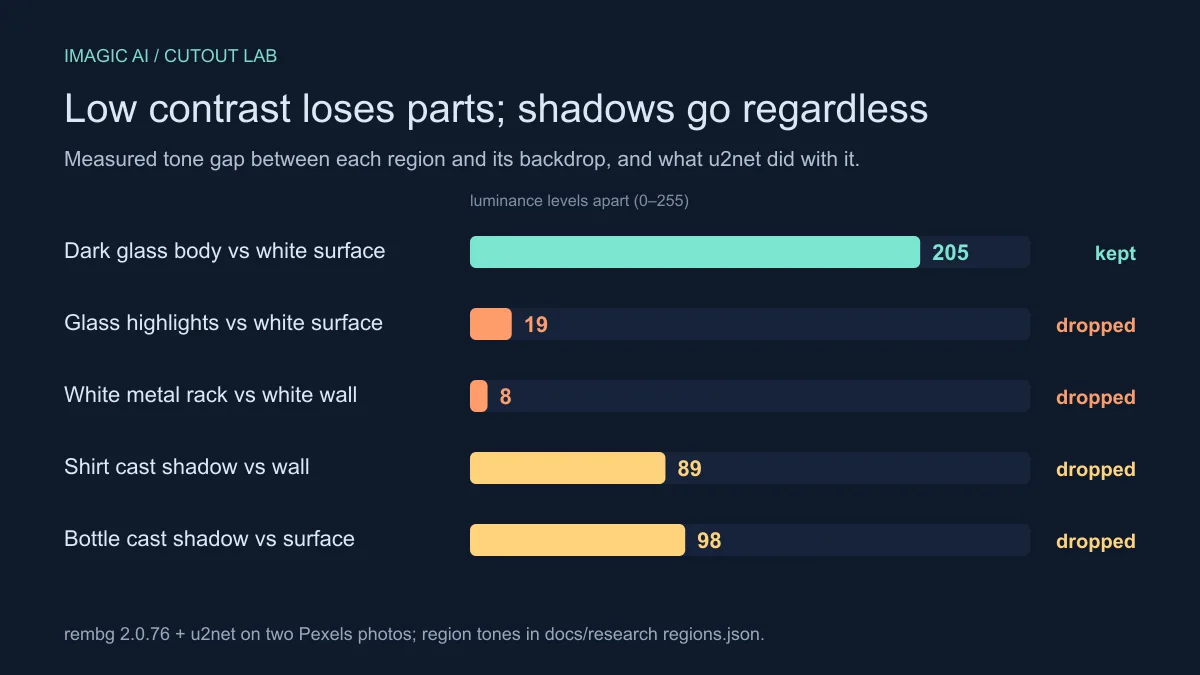
White rack on a white wall: its highlight sat about 8 luminance levels (out of 255) from the wall beside it, and none of it survived the cutout. The white shirt on the same rack came through 100% intact, with zero holes.
-
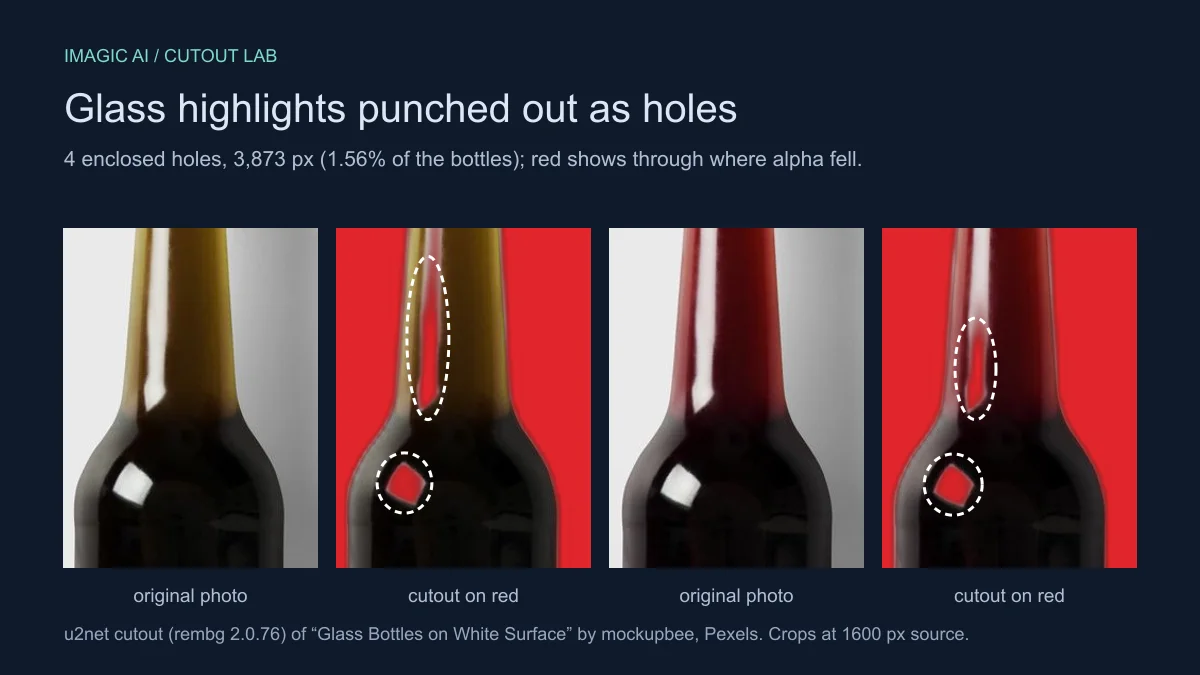
Dark glass bottles: the model punched four enclosed holes, 3,873 px in total (1.56% of the bottles), exactly where the highlights sat about 19 levels from the white surface.
-
Shadows: both photos lost their cast shadows completely, even though those shadows sat 89 and 98 levels darker than the backdrop.
| What you see in the cutout | What it actually is | Fast fix |
|---|---|---|
| Pale limb or clothing missing (beige trousers, forearm, white sleeve) | Pale subject close to a light backdrop in tone | Light-background retry, then restore brush |
| Hole inside the subject (glass, chrome, glossy highlights) | Bright subject pixels close to the backdrop's value, predicted as background | Restore brush, kept inside the hole |
| Whole part missing (white rack, hanger wire, strap) | Part too thin or too close to the backdrop in tone | Restore brush, or reshoot on a contrasting backdrop |
| Shadow gone | The model cuts the object, not its shadow | Add the shadow back in your design tool |
| Pale fringe around the subject | Opposite error: background pixels kept at the edge | Erase brush. See our hair edges guide |
Start with the light-background retry in the Background Remover when pale parts are missing. It is one click, and on the model the tool runs it brought a lost forearm back from 0% to 100%. Use the restore brush for the few holes that remain. Reshoot only when large parts are still missing, because a hand-restored texture looks worse than a better source photo.
Why does a background remover drop white parts, glass highlights and shadows?
A cutout is not a line. It is a number for every pixel. U²-Net is the classic salient-object model in the open-source rembg library, and Imagic AI's remover runs IS-Net, a newer model from the same research group. Both output an alpha value from 0 (transparent) to 255 (opaque) for every pixel. For a coffee mug on a red wall the choice is easy. For the pixels this article is about it is genuinely ambiguous, and the measurements show three different reasons.
Low tone contrast leaves the model guessing. Compositing math says an edge pixel's color is C = α·subject + (1−α)·background. When subject and background differ by only 8 levels, as the white rack and wall did, every possible alpha produces almost the same color. The model has almost nothing to separate them with, so it guesses, and in this photo it guessed "background" for the whole rack. The dark glass body sat 205 levels from its surface, and the model kept all of it.
Bright highlights inside dark glass blend into a white set. I ran rembg 2.0.76 with u2net on a photo of two dark glass bottles on a white surface. The cutout had four enclosed holes. The pixels inside them averaged luminance 215 against a surface of 234, while the glass around them averaged between 29 and 100. Measured by tone, the highlights belong with the white set rather than the bottle. isnet-general-use, the model our Background Remover runs, punched four holes in the same places, larger at 7,939 px. Any bright reflection on dark glass, chrome or glossy plastic shot on white is at risk of the same punch-out.
Shadows are not "the object", so they go. Salient-object models like U²-Net and IS-Net are trained to segment the main object, and a cast shadow is not part of it. On the shirt photo the shadow was 89 levels darker than the wall, and on the bottle photo it was 98 levels darker than the surface. Both shadows were removed completely. In e-commerce cutouts, a lost shadow is the most common missing "part", and it is also the one sellers notice last.
White fringe, holes and lost shadows: what is the difference?
All three are alpha errors, but they need opposite fixes, so diagnose before you touch a brush. A hole is a transparent region fully enclosed by the subject, like the background showing through a bottle's shoulder. A missing part is subject geometry that vanished from the silhouette: the white metal rack around the shirt in my test photo is simply gone. A fringe is the reverse error, background color kept along the boundary, which is the halo problem our hair edges guide covers in depth.
The distinction matters because restoring a fringe makes the cutout worse, since you are painting background back in. Erasing a hole's rim can also eat real subject. Check the cutout on a dark or saturated background, not a light checkerboard, decide which of the three you have, then pick the matching brush mode.
How do you fix a cutout that is missing pieces of the subject?
Work in this order, cheapest fix first:
-
Light-background retry, one click. When pale parts are missing, click "Missing pale parts? Retry for light backgrounds" under the result in the Background Remover. It runs the same model on a copy of your photo with the light tones stretched apart, then applies that mask to your untouched original, so colors don't change. Measured on isnet-general-use, the model the tool runs: the forearm 0% → 100% kept, the bottle shadow 0% → 72%, and the glass holes 4 → 1 (7,939 → 1,119 px). It did not bring back the white rack.
Two trade-offs: it tends to keep soft shadows (good for most product shots, removable with the erase brush), and it is not for dark backgrounds, because it crushes dark tones. One click on "Back to standard cutout" undoes it.
-
Restore brush, one pass. In the Background Remover, click Touch up, switch the brush to Restore, zoom in, and paint over each hole. Restore copies the original photo's pixels back at full opacity. Keep the brush inside the hole, because any background under the brush comes back too. Undo covers your last 15 strokes. This is the one-minute fix for a handful of holes and for thin parts like a hanger wire.
-
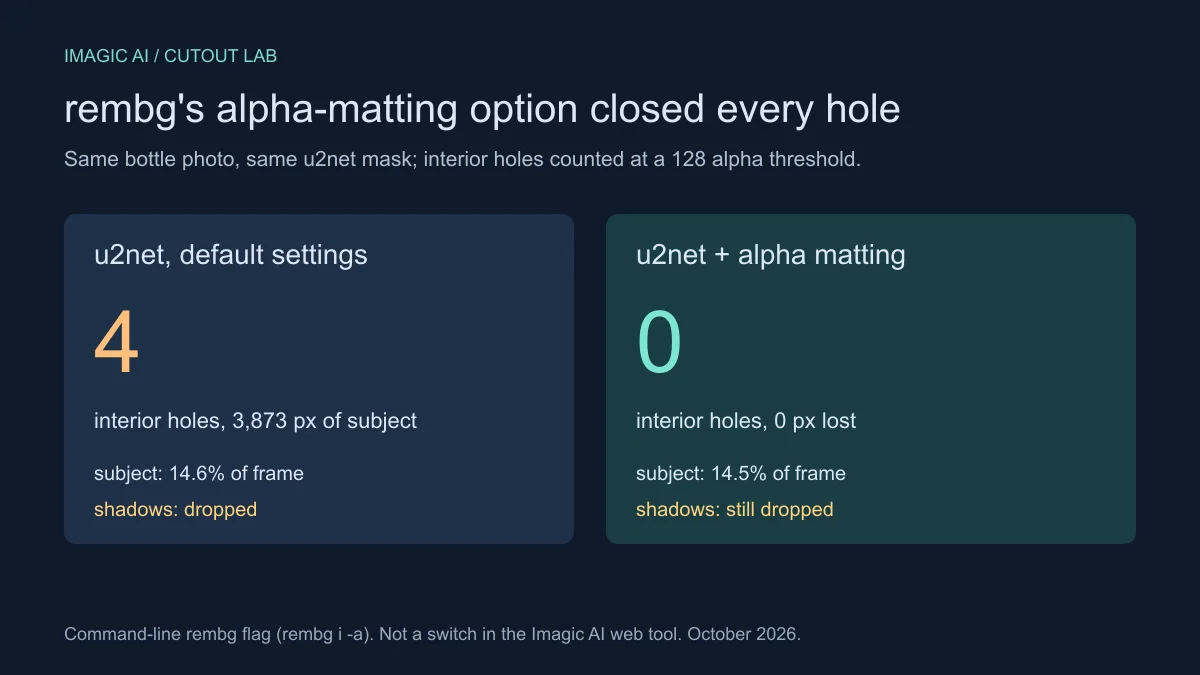
If you run rembg yourself, try alpha matting. The open-source rembg command line has an alpha-matting option (
rembg i -a input.jpg output.png) that re-estimates soft alpha from the original image. On the bottle photo, interior holes went from 4 (3,873 px) to 0, and the subject area barely moved, from 14.6% of the frame to 14.5%. It did not bring back the white rack or either shadow. The Imagic AI web tool does not expose this switch; its light-background retry is the in-browser alternative. -
Decontaminate fringes in a desktop editor. For the pale-ring error, Photoshop's Select and Mask workspace has a Decontaminate Colors option that replaces edge fringe with nearby subject color. It fixes fringes only and will not bring back a hole.
-
Reshoot when the subject itself is ambiguous. As a rule of thumb, once roughly a tenth of the product is missing, restoring it means repainting the product from memory. A backdrop in a contrasting tone costs one sheet of colored paper and removes the ambiguity at the source.
How do you stop the remover eating parts of the next shoot?
-
Shoot white or pale products on a mid-gray or colored backdrop. The rack that vanished sat 8 levels from its wall, while the glass body that survived sat 205 away. As a working rule, aim for a gap of 50 levels or more.
-
Light the backdrop separately from the subject, so "white product" and "white wall" stop sharing a value.
-
Plan the shadow rather than hoping it survives. Expect the cutout to remove it, then add a soft shadow back in your layout or design tool.
-
For glass and chrome, use a polarizer or diffusion to tame specular highlights, or budget a restore pass for them.
-
Keep thin parts like straps, wires and hanger hooks overlapping the main subject, or plan to restore them by hand.
-
Review cutouts on a dark background, where holes in light subjects are impossible to miss. The batch tool (sign-in required) returns a whole set in one ZIP, so check every file before it goes to your store.
What if the remover deleted a hand, arm or person?
People photos fail in the same places as products, just on different parts. Three patterns cover most complaints:
-
Pale skin or clothing on a light wall. With u2net the beige trousers kept 45%, while the blue shirt above them kept everything; isnet-general-use kept both. It is the white-rack problem again, with low tone contrast and the model guessing "background".
-
Limbs cut off by the frame edge. A forearm entering from the side of the frame has no visible connection to the rest of the person, so the model treats it as clutter. In my test it kept 0% of it.
-
More than one candidate subject. Salient-object models look for the single most prominent object. A second person, a held item or a pet can be dropped. Sometimes the model even keeps the background and loses the person.
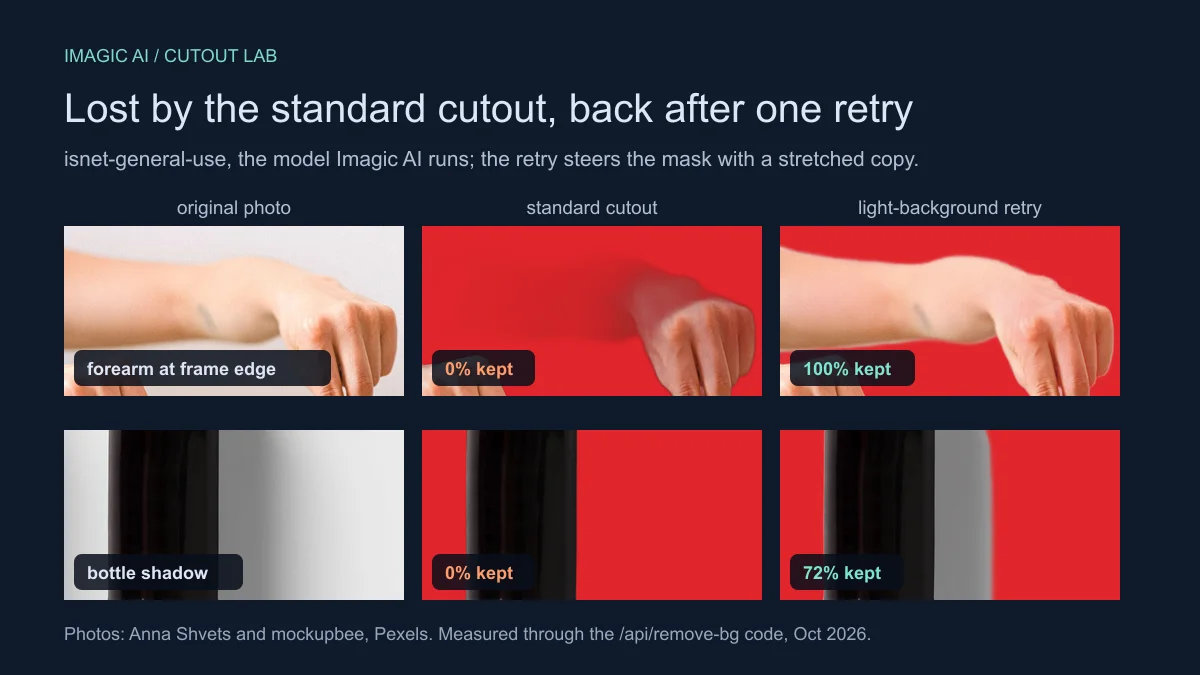
For the first two patterns, run the light-background retry, then restore whatever is left by hand. For the third, crop the photo around the person or object you want before removing the background, so there is less for the model to choose between. If you are holding a product for a listing photo, keep your hand fully inside the frame, not entering from the edge.
The same trick works in other editors. Duplicate the photo, push the copy's highlights apart with Levels (input black point around 150), run the background removal on the copy, and move the resulting mask onto the original layer. That is exactly what the one-click retry does for you.
When is a hole not a defect?
Some transparency is correct. A wine glass should show background through the bowl in places, lace and mesh have real holes, and the gap inside a handle loop or between chair legs should stay see-through. If the "hole" matches a physical opening in the product, the model did the right thing, and restoring it will look pasted on. Restore only pixels that were physically part of the product in the original photo. That is why you compare against the source image before any brush work.
Which fix should you pick? A 10-second decision table
| Situation | Pick | Why |
|---|---|---|
| Pale clothing, skin or a limb missing on a light background | Light-background retry in the Background Remover | Measured 0% → 100% on a frame-edge forearm |
| A few holes, subject otherwise clean | Restore brush in the Background Remover | Fastest path, original pixels come back |
| Many holes on glass or chrome, and you run rembg locally | rembg i -a (alpha matting), then restore the rest |
Measured 4 → 0 holes on the bottle photo |
| Pale halo around the subject | Erase brush, or Decontaminate Colors in Photoshop | Fringe is kept background, not lost subject |
| Shadow must appear in the final image | Light-background retry, or add a shadow in your design tool | The retry kept 72% of the bottle shadow; the default pass keeps none |
| Large part of the product missing | Reshoot on a contrasting backdrop | Restoration turns into invention |
Frequently asked questions
Why does the background remover erase parts of my white product?
When a white product sits on a white backdrop, the two can differ by only a few luminance levels. In my test a white rack sat 8 levels from its wall, and the model dropped all of it. The shirt itself survived because it was brighter and shaded differently from the wall behind it.
Why did the background remover delete my hand or arm?
Usually for one of two reasons. Pale skin against a light wall is low contrast, or the arm enters from the edge of the frame and looks disconnected from the person. In my test a forearm at the frame edge was 0% kept by default and 100% kept after the light-background retry.
How do I put the missing piece back?
For pale parts, click "Missing pale parts? Retry for light backgrounds" first. For anything left, click Touch up, switch the brush to Restore, and paint over the hole. The brush copies the original photo's pixels back at full opacity, so keep it inside the hole.
Why did the tool delete my product's shadow?
Salient-object models like U²-Net segment the object, not its shadow. In my two test photos the shadows were 89 and 98 levels darker than the backdrop and were still removed completely. The light-background retry kept 72% of the bottle shadow, or you can add a shadow in your design tool.
Does this happen more with glass and reflective products?
Yes. Highlights on dark glass can be closer in tone to a white set than to the glass around them. I measured four such holes, 1.56% of the bottles' area, on one bottle photo.
Will a higher-resolution photo stop it?
Usually not. Both models predict their mask on a fixed-size copy of your image, 320 × 320 for u2net and 1024 × 1024 for isnet-general-use, then scale the mask back up. Extra pixels barely change the prediction. Better contrast between subject and backdrop does.
What is alpha matting and does it fix holes?
It is a refinement step that re-estimates soft alpha from the original image instead of trusting the coarse mask. On my bottle photo, rembg's alpha-matting option closed all four holes with almost no change in subject area. It is a command-line option, not a setting in the Imagic AI web tool.
I use Canva or Adobe Express. Does this apply to me?
Yes. The causes are the same, and both tools have a restore brush. In Canva, select BG remover again and choose the Restore brush (Canva Help). In Adobe Express, open Edit Cutout and use Restore. If pale parts are missing, the Levels trick above works in any editor with layer masks.
Does batch processing make holes more likely?
No. Every image runs through the same model. But unreviewed batches are where holes ship, so check each set on a dark background before you upload it.
Is my photo stored when I fix the cutout?
Background removal runs on our server, and the image is processed and discarded rather than stored, as described in our tools overview. The touch-up brush itself runs in your browser.
Summary
A background remover that deletes part of the subject is not broken. It is showing you where your photo forced it to guess. Pale clothing and limbs, white parts on white backdrops, and bright highlights on dark products are the low-contrast zones. Limbs at the frame edge look like clutter, and cast shadows are removed by design.
The fix is a light-background retry for pale parts, a restore-brush pass for small defects, rembg's alpha-matting option for hole-heavy glass if you run it locally, a shadow added in design, and a contrasting backdrop for the next shoot. Start with the Background Remover for single images and the batch tool for catalogs. To go deeper, read how the segmentation model works or the background removal best practices.
Image credits
Test photos: Marina Podrez (White T-Shirt hanging on a Rack), mockupbee (Glass Bottles on White Surface), Polina Tankilevitch (man texting against a white wall) and Anna Shvets (French bulldog puppy with ears lifted by hands), all from Pexels under the Pexels license. Cutouts and charts were produced for this article with rembg 2.0.76, using u2net and isnet-general-use as labelled on each figure. Every number above can be reproduced from the measurement scripts and is drawn directly from those runs.
Use the free tools while you follow the guide.
Keep reading
2026-10-07
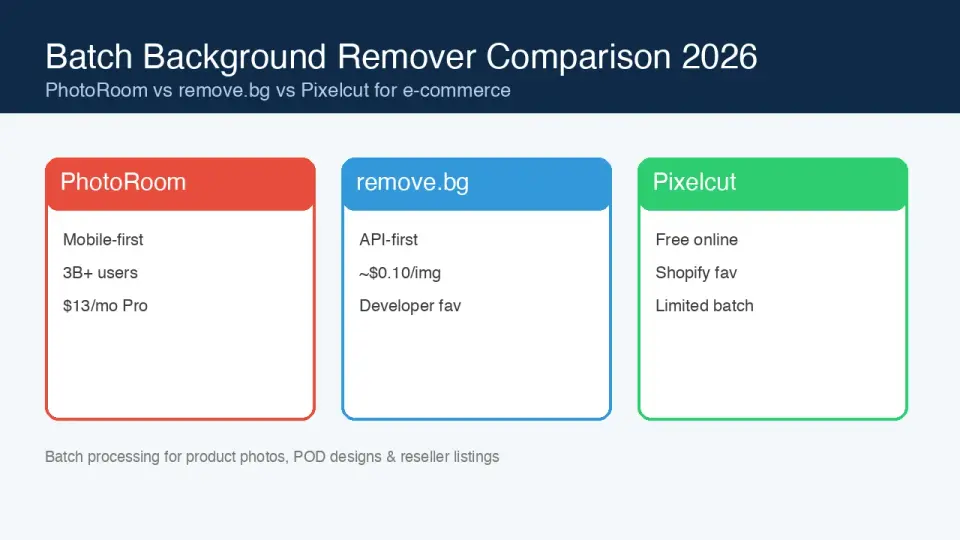
Batch Background Remover Comparison 2026: E-commerce
PhotoRoom, remove.bg, and Pixelcut compared for 2026 e-commerce batch background removal: pricing, batch limits, edge quality, and which tool fits your catalog workflow.
2026-10-07
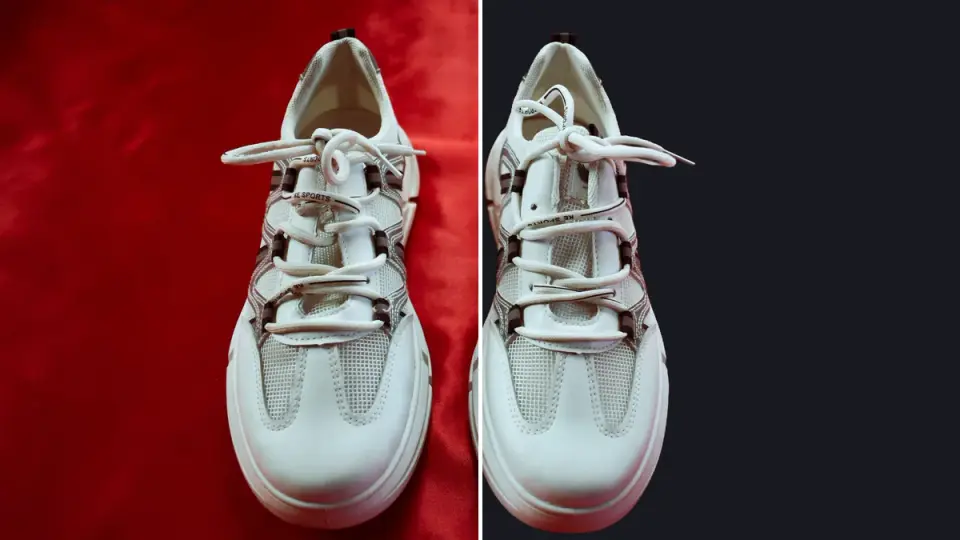
remove.bg Is Shutting Down on December 1: What to Use Instead
remove.bg closes on 1 December 2026 and unused credits expire that day. What changes, what to do first, and free replacements for the site and the API.
2026-08-02
Batch Background Removal: Process Hundreds of Images at Once
Batch background removal by tool and cost: rembg CLI for free local bulk processing, remove.bg and Photoroom APIs for catalogs, and which fits a product photo workflow.