2026-03-21
How to Upscale Images Without Losing Quality (Real Limits Explained)
How to upscale images larger without blur: what upscaling can and cannot recover, the Lanczos and AI methods, and the right target resolution per use case.

Last updated: June 27, 2026
Upscaling makes an image larger, but it cannot invent detail that was never captured. The realistic goal is to enlarge without introducing blur or blockiness — to fill in the new pixels plausibly so the image looks smooth at a bigger size. This guide covers what upscaling can and cannot do, the Lanczos and AI methods, and how to pick a target resolution that matches your use case.
Quick answer: how do you upscale an image?
Pick the method by how much detail the source has and how large you need to go:
| Source / goal | Method | Result |
|---|---|---|
| Enlarge up to ~2x, keep it clean | Lanczos resize | Smooth, no new detail |
| Enlarge 2–4x, recover sharpness | AI upscaler (Real-ESRGAN) | Sharper edges, plausible texture |
| Enlarge beyond 4x | Expect diminishing returns | Looks soft regardless of method |
| Print at large size | Start from a high-res master | Upscaling is not a substitute for resolution |
For one image, use the Image Upscaler; for batches, the realesrgan-ncnn-vulkan CLI or a Python model pipeline.
What can upscaling actually recover?
This is the key expectation to set. Upscaling has hard limits:
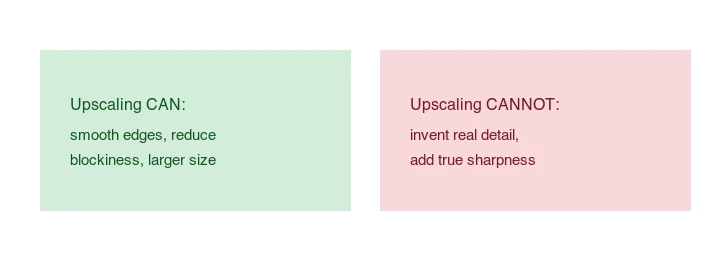
- It can: smooth jagged edges, reduce pixelation, produce a larger file that prints or displays bigger without obvious blocking.
- It cannot: invent detail that was not in the original (a face's eyelashes from a 50px face), add true sharpness to a blurry source, or replace a low-resolution capture with a high-resolution one.
A 300px photo upscaled to 1200px looks smoother than the 300px original displayed at 1200px, but it does not look as sharp as a photo captured at 1200px. The comparison above shows exactly this: Lanczos upscaling removes the blockiness, but the native 1200px capture still has more real detail. Start from the highest-resolution source you have whenever possible.
What resolution do you actually need?
Upscaling to "as big as possible" is usually wrong. Match the resolution to the use case:

| Use case | Target pixels | Why |
|---|---|---|
| Web thumbnail | ~400px | Small display, tiny file |
| Web content image | 800–1200px | Article inline, sharp on mobile |
| Web hero | 1600–1920px | Full-width, retina |
| Small print (4×6") | ~1500px | 300 PPI at print size |
| Large print / crop headroom | 3000px+ | Poster, room to crop |
For web images, 1600–1920px is almost always enough; upscaling beyond that just bloats the file. For print, calculate from the physical size at 300 PPI (a 10-inch print needs ~3000px on the long edge).
Method 1: Lanczos resize (simple enlargement)
For a modest enlargement (up to ~2x) where the source is decent, a high-quality resize filter smooths the result without needing AI. ImageMagick's Lanczos is the standard choice. The Wikipedia article on Lanczos resampling explains why its windowed-sinc kernel reduces aliasing better than bilinear or bicubic interpolation.
## Enlarge 2x with Lanczos (good for moderate upscaling)
magick input.jpg -filter Lanczos -resize 200% output.jpg

## Or to a specific width
magick input.jpg -filter Lanczos -resize 1920x output.jpg
Lanczos preserves edges better than bilinear/bicubic but does not add detail. It is fast, free, and the right call when you just need a bigger, smoother version.
Method 2: AI upscaling (Real-ESRGAN)
For 2–4x enlargement where you want recovered sharpness, AI upscalers (Real-ESRGAN, SwinIR) do better than classic filters. They are trained to predict plausible high-frequency detail, so edges and textures look sharper than a Lanczos resize.
## Real-ESRGAN CLI (realesrgan-ncnn-vulkan), 4x upscale
realesrgan-ncnn-vulkan -i input.jpg -o output.jpg -n realesrgan-x4plus
## Python via the real-esrgan package
from PIL import Image
from realesrgan import RealESRGANer
## (setup model, then upscale)
AI upscaling is slower and can over-sharpen (adding "plastic" texture on skin or fabric), so check the result at 100% rather than trusting it blindly. The Real-ESRGAN paper and project page document the model and its trade-offs. For the model background, see the Real-ESRGAN guide.
How does upscaling interact with compression?
Upscaling multiplies the pixel count, which also multiplies the file size — a 4x upscale of a 12 KB image produces roughly a 70 KB+ file even before re-compression. That larger file then needs normal web compression (resize to display size, encode WebP/AVIF) so you do not ship bloated bytes. The order that matters: upscale to the resolution you will actually display, then compress — do not upscale to a huge size, then downscale again on the client, which wastes bandwidth both ways. This ties into the broader guidance in the image compression deep dive and the resize-first rule in the batch resize guide: every image, upscaled or not, should be exported at its display dimensions.
Should you upscale or re-capture?
Almost always, re-capturing or finding a higher-resolution source beats upscaling. Upscaling is a rescue operation for when you cannot get a better original — an old photo, a downloaded image, a client file that arrived small. If you control the capture, shoot at the resolution you need. The convert RAW to JPG guide covers starting from a high-resolution master.
Common mistakes
- Upscaling beyond 4x. Returns diminish fast; the result looks soft no matter the method.
- Expecting invented detail. Upscaling smooths and sharpens; it does not add real detail that was never captured.
- Upscaling for web past 1920px. It bloats the file with no visible benefit on screen.
- Using a blurry source. Upscaling a blurry image gives a bigger blurry image. Fix focus at capture.
- Over-sharpened AI output. Real-ESRGAN can look "plastic" on skin; reduce the scale or pick a face-specific model for portraits.
Final upscale checklist
- Remove heavy noise before enlarging the image.
- Upscale only to the size you actually need.
- Compare faces, text, and edges at 100%.
- Compress after upscaling, not before.
- Keep the original file for a second pass.
Frequently asked questions
Can you enlarge an image without losing quality?
You can enlarge without introducing new artifacts (blur, blocking) using Lanczos or AI, but you cannot add true detail that was not captured. The result is smoother, not higher-resolution in the sensor sense.
What is the best image upscaler?
For sharpness, AI models like Real-ESRGAN and SwinIR. For a simple, fast enlargement, Lanczos. The Image Upscaler covers the common cases.
Does upscaling work for printing?
Yes, but match the resolution to the print size at 300 PPI. Upscaling helps a low-res file print larger without blocking, but a high-res capture always wins.
How much can I upscale?
Up to ~2x with Lanczos, 2–4x with AI. Beyond 4x the result is visibly soft regardless of method.
How do you upscale an image without losing quality?
Use an AI upscaler (Real-ESRGAN) at 2x for photographs — it synthesizes plausible detail that traditional resizing cannot. For graphics, text, and line art, use Lanczos resize, which is more accurate on sharp edges. Match the method to the content. See the upscaler guide.
What can upscaling actually recover?
Apparent detail, not true detail. An AI upscaler invents texture (skin pores, fabric) that looks real but was not in the source. It cannot recover information that was never captured — a tiny, low-resolution photo upscaled stays a guess. Real resolution comes from capturing more pixels at the source.
What resolution do I actually need?
Usually 2x the source is enough for web and screen; higher ratios invent more detail and risk artifacts. Match the upscale factor to the display size. There is no point upscaling to 8K for a photo shown at 1080p. Start at 2x and only go higher if the display genuinely requires it.
What is interpolation versus AI upscaling?
Interpolation (bicubic, Lanczos) estimates new pixels by averaging neighbors, which softens. AI upscaling learned from low/high-resolution pairs, so it synthesizes plausible texture rather than just smoothing. Interpolation is accurate for graphics and line art; AI wins on photographs. Match the method to the content.
What is the best upscaler for photos?
An AI upscaler like Real-ESRGAN at 2x for photographs; Lanczos resize for graphics and text where sharp edges must be preserved. Hosted AI upscalers (our image upscaler, Topaz) are convenient; open models run free locally if you have the GPU. Match the tool to the content and your hardware.
Can I upscale a compressed JPEG?
Yes, but the compression artifacts (blocking, banding) get upscaled along with the real detail, so the result shows the JPEG damage at a larger size. Start from the highest-quality source you have; upscaling cannot undo prior compression, it only magnifies it. A clean source upscales to a clean larger image.
Image credits
- Upscale before/after, resolution-by-use-case, and upscaling-limits diagrams — generated by the author from an ecommerce-style photograph (Pexels #16675632, photo by Mikael Blomkvist) to show real Lanczos upscaling results and the limits of enlargement.
Use the free tools while you follow the guide.
Keep reading
2026-07-18
AI Face Restoration: GFPGAN vs CodeFormer Compared
GFPGAN and CodeFormer both repair damaged faces, but they trade accuracy for polish differently. Which one to use, how they actually work, and where both can quietly invent a face that isn't the real person.
2026-06-28
AI Face Enhancer: Natural Portrait Retouching Guide
Use an AI face enhancer without plastic skin: choose the right portrait, protect identity, check artifacts, and export sharp web-ready headshots.
2026-06-28
How to Enhance Photos With AI in 2026: Real Results
I enhanced 60 photos with AI to fix noise, blur, and low resolution. Here is the 2026 workflow, the tools that actually worked, and where AI falls short.