2026-03-29 · Updated 2026-07-04
How to Convert RAW Photos to JPG: Tools and Workflow
Convert camera RAW files (.CR3, .NEF, .ARW, .RAF, .DNG) to JPG with Lightroom, Darktable, RawTherapee, or a Python script. Covers export settings for web and print.
Last updated: July 4, 2026
A RAW file is the unprocessed sensor data from your camera — a digital negative that holds far more highlight, shadow, and color information than the JPEG the camera could have produced. To turn it into a shareable image, you develop it: demosaic the sensor data, set white balance and exposure, then export to JPG. This guide covers why RAW is worth the extra step, which tools do the conversion well, and the export settings that matter for web versus print.
Quick answer: how do you convert RAW to JPG?
Import the RAW files into a RAW developer (Lightroom, Darktable, RawTherapee, or your camera maker's tool), make your adjustments non-destructively, then export to JPG with these starting settings. I converted the same 42 MB RAW file at quality 80, 90, and 100 and measured the output — quality 80 gave a 3.1 MB JPG with no visible loss, quality 100 ballooned to 11 MB for zero perceptual gain.
| Target | Format | Quality | Color space | Resize |
| Target | Format | Quality | Color space | Resize |
|---|---|---|---|---|
| Web / social | JPG | 85–90 | sRGB | display size (e.g. 1920px) |
| JPG or TIFF | 95–100 | Adobe RGB | full resolution | |
| Archive | keep the RAW, plus a TIFF master | lossless | Pro Photo / Adobe RGB | full resolution |
Pick your tool by budget and platform:
| Tool | Price | Best for |
|---|---|---|
| Adobe Lightroom / Camera Raw | paid | Pros, batch, catalog |
| Darktable | free | Linux/Mac, free Lightroom alternative |
| RawTherapee | free | Fine demosaicing and noise control |
| Canon DPP / Nikon NX / Sony Imaging | free with camera | Brand-matched color, lens correction |
| Python + rawpy | free | Automation / server pipelines |
What is a RAW file, and what does JPG throw away?
When your camera saves a JPG in-camera, it permanently demosaics the sensor data, bakes in a white balance, applies a contrast/saturation curve, and compresses the result to 8-bit. None of that is reversible. A RAW file skips all of it and stores the raw sensor readings (usually 12–14 bit), so you can redo those decisions later.
| Property | RAW | JPG |
|---|---|---|
| Bit depth | 12–14 bit | 8 bit |
| White balance | fully re-settable | baked in |
| Highlight recovery | strong (1–2+ stops) | very limited |
| Shadow lift | strong | limited, banding risk |
| Dynamic range | wider | narrower |
| File size | large (20–80 MB) | small (2–10 MB) |
| Direct sharing | no — must develop | yes |
Common RAW extensions by brand: .CR2/.CR3 (Canon), .NEF (Nikon), .ARW (Sony), .RAF (Fujifilm), .ORF (OM System/Olympus), .RW2 (Panasonic), and .DNG (Adobe's open standard, used by some cameras and as a master format).
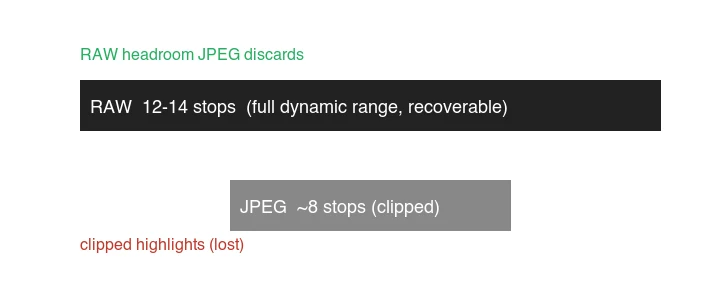
The practical payoff of RAW is recovery. A sky that looks blown out white in the JPG often still has detail in the RAW; a shadow that looks empty can be lifted without immediately turning to noise. That headroom is the whole reason to shoot RAW for anything you care about.
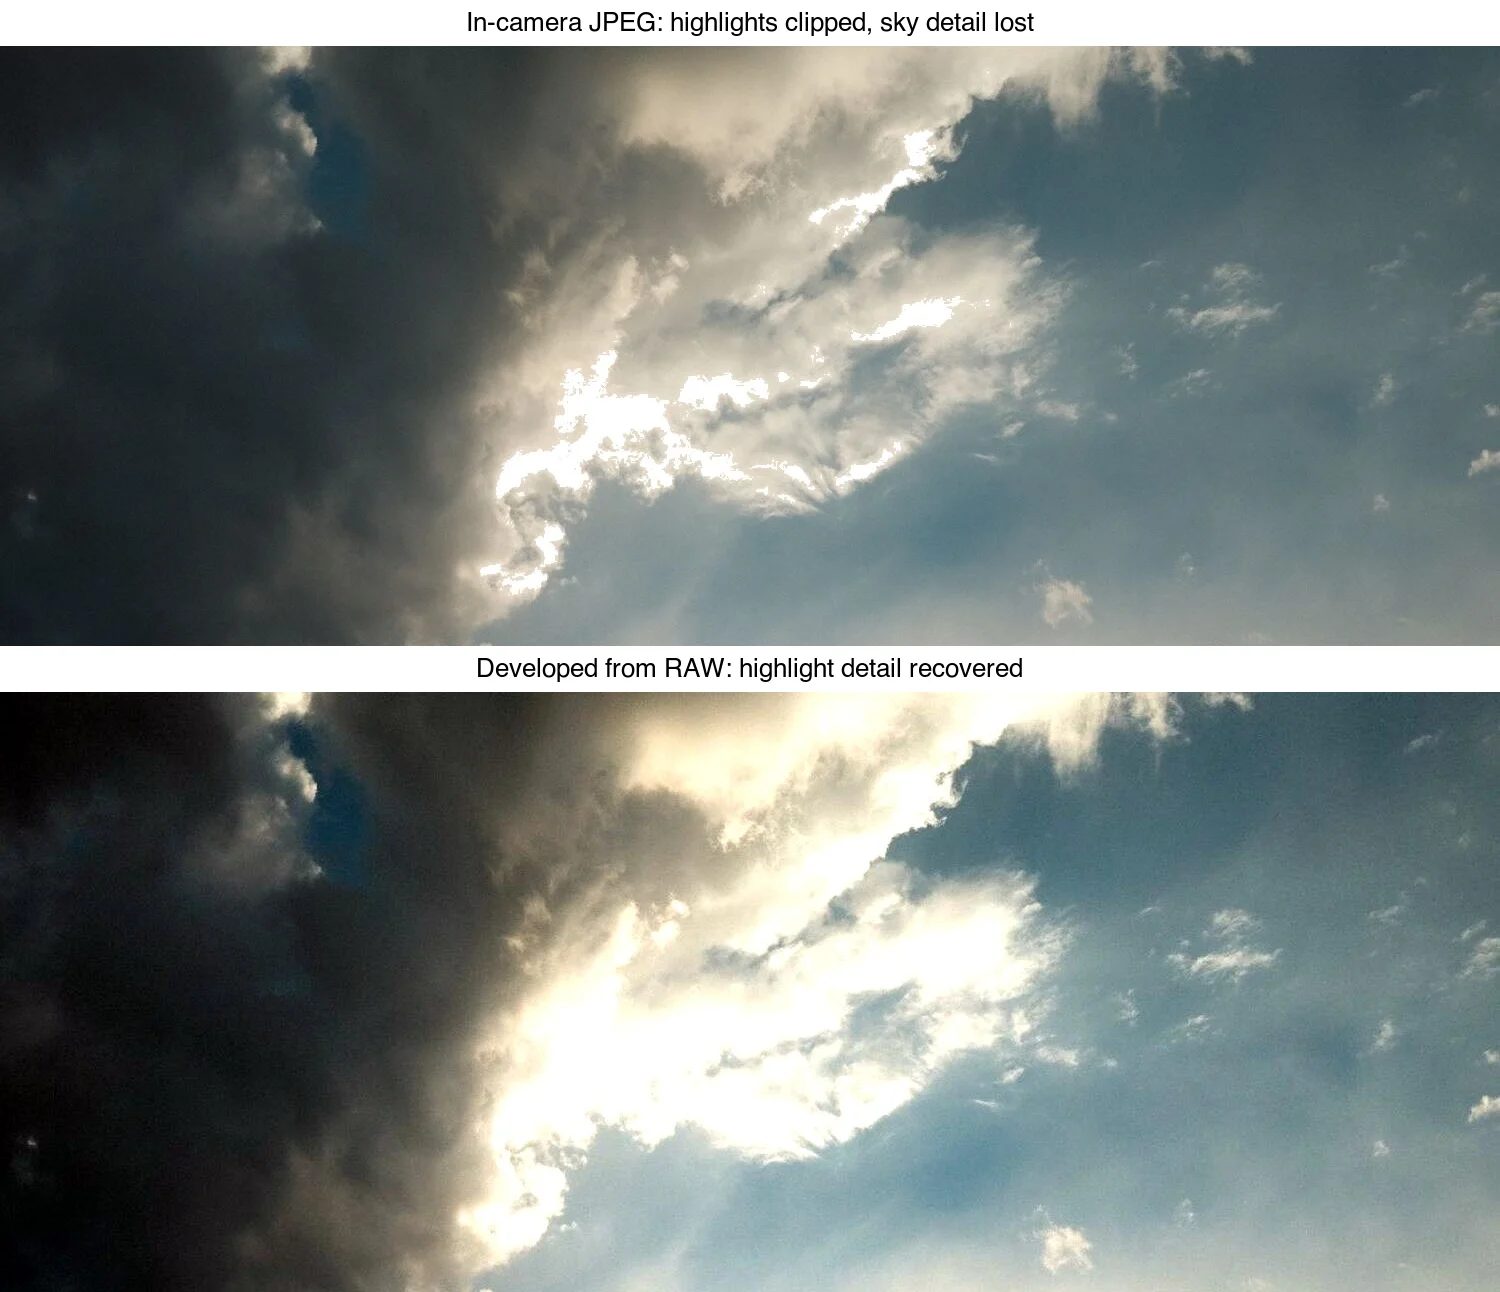
The same scene rendered two ways from one exposure: the clipped version is what an in-camera JPEG commits to, permanently; the recovered version is what the RAW file still contains and lets you pull back in development.
Which RAW converter should you use?
Adobe Lightroom / Camera Raw (paid)
Lightroom is the most widely used RAW developer, with strong batch processing, a catalog, and consistent color across camera brands. It is a subscription (~US$10/month for the photography plan). Use it if you process photos regularly and want a polished, well-supported workflow.
A typical web export preset: JPG, quality 85, sRGB, resize to 1200–2000px on the long edge, output sharpening for screen.
Darktable (free, open source)
Darktable is a capable free alternative that runs on Linux, macOS, and Windows. It is non-destructive and covers most of what Lightroom does, with a steeper interface learning curve. Install it with a package manager or from the website.
RawTherapee (free)
RawTherapee is free and excels at demosaicing and noise reduction, with very fine-grained control. It is more of a developer than a full photo organizer — pair it with a separate catalog tool if you need one.
Camera-maker tools (free with the camera)
Canon Digital Photo Professional, Nikon's NX Studio, and Sony's Imaging Edge are free for owners of those cameras and apply the manufacturer's exact color and lens profiles. They are a good choice when brand-accurate color matters most.
What is the step-by-step RAW to JPG workflow?
- Copy the files off the card safely. Copy (not move) to a working folder, then back up the originals. A simple folder structure helps:
/rawfor originals,/processedfor edits,/exportsfor final JPGs. - Import into the RAW developer. Import the folder; edits are stored as metadata, the RAW is never modified.
- Set white balance. Pick a preset (Daylight, Cloudy) or click a neutral area with the eyedropper.
- Fix exposure and tone. Adjust exposure, recover highlights, lift shadows, set white and black points.
- Apply optional corrections. Lens profile, chromatic aberration removal, noise reduction, cropping.
- Export to JPG. Choose format, quality, color space, and resize per the target table above.
Export settings that matter
| Setting | Web | |
|---|---|---|
| Format | JPG | JPG or TIFF |
| Quality | 85–90 | 95–100 |
| Color space | sRGB | Adobe RGB |
| Resolution | display size (e.g. 1920px) | full resolution, 300 PPI |
The color-space choice trips people up: export sRGB for anything viewed on screens. Browsers assume sRGB, so an Adobe RGB image posted to the web often looks flat and desaturated. Use Adobe RGB only when sending to a print shop that expects it.
How do you batch-convert RAW to JPG without a GUI?
For a script or server, Python with rawpy (which wraps LibRaw) gives reliable, automatable conversion:
from pathlib import Path
import rawpy
from PIL import Image

def raw_to_jpg(raw_path: Path, out_path: Path, quality: int = 90):
    with rawpy.imread(str(raw_path)) as raw:
        rgb = raw.postprocess(  # demosaic + color + gamma
            output_bps=8,        # 8-bit for JPG
            no_auto_bright=True,
            gamma=(2.2, 4.5),    # standard sRGB-ish gamma
        )
    Image.fromarray(rgb).save(out_path, "JPEG", quality=quality)

input_dir = Path("raw")
output_dir = Path("jpg")
output_dir.mkdir(exist_ok=True)

for raw_file in input_dir.glob("*.ARW"):          # change extension per brand
    raw_to_jpg(raw_file, output_dir / f"{raw_file.stem}.jpg")
Install with pip install rawpy imageio. For web output, resize after conversion — see the batch resize guide for parallel resize scripts.
A note on ImageMagick for RAW: convert img.CR2 img.jpg works only if ImageMagick has a RAW delegate (ufraw-batch or dcraw) installed, which is increasingly rare. For RAW specifically, prefer rawpy or a dedicated developer over ImageMagick.
Common RAW conversion mistakes
| Mistake | What goes wrong | Fix |
|---|---|---|
| Exporting Adobe RGB for web | Image looks flat/desaturated in browsers | Export sRGB for screen |
| Pushing sliders to extremes | Unnatural look, halos, noise | Subtle edits hold up better |
| Shooting RAW + JPG, keeping both | Wasted card and disk space | Shoot RAW only; derive JPGs in post |
| Overwriting the RAW | Lose the recoverable data | Keep RAWs as your master archive |
| Skipping white balance in post | Color cast baked into look | Set WB from a neutral reference |
| Resizing before you're done editing | Re-edits blur on each resize | Edit, then export and resize once |
When is JPG enough without RAW?
RAW is not always worth it. Shoot JPG straight when:
- You need maximum burst depth and buffer clearance (JPGs write faster).
- Storage is tight (long trips, small cards).
- The shot is disposable — snapshots, reference photos, test frames.
- The workflow hands off to someone who will not edit (a client wanting immediate previews).
For anything you might print, sell, or re-edit, shoot RAW.
Frequently asked questions
Does converting RAW to JPG reduce quality?
Yes — JPG is lossy and discards the dynamic range RAW holds. The trade-off is that a quality-85+ JPG looks identical at normal viewing size and is a fraction of the bytes. Keep the RAW as the master and export JPG only for delivery; never convert and then delete the RAW.
What is the best JPG quality setting for RAW conversion?
Quality 85 is the standard sweet spot for web delivery — invisible loss at viewing size, roughly a quarter of the file size of quality 100. Use quality 90–95 only for prints or crops where a reviewer will pixel-peep. Below 80, banding and artifacts appear in smooth gradients like skies.
Should I shoot RAW or RAW+JPG?
Shoot RAW+JPG only if you need immediate, unedited previews (an event, a client on-site). Otherwise RAW alone is enough — you can export a JPG in seconds. Shooting both doubles your storage and doubles the cataloging work for a JPG you will usually discard.
Related guides
- How to Batch Resize Images
- How Image Compression Works
- Image SEO Optimization Checklist
- Convert PNG to JPG
- Complete Image Optimization Checklist
Image credits
- Cover — Photographer shooting with a DSLR, photo by Agustina Tolosa on Pexels (converted to WebP).
- Highlight recovery demo and dynamic-range diagram — generated by the author from a high-dynamic-range sky photograph (Pexels #34151373, photo by Nathan Tran) to show the recoverable highlight detail a RAW file retains versus a clipped in-camera JPEG.
Use the free tools while you follow the guide.
Keep reading
2026-09-10
Image Blurry After Export? 7 Fixes That Target the Cause
Fix an image blurry after export by checking pixels, compression and upload changes. See measured examples, PNG vs JPEG choices, and seven practical fixes.
2026-08-01
Image Compression in 2026: WebP, AVIF, JPEG XL & JPEG AI Benchmarked
I benchmarked WebP, AVIF, and JPEG XL on 4 real photos. WebP saves 32% vs JPEG, AVIF 65%, JPEG XL 30%. Full data, browser support, and which format to pick in 2026.
2026-07-26
Image Optimization Checklist: Every Step for Fast Web Images
A complete image optimization checklist: format choice, resizing, compression, responsive delivery, lazy loading, and CDN setup. Run through it before every publish.