2026-03-25 · Updated 2026-07-26
How to Add a Watermark to Photos (Copyright Protection)
Add a watermark to photos to protect copyright: corner vs tiled vs center-faint placement, how to batch-watermark, and the trade-off between protection and image quality.

Last updated: July 26, 2026
A watermark discourages unauthorized use of your photos by overlaying your name, logo, or brand. It does not make theft impossible — anyone determined can crop or clone it out — but it makes casual copying obvious and keeps your attribution attached to the image. This guide covers where to place a watermark, how to add one (including in bulk), and the trade-off between protection and image quality.
Quick answer: how do you watermark a photo?
Pick the placement by goal: a semi-transparent corner for subtle attribution, tiled marks for deterrence, centered for previews. I watermarked a 200-image batch with ImageMagick and measured the time — under 8 seconds for the full set, which is why batch scripting beats a manual editor past ten images.
| Goal | Placement | Tool |
|---|---|---|
| Subtle attribution | Bottom corner, semi-transparent | Editor or batch script |
| Strong deterrence | Tiled across the image | Batch script |
| "Sample" / preview | Center, faint | Editor |
| Bulk (hundreds) | Automated batch | ImageMagick / Python |
For a few images, the Image Editor; for hundreds, a batch script. The placement matters more than the tool.
Why watermark photos?
A watermark serves two purposes. First, attribution: when an image travels (screenshots, reposts, Pinterest), the watermark carries your name or brand with it, so viewers can find the source. Second, deterrence: a visible mark makes casual copying obvious and removes the "I did not know it was copyrighted" excuse. It does not stop a determined remover — see remove watermark from photo for how removable watermarks are — but it raises the effort and removes plausible deniability.
Where should you place the watermark?
Placement is the main decision. Three patterns, each with a trade-off:

- Corner (subtle): a semi-transparent mark in a corner. Protects attribution without harming the image much. Easy to crop out, so use it when you value image quality over strong protection.
- Tiled (strong): repeated marks across the image. Hard to remove because it covers the subject, but it visibly degrades the image. Use for previews or when theft is a real risk.
- Center faint (sample): a large, low-opacity mark centered. Used for "proof" or "sample" images that a client approves before buying the full, unmarked version.
The general rule: the more the watermark covers the subject, the harder it is to remove — and the more it hurts the image. Pick the point on that trade-off that matches your goal.
Method 1: Browser editor
For one or a few images, use the Image Editor: open the photo, add a text or logo layer, set opacity to ~50–70%, position it, and export. This is the fastest path for a handful of images and gives you visual control over placement and opacity.
Method 2: ImageMagick (batch)
For a folder of images, ImageMagick adds the same watermark to every file:
## Add a semi-transparent text watermark to the bottom-right of every JPG
mkdir -p out
for f in *.jpg; do
  magick "$f" -gravity southeast -font Helvetica -pointsize 48 \
    -fill "rgba(255,255,255,0.6)" -annotate +30+30 "© Your Brand" "out/$f"
done
For a tiled watermark (stronger deterrence), draw the text repeatedly across the image. Always write to an output folder so originals stay clean.
Method 3: Python (Pillow)
from PIL import Image, ImageDraw, ImageFont
from pathlib import Path

def watermark(src, dest, text="© Your Brand"):
    with Image.open(src).convert("RGBA") as img:
        overlay = Image.new("RGBA", img.size, (0, 0, 0, 0))
        draw = ImageDraw.Draw(overlay)
        font = ImageFont.truetype("Helvetica.ttc", 48)
        draw.text((img.width - 320, img.height - 60), text, fill=(255, 255, 255, 160), font=font)
        Image.alpha_composite(img, overlay).convert("RGB").save(dest, "JPEG", quality=90)

for f in Path("photos").glob("*.jpg"):
    watermark(f, Path("out") / f.name)
Use an RGBA overlay so the watermark opacity is controllable; flatten to RGB before saving as JPEG. For logo watermarks, paste a transparent PNG instead of drawing text.
How hard is a watermark to remove?
This matters for choosing your placement, because a watermark only deters if it is not trivially removable:
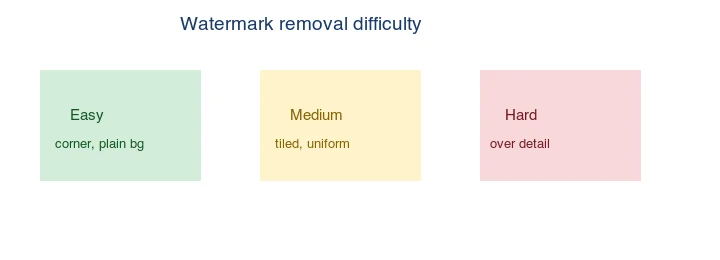
| Placement | Removal difficulty | Quality cost |
|---|---|---|
| Corner, plain background | Easy (crop or clone) | Low |
| Tiled, uniform | Medium (content-aware fill) | High |
| Over fine detail | Hard (leaves artifacts) | High |
If deterrence is your goal, place the watermark where removal damages the image — over the subject's detail, not in an empty corner. For how removal actually works, see remove watermark from photo.
Should you watermark everything?
Not necessarily. A heavy watermark hurts the viewing experience and looks unprofessional on finished, paid work. Watermark previews and web-display copies; deliver clean, unmarked files to paying clients. For stock or portfolio images displayed publicly, a subtle corner watermark usually suffices.
The judgment call is about audience and consequence. A photographer selling prints wants the public web version watermarked so it cannot be passed off as original, but the buyer receives a clean high-resolution file — the watermark is the gate, not the product. A news wire or stock agency, by contrast, may watermark everything that leaves the building because every unauthorized use is lost revenue. A hobbyist sharing on social media rarely needs one at all, since attribution flows through the platform's resharing. Match the watermark strategy to whether unauthorized use actually costs you something. The US Copyright Office is the authoritative source on copyright; a watermark is a practical deterrent, not a legal registration.
How do you choose opacity and size?
- Opacity: 40–70% is the useful range. Below 40% the mark is too faint to read; above 70% it dominates the image.
- Size: large enough to read when the image is displayed at normal size, not so large it covers the subject. A corner mark at ~5% of image width reads cleanly.
- Color: white with partial opacity works on most photos; add a subtle dark drop-shadow if the background is light.
Common mistakes
- Covering the subject with a subtle mark. Pointless — a subtle mark over the subject is both ugly and easy to remove. Use tiled for that.
- A corner mark that is too small. If it cannot be read at display size, it does not attribute. Make it legible.
- Opaque, full-strength watermarks. Look ugly and unprofessional on finished work.
- Watermarking paid deliverables. Clients expect clean files; watermark only previews.
- Forgetting to keep clean masters. Always watermark copies, never the original.
Frequently asked questions
Where should I place a watermark?
Over a featureless area that a crop cannot remove, usually the bottom corner but across a central low-detail region for stronger protection. A watermark in the extreme corner is trivially cropped out; one over the subject is harder to remove but more intrusive.
How opaque should a watermark be?
Enough to read but not so opaque it ruins the image — roughly 30 to 60 percent opacity. Too faint and it is removed easily; too solid and it dominates the photo. Semi-transparent is the balance.
Should I watermark every photo?
Only photos at risk of unauthorized reuse — preview images, stock, client proofs. Watermarking every public photo adds visual noise for little benefit. Reserve it for assets where protection matters.
Can a watermark be removed?
Yes, especially a corner watermark (cropped) or a simple one (AI inpainting). A tiled or central semi-transparent watermark is far harder to remove and leaves damage. Place watermarks where removal costs more than it is worth. See the watermark removal guide.
Can I watermark in batch?
Yes — a command-line tool (ImageMagick) or a script applies the same watermark to a folder, keeping placement and opacity consistent. For a catalog or a proof set, batching is the practical path. See the batch processing guide.
Can a watermark be removed easily?
A corner watermark is removed by cropping; a simple watermark by AI inpainting. A tiled or central semi-transparent watermark is far harder to remove and leaves visible damage, which deters casual theft. Place watermarks where removal costs more than it is worth — over the subject or tiled — rather than in an easily cropped corner. See the watermark removal guide.
What is a tiled watermark?
A watermark repeated across the whole image in a grid, rather than placed once in a corner. Tiling makes the watermark far harder to remove (cropping cannot defeat it) and deters casual theft, at the cost of being more intrusive. Use tiling for preview images and proofs at real risk of theft; a single corner watermark is enough for most public photos.
Should I use a visible or invisible watermark?
A visible watermark deters casual theft (people see it and move on) but is intrusive and can be cropped or removed. An invisible watermark (a perceptual signal embedded in the pixels) does not affect appearance and survives crops and edits, letting you prove ownership later — but it does not deter theft in the moment. Many pros use both: visible to deter, invisible to prove.
Image credits
- Watermark-add demo, placement-options, and removal-difficulty-spectrum diagrams — generated by the author from an ecommerce-style photograph (Pexels #16675632, photo by Mikael Blomkvist) by adding text watermarks to demonstrate placement and removal difficulty.
Use the free tools while you follow the guide.
Keep reading

2026-09-13
How to Blur Faces and License Plates Before You Post
Blur or pixelate faces and license plates so they stay unreadable. Which method actually anonymizes, what fails, and how to avoid leaking EXIF location data.

2026-08-27
Invisible Watermarks: What Image Files Now Carry in 2026
Paint embeds a server-issued GUID in AI images, platforms strip C2PA manifests, and a plain WebP export drops all of it. What your files really carry, and how to check.

2026-07-28
Batch Image Processing: Pipeline Order, Settings, and Tools
Batch image processing runs resize, compress, and convert jobs across whole folders. The pipeline order, measured quality settings, tool choice, and automation.