2026-06-28 · Updated 2026-06-30
Print Ready Images: Resolution, Color, and Bleed for Clean Output
Prepare images that print cleanly: 300 DPI resolution, CMYK color, bleed margins, and the right format. Real settings and checks that prevent soft or off-color prints.
Last updated: June 30, 2026
A print-ready image is one a commercial printer can send straight to press without correction. That means the right resolution, the right color space, the right bleed, and the right format. Most print problems — soft edges, dull colors, white borders — trace back to an image that was not actually print-ready. This guide covers the four things that make an image press-ready and the checks that confirm it before you send it.
Quick answer: what makes an image print ready?
A print-ready image has 300 DPI at the final printed size, is in the CMYK color space (or sRGB if the printer requests it), includes bleed margin so trimming does not leave white edges, and is saved as a format the printer accepts — usually PDF, TIFF, or high-quality JPEG. Before sending, check the resolution at the print size, confirm the color space, and verify the bleed. If the image is too small at the print size, it is not print-ready and no amount of editing fixes it — you need more source pixels via an upscaler or a higher-resolution original.
Why resolution matters most for print
Print is unforgiving about resolution in a way screens are not. A slightly soft web image still looks fine because screens are forgiving and viewers scroll past. A soft print sits on a wall or in a brochure and gets looked at, and the softness reads as a defect.
| Print size at 300 DPI | Required pixels |
|---|---|
| 4×6 inches | 1200×1800 |
| 8×10 inches | 2400×3000 |
| 11×17 inches | 3300×5100 |
| 24×36 inches (poster) | 7200×10800 |
- The pixel requirement scales linearly with print size at a fixed DPI.
- 300 DPI is the standard for anything viewed at arm's length.
- Large posters viewed from a distance can drop to 150 DPI.
- Upscaling to hit the pixel count invents detail and does not truly fix softness.
The math is simple: pixels divided by 300 equals the largest clean print in inches. The DPI guide walks through this calculation in detail.
How do you set the right color space for print?
Printers use CMYK (cyan, magenta, yellow, black) ink, while screens display in RGB. An image prepared in RGB and sent straight to print often comes back dull, because the bright RGB greens and blues have no direct CMYK equivalent and get compressed into the smaller CMYK gamut.
- Convert to CMYK before sending, unless the printer specifically requests sRGB.
- Expect some color shift — vivid greens, blues, and oranges will mute.
- Proof the converted image on screen to preview the shift.
- Use ICC profiles from the printer for the most accurate conversion.
The color shift is the reason print never looks quite as saturated as the on-screen version. For the technical basis, the International Color Consortium maintains the ICC profile standards that printers use, and applying the printer's specific profile before conversion gives the most predictable result.
What is bleed, and why does it matter?
Bleed is extra image area that extends beyond the trim edge, so when the paper is cut to size the design runs all the way to the edge with no white margin. Without bleed, a tiny cutting misalignment leaves a white sliver along the edge.
- Standard bleed is 0.125 inches (3mm) on every side.
- Keep all critical content inside the safe margin — typically 0.25 inches from the trim.
- Bleed is part of the document setup, not a separate file.
- Backgrounds and full-bleed photos must extend into the bleed area.
A common error is designing right to the trim edge with no bleed. The printer then either adds white margins or asks for a corrected file, both of which delay the job.
Choosing the right format for print
| Format | Best for | Notes |
|---|---|---|
| PDF/X | Multi-page, mixed content | Print industry standard |
| TIFF | Single photos | Lossless, large |
| EPS | Vector logos | Scales without loss |
| JPEG (max quality) | Photo prints | Lossy but compact |
- PDF/X is the safest choice for anything with text and images combined.
- TIFF preserves every pixel for photographic prints.
- Avoid PNG for full-color photo prints — it is a screen format.
- Never send a compressed JPEG that has been re-saved multiple times.

Preparing photos specifically for print
Photographs need a slightly different preparation path than graphics or layouts, because their detail and tonal range push every setting harder. A photo headed for print should be finished — color-corrected, retouched, and noise-reduced — before the CMYK conversion, because every edit after the conversion compounds the color shift.
| Photo type | Resolution tip | Color tip |
|---|---|---|
| Portrait | 300 DPI, sharper face detail | Watch skin tones in CMYK |
| Landscape | 300 DPI, recover shadow detail | Greens mute — expect it |
| Product | 300 DPI, clean background | Match brand swatches precisely |
| Large fine-art print | 300+ DPI, full tonal range | Soft-proof on calibrated screen |
A few practical steps apply across photo types. Upscale only if the source falls short of the pixel requirement, since genuine detail cannot be invented. Denoise before conversion so compression noise does not amplify in CMYK. If the photo will appear in a multi-page document, the JPG to PDF guide covers combining images into a print-ready PDF. For images that also need a web version, the image optimization guide explains keeping a separate screen-optimized copy rather than reusing the print file online.
Pre-flight checklist before you send
Run through these checks before handing a file to a printer; catching an error now saves a ruined print run. Print is not like the web, where a mistake can be fixed with a redeploy — once a job is on press, errors are expensive or impossible to correct, and a re-run costs real money and time. The discipline of pre-flight is what separates professional print work from amateur jobs that come back wrong.
- Confirm 300 DPI at the final printed dimensions.
- Confirm the color space matches what the printer requested.
- Confirm bleed is included on all edges.
- Confirm critical content sits inside the safe margin.
- Confirm the format and that the file opens cleanly.
- Embed all fonts and linked images if sending a layout file.
- Soft-proof the converted colors on a calibrated monitor.
The Adobe preflight documentation covers the automated checks that catch these issues, and most print shops provide a preflight profile tuned to their press. A file that passes preflight is genuinely print-ready; a file that does not will cost time and money to fix after the fact.
Frequently asked questions
What makes an image print ready?
Sufficient resolution (300 DPI at the print size), the correct color mode (CMYK with the right profile), a bleed if the image runs to the page edge, and an appropriate format (TIFF or high-quality PDF). Missing any of these causes print problems.
Why does resolution matter most for print?
Because print lays ink at a fixed density (usually 300 DPI). Too few pixels and the print looks soft or pixelated. Calculate the pixels needed from the physical size: a 4×6 inch print at 300 DPI needs 1200×1800 pixels.
What is bleed, and why does it matter?
Bleed is extra image area (usually 3mm) beyond the trim edge, so a cutting misalignment does not leave a white sliver at the edge. Any image that runs to the page edge needs bleed; without it, trimming reveals unprinted paper.
What color mode should print images use?
CMYK, with the printer's profile embedded. RGB images converted at print time may shift colors unpredictably. Convert to CMYK with the correct profile and soft-proof before committing. See the color mode guide.
What format should print images use?
TIFF for masters and high-quality print, or a high-quality PDF for delivery. Avoid JPEG for print masters (it is lossy); use it only for proofs. Embed the correct color profile so the printer reproduces colors accurately.
What is a bleed and why do I need it?
Bleed is extra image area (usually 3mm) beyond the trim edge, so a cutting misalignment does not leave a white sliver at the edge. Any image that runs to the page edge needs bleed; without it, trimming reveals unprinted paper. Add bleed in the design, and keep important content inside the safe margin (away from the trim).
Use the free tools while you follow the guide.
Keep reading
2026-09-13
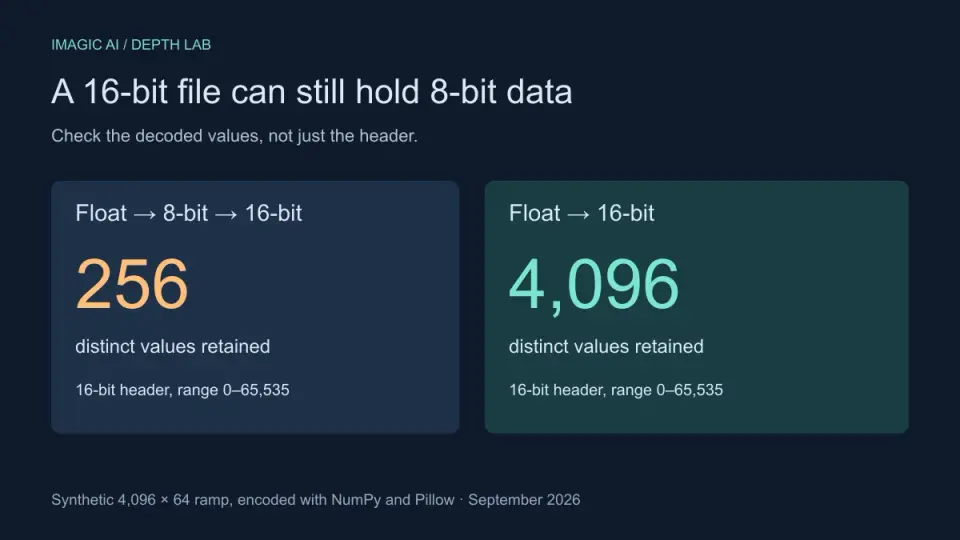
16-Bit Depth Maps: Fix Banding and Verify Your PNG
Fix stair-stepped or inverted depth maps with a reproducible 8-bit vs 16-bit PNG test, a file inspection script, and a practical Blender import checklist.

2026-09-13
GIF Maker From Images: Build Animated GIFs That Load Fast
Turn a set of images into an animated GIF for web and social media. Real frame timing, size limits for each platform, and when to choose GIF over video.

2026-09-13
Screenshot to Image: Save, Format, and Optimize Screenshots
Capture screenshots on any device, save them in the right format, and compress them for web without blurring text. Real steps for PNG, WebP, and full-page capture.