2026-03-28 · Updated 2026-07-12
Image Compression Ratio: Quality and Size Guide
Learn how to calculate image compression ratio, choose practical WebP and JPEG quality settings, and avoid visible artifacts before publishing.
Last updated: July 12, 2026
Image compression ratio tells you how much smaller an image became after export. It is useful, but only when you pair the number with a visual check. A 12:1 ratio can be excellent for a soft background photo and unacceptable for a product screenshot with small text.
This guide gives you the formula, the usual quality ranges, and a publishing checklist for WebP, JPEG, PNG, and AVIF. Use it when you need smaller pages without turning images mushy.
Quick answer: what is a good image compression ratio?
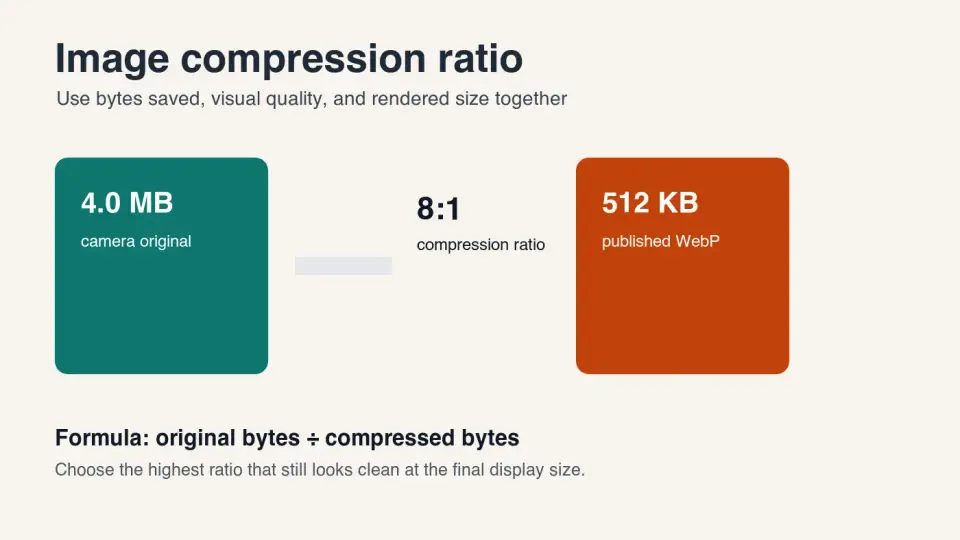
A good image compression ratio is the highest byte reduction that still looks clean at the final display size. Calculate it like this: original file size divided by compressed file size. A 4 MB image compressed to 500 KB has an 8:1 ratio.
For web photos, a practical target is often 5:1 to 12:1 after resizing and exporting to WebP or AVIF. For text-heavy screenshots, logos, and UI images, lower ratios are normal because sharp edges and flat colors need protection. Lossless PNG or lossless WebP may only produce 1.2:1 to 3:1.
Do not judge compression by ratio alone. Inspect faces, product edges, gradients, and small text. If users can see blocking, ringing, smearing, or banding, the ratio is too aggressive even if the file size looks attractive.
How do you calculate image compression ratio?
Use the original byte size and the final byte size after all real publishing steps: crop, resize, metadata stripping, format conversion, and quality setting. If you calculate before resizing, the number is usually misleading.
| Original file | Final file | Calculation | Compression ratio | Size reduction |
|---|---|---|---|---|
| 4.0 MB camera photo | 512 KB WebP | 4096 / 512 | 8:1 | 87.5% smaller |
| 2.4 MB JPEG | 300 KB WebP | 2400 / 300 | 8:1 | 87.5% smaller |
| 900 KB screenshot PNG | 420 KB lossless WebP | 900 / 420 | 2.1:1 | 53.3% smaller |
| 160 KB logo PNG | 118 KB WebP | 160 / 118 | 1.4:1 | 26.3% smaller |
Use the exact byte count when you are tuning a build pipeline. Use rounded KB or MB when you are documenting editorial settings. The decision does not change: smaller is useful only while the image still communicates its job.
Google's image guidance stresses both speed and quality: images often drive page weight, but blurry or unclear images are bad for users and search previews. It also recommends crawlable HTML image elements, descriptive alt text, and supported formats such as JPEG, PNG, WebP, SVG, and AVIF in Google Images best practices.
What ratio should you use for WebP, JPEG, PNG, and AVIF?
The right ratio depends on image content. Photographs compress hard because tiny texture changes are hard to notice. Screenshots and diagrams compress less because text, lines, and UI borders make artifacts obvious.
| Image type | Safer format | Starting setting | Typical ratio | Watch for |
|---|---|---|---|---|
| Product photo | WebP or AVIF | WebP q80, AVIF q55-65 | 6:1 to 12:1 | Texture loss, haloing around edges |
| Blog hero photo | WebP or AVIF | WebP q75-80 | 5:1 to 10:1 | Banding in skies or gradients |
| Small thumbnail | WebP | q70-75 | 8:1 to 15:1 | Over-sharpened faces, noisy backgrounds |
| UI screenshot | PNG or WebP lossless | Lossless first | 1.5:1 to 4:1 | Blurred text, color fringing |
| Logo or icon | SVG, PNG, or WebP lossless | Lossless | 1:1 to 3:1 | Soft edges, wrong transparency |
MDN's image format guide notes that WebP can be lossy or lossless, while lossy WebP and lossless WebP use different internal representations. That is why a single "WebP ratio" does not exist; the correct setting depends on whether the content can tolerate loss. See MDN's image file type and format guide for format behavior.
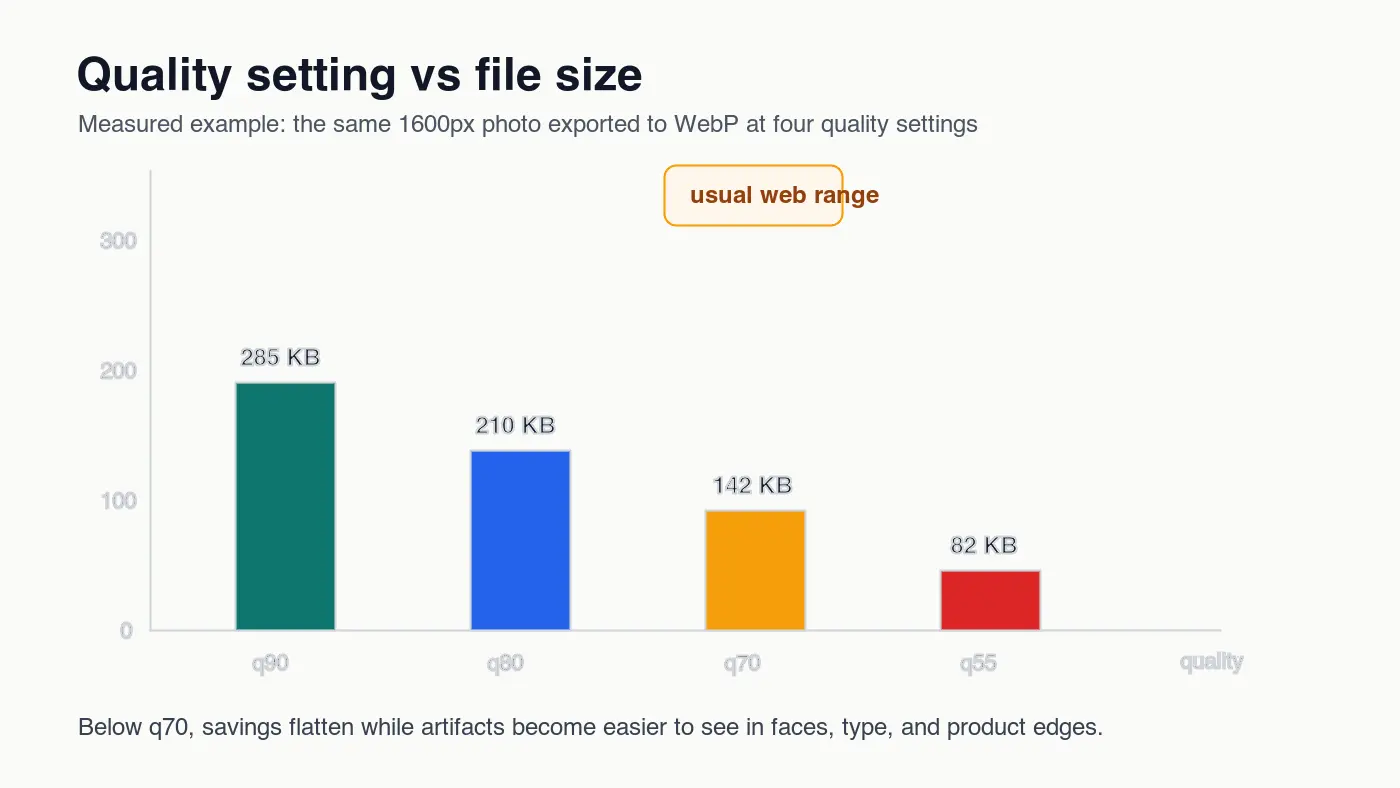
For this article, I encoded four 1400 by 788 graphics locally with ImageMagick and WebP. The files published at 23 KB, 28 KB, 35 KB, and 40 KB. Those are unusually small because the assets are clean diagrams, not camera photos; use the numbers as evidence that flat graphics compress differently from photographic detail.
For broader format trade-offs, compare this article with AVIF vs WebP Comparison. If you need the algorithm details behind artifacts, read How Image Compression Works.
Why do quality settings stop saving much after a point?
Most encoders have a steep early win and a painful late trade-off. Going from an original camera file to WebP q80 may remove a lot of invisible data. Going from q70 to q55 may save fewer bytes while making artifacts easier to notice.
The practical effect is simple: the size curve flattens while the quality curve keeps falling. That is why WebP q75-85 is a common starting band for article and product photos. It is not a rule for every file; it is a good first test before you inspect the result.
Use this order when tuning quality:
- Resize to the largest rendered width you actually serve.
- Export one WebP at q85, one at q80, and one at q75.
- Open them beside the original at the intended display size.
- Check faces, text, product edges, shadows, and smooth gradients.
- Pick the smallest version that does not look degraded.
- Record the resulting ratio for that content type.
If the image is likely to be the Largest Contentful Paint element, compression is only part of the fix. The web.dev LCP guidance recommends prioritizing likely LCP images with fetchpriority="high" and checking resource discovery in the network waterfall in Optimize Largest Contentful Paint.
How should you compare compression ratios across formats?
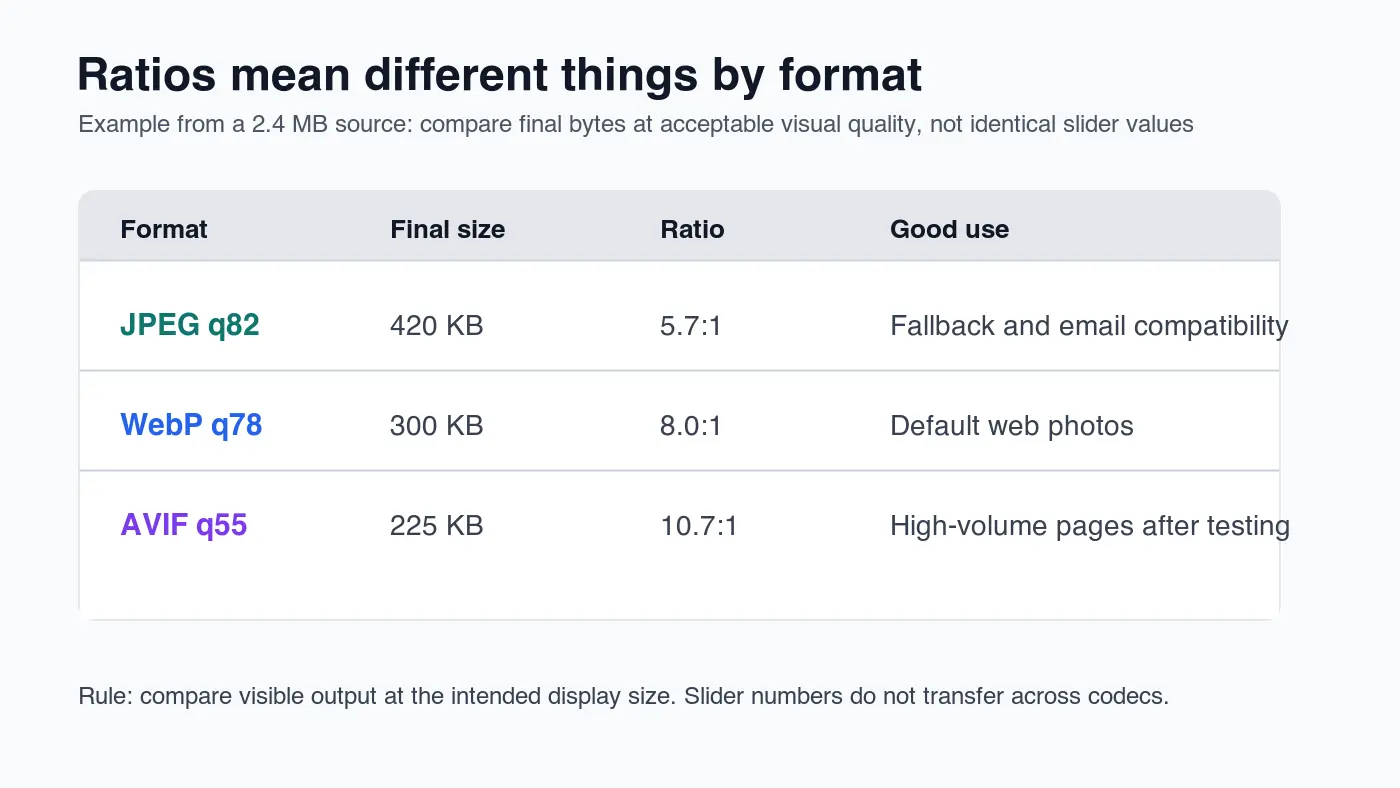
Compare formats at matched visible quality, not matched slider numbers. JPEG q82, WebP q78, and AVIF q55 can all be reasonable outputs from the same source. The numbers are encoder controls, not universal quality scores.
| Comparison mistake | Better method | Reason |
|---|---|---|
| Export JPEG, WebP, and AVIF all at q80 | Tune each format until they look equally good | Quality scales are not equivalent |
| Judge at 400% zoom only | Judge at display size, then spot-check crops | Users see the rendered image first |
| Compress before resizing | Resize first, then encode | Pixel count usually saves more bytes than quality tweaks |
| Keep every EXIF field | Strip metadata for public web copies | Camera data can add bytes without helping the page |
| Use one setting for every image | Set defaults by content type | Photos, screenshots, and logos fail differently |
This is where teams often misread ratios. A JPEG at 5.7:1 may be worse than a WebP at 8:1 if both look the same on screen. A lossless WebP at 2:1 may be better than a lossy WebP at 10:1 if the asset is a pricing-table screenshot.
For batch work, generate multiple outputs from the same master and keep the decision visible in file names or build logs. The Batch Resize Guide covers the resize-first workflow, and Complete Image Optimization Checklist gives a final pre-publish pass.
When is a high compression ratio a bad sign?
A high ratio is a warning sign when the image has detail people inspect. Store owners notice product texture. Designers notice softened type. Buyers notice muddy jewelry edges. In those cases, the "smallest file" can cost more than it saves.
High ratios deserve extra inspection when the image includes:
- Product labels, packaging text, ingredients, or serial numbers.
- UI screenshots, dashboards, code, or pricing tables.
- Faces, skin texture, hair, jewelry, fabric, or food.
- Smooth gradients, skies, shadows, neon, or dark backgrounds.
- Thin lines, icons, transparent edges, or brand marks.
- Images that will be zoomed, cropped, or reused in ads.
For e-commerce, use a stricter check than you would for a decorative blog image. A category thumbnail can tolerate more loss than the lead product image. If the same master feeds both, create separate exports instead of forcing one ratio to serve every slot.
What workflow gives the best size without visible quality loss?
Use compression ratio as a measurement, not as the first setting. The output quality depends more on the source, crop, pixel dimensions, and format choice than on the final ratio number.
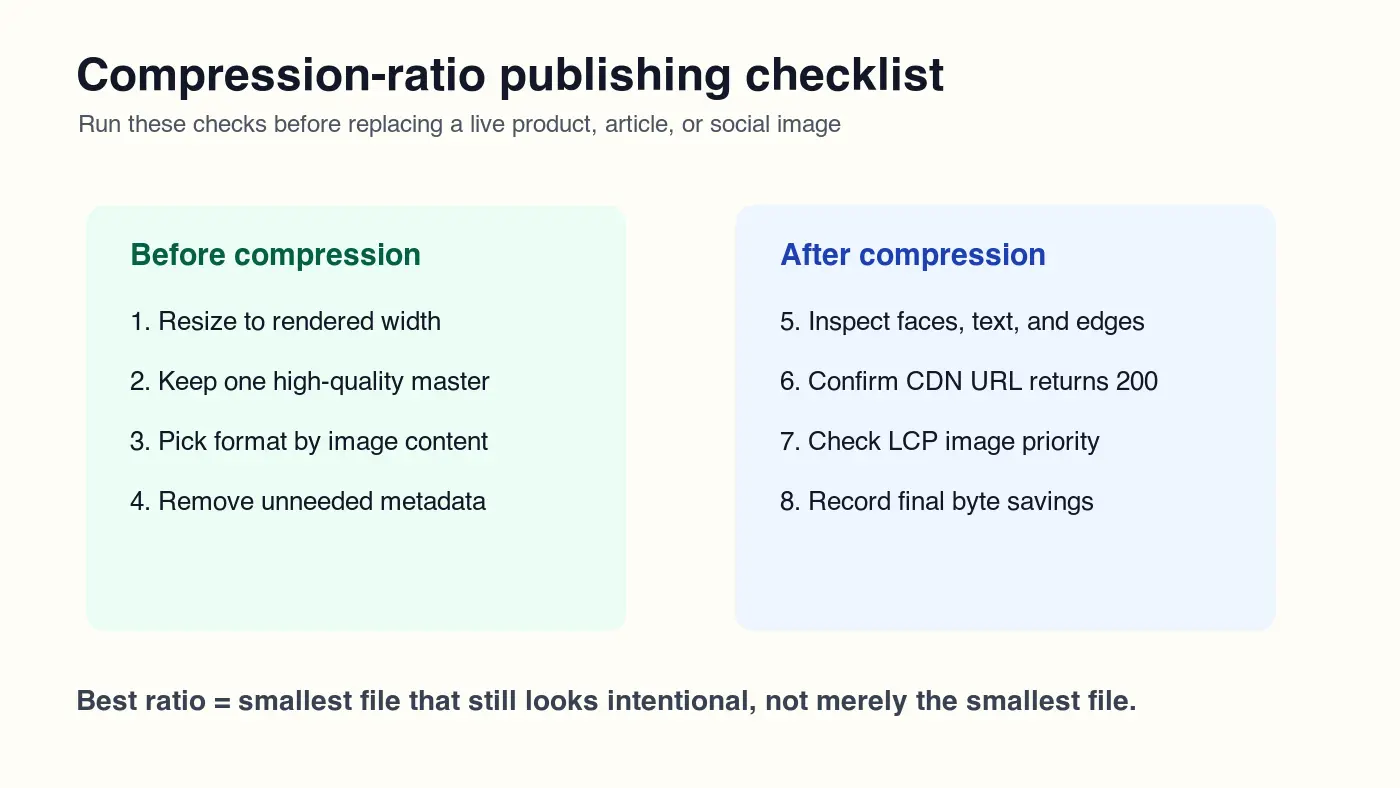
Use this publishing sequence:
- Keep a master file that has not been repeatedly re-encoded.
- Crop for the final use case before resizing.
- Resize to the largest rendered width, with responsive variants if needed.
- Choose format by content: WebP or AVIF for photos, lossless for text-heavy graphics.
- Export two or three quality candidates.
- Strip metadata from public copies unless it is legally or editorially required.
- Compare candidates at the rendered size on desktop and mobile.
- Check the likely LCP image separately from below-fold images.
- Publish to a stable CDN URL and verify HTTP 200.
- Record final bytes, ratio, and setting so the next batch is faster.
If you are targeting a strict size budget, start with the workflow in Compress Image to 100KB or Compress Image to 200KB. For mobile pages, pair the ratio decision with the Mobile Image Optimization Guide.
How do compression ratio and SEO fit together?
Compression ratio helps SEO indirectly. Smaller images reduce transfer size, which can improve load performance, especially when the compressed image is also correctly sized. But search engines and users still need a useful image, a stable URL, readable surrounding text, and descriptive alt text.
Do not ship a tiny image that looks broken in search previews or social cards. Google explicitly recommends choosing a representative image for metadata and avoiding generic images for structured data or og:image when a more relevant image exists. The image should be fast and clear.
For a blog post, that usually means:
- Use a unique WebP cover in the frontmatter and Open Graph data.
- Keep the cover readable at social-preview size.
- Put the image near text that explains the takeaway.
- Use descriptive alt text, not keyword stuffing.
- Serve the final asset from a crawlable CDN URL.
- Avoid replacing indexed image URLs unless the asset is wrong.
The ratio is one line in the publishing record. It should sit beside rendered width, format, quality setting, byte size, and visual notes.
Compression ratio checklist
Before publishing, run this short review:
| Check | Pass condition | Fix if it fails |
|---|---|---|
| Ratio calculated after resizing | Original bytes and final bytes use the real publish dimensions | Resize first and recalculate |
| Format matches content | Photos use lossy WebP/AVIF; text graphics stay lossless | Re-export with the right codec |
| Visual review completed | No obvious blocking, ringing, blur, or banding at display size | Raise quality or use lossless |
| CDN URL works | Final image returns HTTP 200 and correct content type | Re-publish or fix the path |
| LCP image handled | Hero image is discoverable early and not lazy-loaded | Add dimensions and priority handling |
The useful target is not "maximum compression." It is a repeatable setting that keeps the page light and the image trustworthy. When in doubt, use the smaller file only after the visual check passes.
Frequently asked questions
What does a compression ratio of 8:1 mean?
It means the original file was eight times larger than the compressed file, so a 4 MB photo compressed to 512 KB has an 8:1 ratio.
Is a higher compression ratio always better?
No, a higher ratio only helps if the image still looks clean at its final display size; otherwise the smaller file just hides visible quality loss.
What compression ratio is normal for WebP photos?
Web photos usually land between 5:1 and 12:1 after resizing and exporting to WebP or AVIF at a moderate quality setting.
Why do screenshots compress less than photos?
Screenshots and UI graphics have sharp text and flat colors, so they typically only reach 1.5:1 to 4:1 before artifacts become visible.
Should compression ratio be calculated before or after resizing?
Calculate it after resizing, using the real publish dimensions, because a ratio measured on an unresized image is usually misleading.
Does a smaller compressed file directly improve SEO rankings?
Not directly; it helps indirectly by reducing page weight and improving load speed, while rankings still depend on relevance, alt text, and a stable image URL.
What ratio should product photos target?
Product photos usually start around WebP q80 or AVIF q55-65, which lands in the 6:1 to 12:1 range while protecting texture detail.
How much smaller can WebP make a camera photo?
In the measured example in this guide, a 4.0 MB camera photo compressed to a 512 KB WebP file, an 8:1 ratio and 87.5% size reduction.
Use the free tools while you follow the guide.
Keep reading
2026-09-10
Image Blurry After Export? 7 Fixes That Target the Cause
Fix an image blurry after export by checking pixels, compression and upload changes. See measured examples, PNG vs JPEG choices, and seven practical fixes.

2026-08-01
Image Compression in 2026: WebP, AVIF, JPEG XL & JPEG AI Benchmarked
I benchmarked WebP, AVIF, and JPEG XL on 4 real photos. WebP saves 32% vs JPEG, AVIF 65%, JPEG XL 30%. Full data, browser support, and which format to pick in 2026.

2026-07-26
Image Optimization Checklist: Every Step for Fast Web Images
A complete image optimization checklist: format choice, resizing, compression, responsive delivery, lazy loading, and CDN setup. Run through it before every publish.