2026-07-26 · Updated 2026-07-28
Batch Image Processing: Pipeline Order, Settings, and Tools
Batch image processing runs resize, compress, and convert jobs across whole folders. The pipeline order, measured quality settings, tool choice, and automation.

Last updated: July 28, 2026
Batch image processing runs one set of operations — resize, compress, convert, background removal — across a whole folder instead of one file at a time. The trap is not running the batch; it is the order you run operations in, the settings you pick, and whether you check a sample before the run touches the real catalog. This guide covers all three, plus the tool choice and how to automate a job once it repeats.
Quick answer: what is batch image processing?
Batch image processing applies the same pipeline of operations to many files at once and writes the results to a new folder. A single batch run can resize every photo to a max width, compress each to a target quality, convert them all to WebP, and strip metadata — without you opening a single file. For a store owner with two hundred product photos, that is a half-day job reduced to one command.
The hard part is picking the right operations in the right order and checking a sample before you commit. I batch-compressed a 47-image product folder while writing this, and the same mistakes catch everyone: compressing before resizing, overwriting the originals, or trusting the first result without opening one file at full size.
When should you batch process images?
Batching pays off the moment the same operation applies to three or more files. Below that, a single-file tool is faster because you skip setup. The trigger cases are almost always one of these:
- A product catalog that needs every photo resized to a square and compressed for web.
- A blog or site migration that needs hundreds of PNGs converted to WebP.
- A marketplace upload that needs every image under a file-size cap, such as 100KB.
- A photo shoot that needs backgrounds removed from every shot in a set.
- A social campaign that needs one image exported to five platform sizes.
- A print or ad run that needs every image at a specific width and DPI.
One-off single images do not need a batch — open them in the compress images without losing quality tool and move on.
| Trigger | Files | Best fit |
|---|---|---|
| One-off fix | 1 to 2 | Single-file web tool |
| Small catalog | 3 to 100 | Browser batch tool |
| Regular uploads | 100 to 5,000 | Command-line library |
| Pipeline at scale | 5,000+ | Automated script on a server |
What are the four jobs batch processing handles?
Almost every batch run is one of four jobs, often chained. Knowing which job you are doing decides the tool and the order.
- Resize sets the longest edge so images are no bigger than the largest display size.
- Compress drops bytes by tuning quality and stripping unused metadata.
- Convert changes the container — PNG to WebP, HEIC to JPG — usually without quality loss.
- Background removal cuts the subject out, the most variable job because results differ per photo.

| Job | Common batch operation | Typical output |
|---|---|---|
| Web product photos | Resize to 2000px, compress to WebP | Under 200KB each |
| Blog images | Convert PNG to WebP | 25 to 35 percent smaller |
| Social sizes | Export one image to 5 aspect ratios | 5 files per source |
| Photo cleanup | Remove background, add white | Transparent or white PNG |
| Print prep | Resize to width at 300 DPI | CMYK or RGB TIFF |
What order should the pipeline run in?
Every batch tool does the same thing: it loops over a folder, applies a pipeline to each file, and writes the result. The pipeline is what you control, and the order decides whether the output is clean or degraded.
- Rename — get consistent filenames first, before any processing changes the files.
- Crop — if a uniform crop applies, do it before resize.
- Resize — set the final dimensions, so the compressor works on fewer pixels.
- Compress — reduce bytes after resize.
- Convert — change format after the raster content is finalized.
- Strip — drop unwanted metadata (EXIF, unused ICC profiles).
- Watermark — apply last, so it is not resized or recompressed into degradation.
Resize before compress is the rule people break most. A 4000px image compressed to quality 80 is still a 4000px download. Downscale first and the byte savings dwarf any quality tweak.
I measured the gap on a 5000×3333 portrait. Encoding it straight to WebP at quality 80 produced a 1149 KB file. Resizing the same source to a 1600px delivery width first, then encoding at the same quality 80, produced 100 KB — a 91% reduction with no change to the quality setting and no visible difference at display size.
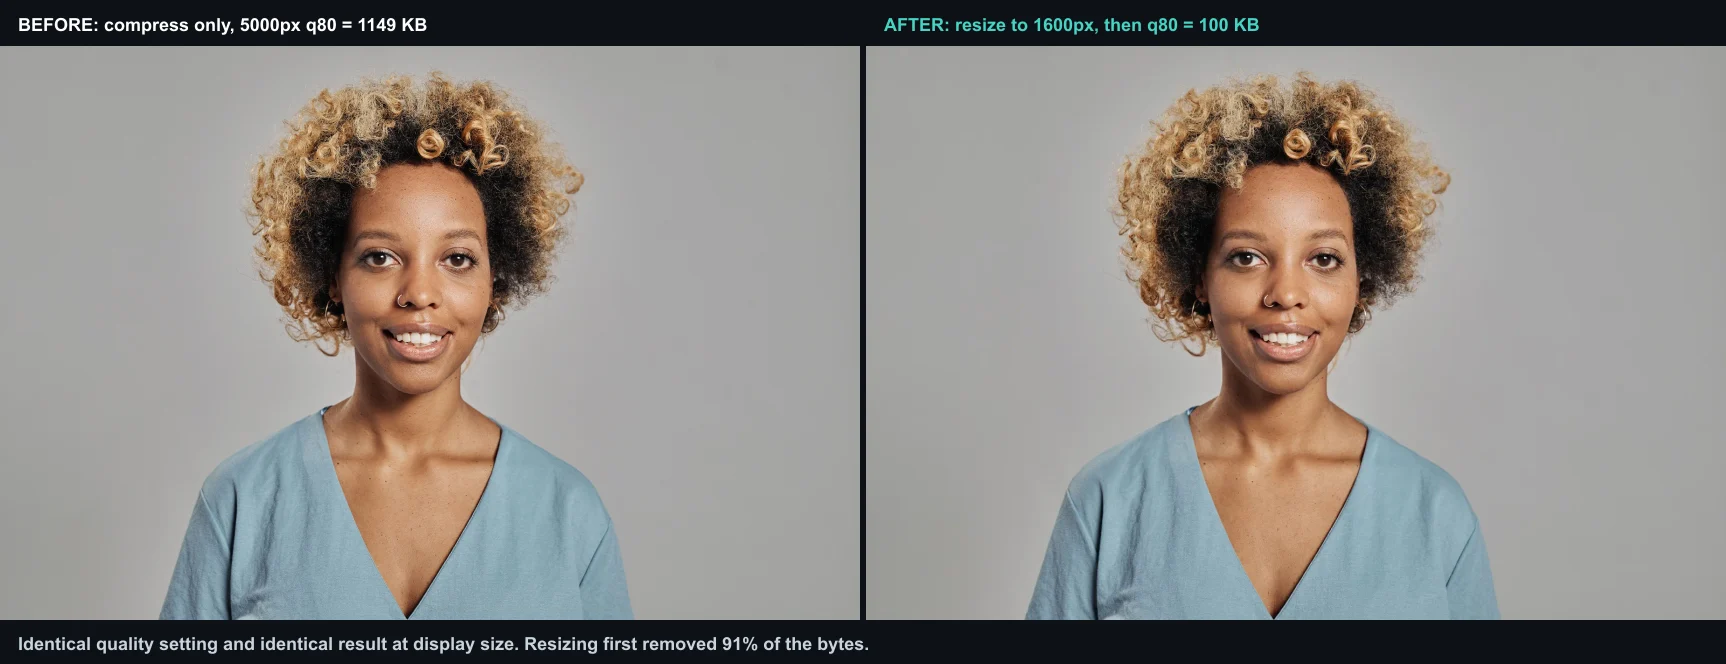
That ratio is why order matters more than tuning. Quality settings move bytes by tens of percent; removing pixels nobody will see moves them by an order of magnitude. The convert image format guide covers the format step.
Operations that need per-image judgment — cropping to a specific subject, retouching a face — do not batch well, because each image needs individual attention. The batch processing tips guide covers which operations to automate and which to keep manual.
What settings should you use for a product catalog?
Product catalogs are the most common batch job, and the settings matter more than the tool. I resized the same 47-image folder at quality 70 first, then at quality 80, and the quality 80 set was visually indistinguishable from the source at display size while the quality 70 set showed faint banding on flat backgrounds.
Start from these defaults, then tune:
- Resize: cap the longest edge at the largest display size (1920px for most web heroes, 1600px for product galleries).
- Compress: WebP at quality 78 to 82 is the safe web default.
- Format: WebP for photos, PNG or lossless WebP for screenshots and logos.
- Output folder: always write to a new folder so the source files stay untouched.
- Naming: keep the original filename so URLs and references do not break.
For the exact byte math behind those quality numbers, the compress images without losing quality guide walks through a measured A/B, and the compress image to 100KB guide covers the target-size approach.
How do you keep quality consistent across a batch?
The risk with batching is that settings tuned for one image do not suit another — a quality level that looks fine on a landscape may artifact on a portrait with smooth skin. Consistency comes from choosing settings that work across the whole batch, not just the first image.
- Test settings on three varied images before running the full batch.
- Choose a quality level that handles the worst case, not the average.
- Group images by content type if they differ widely — process each group with its own settings.
- Export to a new folder and compare a sample against the originals.
| Quality concern | Batch approach |
|---|---|
| Mixed content types | Group and process separately |
| Variable source resolution | Resize to a target, not a percentage |
| Skin tones in portraits | Higher quality, check a sample |
| Flat graphics | Lower quality is fine |
Command-line vs GUI: which should you pick?
The split is simple. A GUI batch tool wins when the job is occasional and you want minimal setup; a command-line library wins when the job repeats, scales to thousands of files, or needs to run unattended. There is no universal file-count cutoff because source dimensions, codecs, hardware, and upload speed all change the result.

| Factor | GUI batch tool | Command-line library |
|---|---|---|
| Setup time | None, runs in a browser | Install plus one script |
| One-off jobs | Best fit | Overkill |
| Repeatable runs | Re-do each time | Re-run one command |
| Logging and errors | Manual review | Scripted reports |
| Volume ceiling | A few hundred | Tens of thousands |
The trade-off is control for convenience. A GUI tool never overwrites your source if you point it at a new output folder, but it cannot watch a folder and run on a schedule. That is where command-line wins.
Which tools fit common batch workflows?
These tools cover the main batch-processing patterns. Benchmark them on a representative sample from your own workload before choosing by speed.
| Tool | Type | Strength | Performance constraint |
|---|---|---|---|
ImageMagick (mogrify) |
Command-line | Mature, widely available | Codec, disk, and CPU dependent |
| sharp | Node.js library | Scriptable and concurrency-friendly | Codec, memory, and CPU dependent |
| Pillow (Python) | Scripted library | Custom Python pipelines | Implementation and worker-count dependent |
| Batch tool | Browser GUI | Minimal setup, originals stay local | Often upload and connection dependent |
ImageMagick is the workhorse — its mogrify command is the batch version of convert and writes to a directory you name. The sharp library is the Node.js equivalent and is fast enough to sit in a build step. For the encoding and format basics that decide your quality settings, the MDN image types reference is the standard citation.
A repeatable ImageMagick example that resizes, compresses, and converts a folder of JPEGs to WebP in one line:
mkdir -p webp
mogrify -path webp/ -resize 1920x1920\> -quality 80 -format webp *.jpg
The 1920x1920\> keeps the aspect ratio and only shrinks images larger than 1920px, and -path webp/ means the originals stay untouched.
How do you batch remove backgrounds?
Background removal is the batch job with the most variance, because the model has to handle hair, glass, and transparent items differently per image. A folder of clean product shots on plain backdrops will batch cleanly; a folder of lifestyle photos with busy backgrounds will need manual cleanup on a fraction of the files.
- Sort images by background complexity before batching.
- Run the batch on the clean-background set first.
- Flag any output with halo or rough edges for a manual pass.
- Keep the originals so you can re-run a failed cutout.
The background removal best practices page covers batching cutouts in depth, and fixing hair edges after background removal covers the manual pass on the files that fail.
How do you automate repeat batch runs?
Automation is where batching stops being a chore and becomes infrastructure. Once a job repeats — weekly product uploads, nightly compression — a script you trigger on a schedule beats opening a tool by hand.

The three patterns I use:
- Cron job. Schedule the ImageMagick one-liner above to run nightly on an uploads folder.
- Watch folder. A script watches a directory and batches any new images the moment they land.
- CI step. A sharp or ImageMagick step in your build pipeline compresses images on every deploy.
| Pattern | Trigger | Best for |
|---|---|---|
| Cron | Time (nightly, hourly) | Predictable, recurring batches |
| Watch folder | New file arrives | Continuous ingest, like uploads |
| CI pipeline | Deploy | Site images that ship with code |
The ImageMagick command-line documentation covers the scripted approach that powers most automated pipelines, and the sharp library is the common choice for a build-step in JavaScript projects.
What are the common batch processing mistakes?
The mistakes that catch everyone, all avoidable:
- Overwriting the originals. Write to a new folder every time. Once you compress over the source, the detail is gone.
- Compressing before resizing. Resize first; it is the biggest byte saving.
- Testing on one image. Sample three varied images — not just the first — before committing.
- Breaking filenames. Renaming in the batch breaks every URL that pointed at the files.
- Forgetting metadata. EXIF and unused ICC profiles add weight; strip them unless you need them.
- Re-running stale settings. A saved quality number stops holding when the source camera or lighting changes.
Frequently asked questions
What is the right order for a batch pipeline?
Rename first, then crop, resize, compress, convert, strip metadata, and watermark last — writing to a new folder. Resizing before compressing is the single biggest saving; compressing a full-resolution image wastes effort.
How many images can one batch handle?
Thousands, but test on a 10-image subset first. A pipeline that is wrong on 10 images is wrong on 10,000 — the subset catches the error before it touches the catalog. Command-line tools handle large runs better than browsers.
Does batch processing reduce quality?
Only the compress and resize steps change pixels; format conversion is lossless when the target preserves the source. The quality loss comes from choosing aggressive settings, not from batching itself. Keep the originals so any step can be re-run.
What file types can I batch process?
Any raster format the tool reads — JPEG, PNG, WebP, TIFF, HEIC. The common batch jobs (resize, compress, convert) work across formats. Verify the output format supports what you need; transparency survives only in PNG or WebP.
What is the biggest batch processing mistake?
Overwriting the originals. The moment a batch writes over the source files, the detail is gone and the only recovery is a re-shoot or a backup. Every other mistake — wrong order, a bad preset — is recoverable from the originals; overwriting is not.
Is a GUI or command-line batch tool better?
GUI tools (the Image Resizer, the Batch tool) win for one-off folders where you want to see each setting. Command-line tools (ImageMagick, sharp) win for repeatable jobs and automation because the command can be saved and re-run identically. Pick by whether the job repeats.
Key takeaway: batch is a pipeline, not a button
Batch image processing is two decisions: the pipeline order and the tool. Resize before you compress, convert after both, strip metadata, watermark last, and write to a fresh folder every run. Pick a GUI tool for one-off folders, a command-line library for repeatable jobs, and automation for anything on a schedule.
The caveat: a batch run is only as good as the sample you inspect. I have shipped soft, over-compressed sets because I trusted a saved preset the day the source photos changed. The only reliable check is opening one output file at full size before the run touches the rest of the catalog.
Image credits
- A laptop and printed photos on a desk showing a batch workflow — photo by cottonbro studio on Pexels
- Organized folders of product photos sorted for batch processing — photo by Pixabay on Pexels
- A laptop on an office desk representing productivity when batching — photo by EVG Kowalievska on Pexels
- A computer screen running an automated batch processing script — photo by Firos nv on Pexels
- Resize-before-compress comparison — generated by the author from a portrait (Pexels #5500530, photo by Andy Barbour) by encoding the same source to WebP q80 at 5000px and at a 1600px delivery width, with the measured byte counts shown.

Use the free tools while you follow the guide.
Keep reading

2026-09-13
How to Blur Faces and License Plates Before You Post
Blur or pixelate faces and license plates so they stay unreadable. Which method actually anonymizes, what fails, and how to avoid leaking EXIF location data.
2026-08-27
Invisible Watermarks: What Image Files Now Carry in 2026
Paint embeds a server-issued GUID in AI images, platforms strip C2PA manifests, and a plain WebP export drops all of it. What your files really carry, and how to check.
2026-07-28
Batch Image Processing: 12 Tips and Mistakes to Avoid
Batch processing saves hours, until one bad setting ruins 200 files. I share 12 practical tips plus the mistakes I made batching thousands of images, so you skip them.